34

 EN
EN


 TROUBLESHOOTING


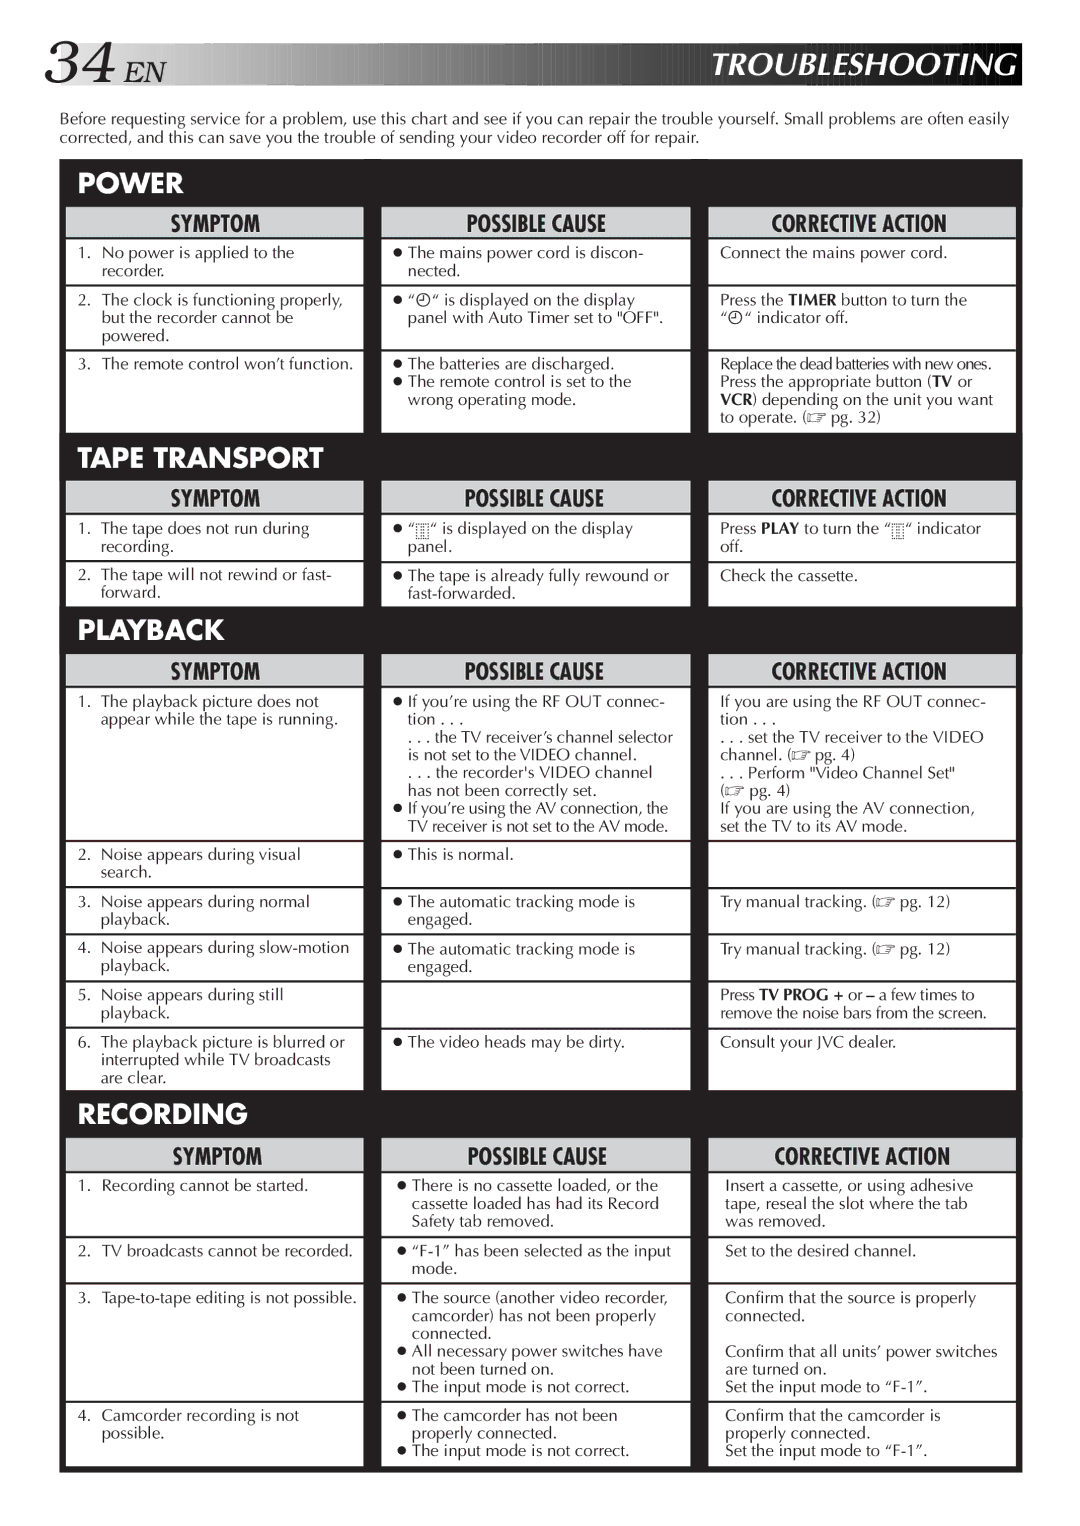
Before requesting service for a problem, use this chart and see if you can repair the trouble yourself. Small problems are often easily corrected, and this can save you the trouble of sending your video recorder off for repair.
POWER
SYMPTOM
1.No power is applied to the recorder.
2.The clock is functioning properly, but the recorder cannot be powered.
3.The remote control won’t function.
TAPE TRANSPORT
SYMPTOM
1.The tape does not run during recording.
2.The tape will not rewind or fast- forward.
PLAYBACK
SYMPTOM
1.The playback picture does not appear while the tape is running.
2.Noise appears during visual search.
3.Noise appears during normal playback.
4.Noise appears during
5.Noise appears during still playback.
6.The playback picture is blurred or interrupted while TV broadcasts are clear.
RECORDING
SYMPTOM
1.Recording cannot be started.
2.TV broadcasts cannot be recorded.
3.
4.Camcorder recording is not possible.
POSSIBLE CAUSE
●The mains power cord is discon- nected.
●“ä“ is displayed on the display panel with Auto Timer set to "OFF".
●The batteries are discharged.
●The remote control is set to the wrong operating mode.
POSSIBLE CAUSE
●“![]()
![]() “ is displayed on the display panel.
“ is displayed on the display panel.
●The tape is already fully rewound or
POSSIBLE CAUSE
●If you’re using the RF OUT connec- tion . . .
. . . the TV receiver’s channel selector is not set to the VIDEO channel.
. . . the recorder's VIDEO channel has not been correctly set.
●If you’re using the AV connection, the TV receiver is not set to the AV mode.
●This is normal.
●The automatic tracking mode is engaged.
●The automatic tracking mode is engaged.
●The video heads may be dirty.
POSSIBLE CAUSE
●There is no cassette loaded, or the cassette loaded has had its Record Safety tab removed.
●
●The source (another video recorder, camcorder) has not been properly connected.
●All necessary power switches have not been turned on.
●The input mode is not correct.
●The camcorder has not been properly connected.
●The input mode is not correct.
CORRECTIVE ACTION
Connect the mains power cord.
Press the TIMER button to turn the “ä“ indicator off.
Replace the dead batteries with new ones. Press the appropriate button (TV or VCR) depending on the unit you want to operate. (☞ pg. 32)
CORRECTIVE ACTION
Press PLAY to turn the “![]()
![]() “ indicator off.
“ indicator off.
Check the cassette.
CORRECTIVE ACTION
If you are using the RF OUT connec- tion . . .
. . . set the TV receiver to the VIDEO channel. (☞ pg. 4)
. . . Perform "Video Channel Set" (☞ pg. 4)
If you are using the AV connection, set the TV to its AV mode.
Try manual tracking. (☞ pg. 12)
Try manual tracking. (☞ pg. 12)
Press TV PROG + or – a few times to remove the noise bars from the screen.
Consult your JVC dealer.
CORRECTIVE ACTION
Insert a cassette, or using adhesive tape, reseal the slot where the tab was removed.
Set to the desired channel.
Confirm that the source is properly connected.
Confirm that all units’ power switches are turned on.
Set the input mode to
Confirm that the camcorder is properly connected.
Set the input mode to