FR

Réglage automatique — en se référant au panneau d’affichage avant

La fonction de réglage automatique règle automatiquement les canaux du syntoniseur, l’horloge et les numéros guides.

AVANT DE COMMENCER, VEUILLEZ VOUS ASSURER QUE:

8 Le câble d’antenne TV est raccordé au connecteur ENTREE ANTENNE du panneau arrière du magnétoscope.

8 Le cordon d’alimentation du magnétoscope est branché à une prise secteur. 8 L’alimentation du magnétoscope est coupée.

8 Mettre des piles dans la télécommande.

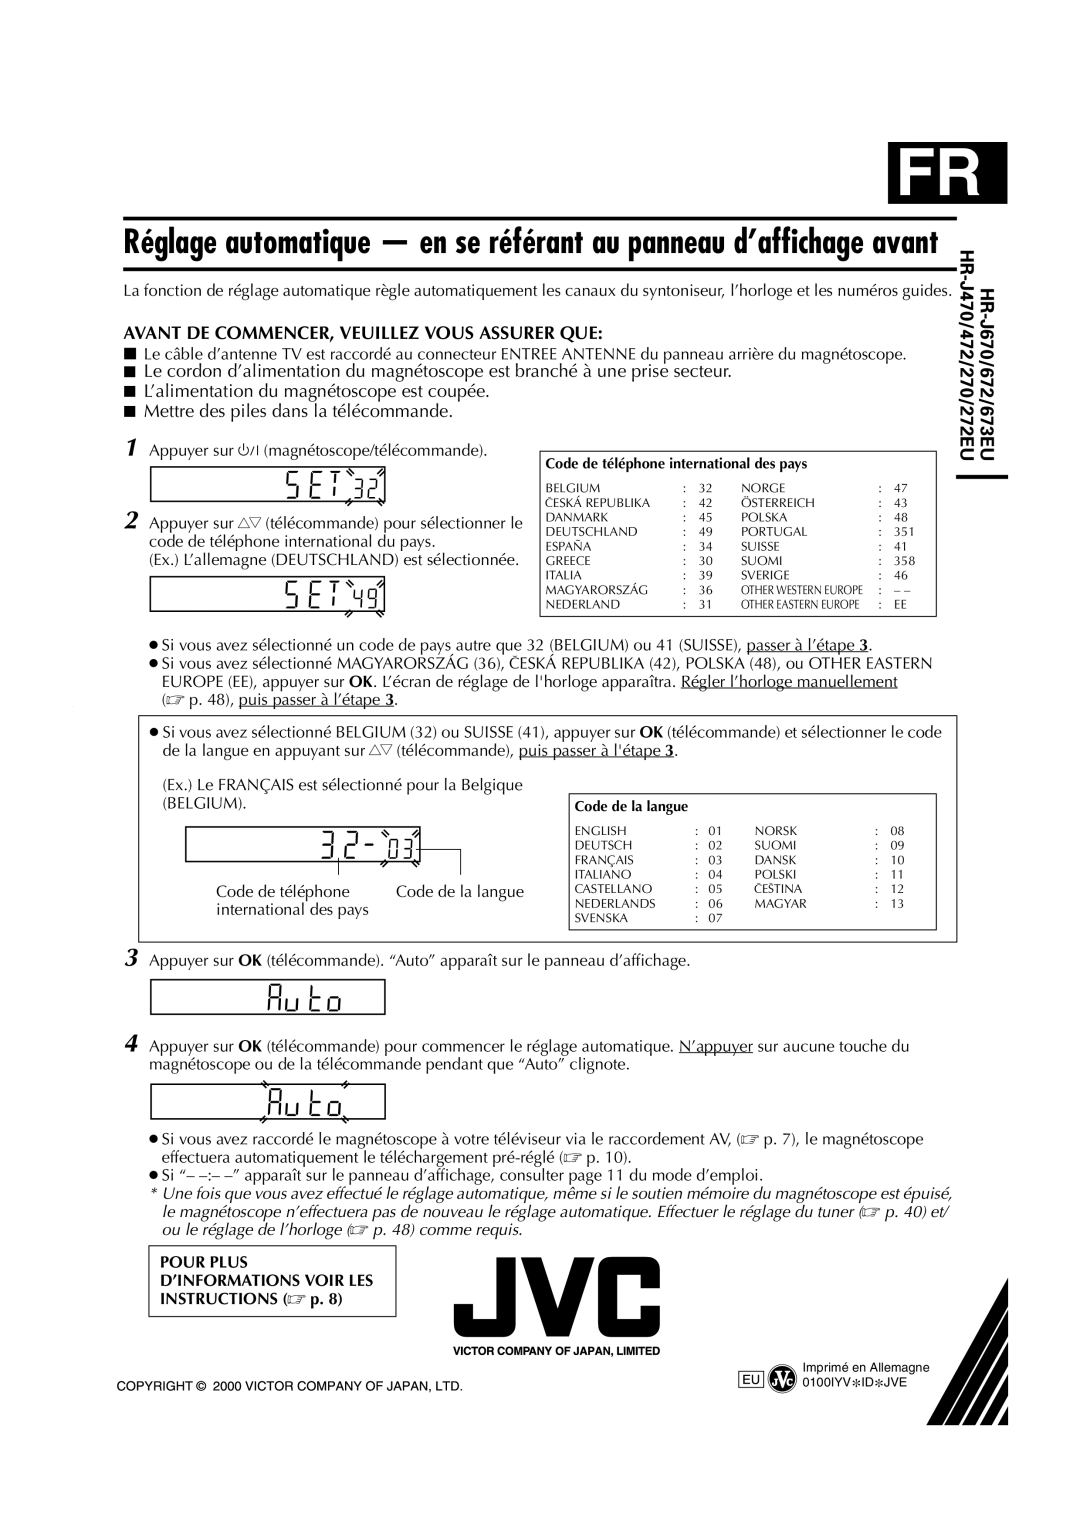
1 Appuyer sur 1 (magnétoscope/télécommande).


Code de téléphone international des pays


BELGIUM

:

32

NORGE

:

47


CESKÁ REPUBLIKA

:

42

ÖSTERREICH

:

43

2 Appuyer sur rt (télécommande) pour sélectionner le

DANMARK

:

45

POLSKA

:

48

DEUTSCHLAND

:

49

PORTUGAL

:

351

code de téléphone international du pays.

ESPAÑA

:

34

SUISSE

:

41

(Ex.) L’allemagne (DEUTSCHLAND) est sélectionnée.

GREECE

:

30

SUOMI

:

358


ITALIA

:

39

SVERIGE

:

46


MAGYARORSZÁG

:

36

OTHER WESTERN EUROPE

:

– –


NEDERLAND

:

31

OTHER EASTERN EUROPE

:

EE


Si vous avez sélectionné un code de pays autre que 32 (BELGIUM) ou 41 (SUISSE), passer à l’étape 3.

Si vous avez sélectionné MAGYARORSZÁG (36), CESKÁ REPUBLIKA (42), POLSKA (48), ou OTHER EASTERN EUROPE (EE), appuyer sur OK. L’écran de réglage de l'horloge apparaîtra. Régler l’horloge manuellement ( p. 48), puis passer à l’étape 3.

Si vous avez sélectionné BELGIUM (32) ou SUISSE (41), appuyer sur OK (télécommande) et sélectionner le code de la langue en appuyant sur rt (télécommande), puis passer à l'étape 3.

(Ex.) Le FRANÇAIS est sélectionné pour la Belgique (BELGIUM).

Code de téléphone

Code de la langue

international des pays


Code de la langue

ENGLISH

:

01

NORSK

:

08

DEUTSCH

:

02

SUOMI

:

09

FRANÇAIS

:

03

DANSK

:

10

ITALIANO

:

04

POLSKI

:

11

CASTELLANO

:

05

CEcTINA

:

12

NEDERLANDS

:

06

MAGYAR

:

13

SVENSKA

:

07


3 Appuyer sur OK (télécommande). “Auto” apparaît sur le panneau d’affichage.

4 Appuyer sur OK (télécommande) pour commencer le réglage automatique. N’appuyer sur aucune touche du magnétoscope ou de la télécommande pendant que “Auto” clignote.

Si vous avez raccordé le magnétoscope à votre téléviseur via le raccordement AV, ( p. 7), le magnétoscope effectuera automatiquement le téléchargement pré-réglé ( p. 10).

Si “– –:– –” apparaît sur le panneau d’affichage, consulter page 11 du mode d’emploi.

*Une fois que vous avez effectué le réglage automatique, même si le soutien mémoire du magnétoscope est épuisé, le magnétoscope n’effectuera pas de nouveau le réglage automatique. Effectuer le réglage du tuner ( p. 40) et/ ou le réglage de l’horloge ( p. 48) comme requis.

POUR PLUS

D’INFORMATIONS VOIR LES

INSTRUCTIONS ( p. 8)

Imprimé en Allemagne 0100IYV*ID*JVE

Page 56
Image 56
JVC HR-J670 Appuyer sur 1 magnétoscope/télécommande, Appuyer sur rt télécommande pour sélectionner le, Instructions  p

HR-J472EU, HR-J470, HR-J673EU, HR-J670, HR-J270 specifications

The JVC HR series of VCRs, including the HR-J672, HR-J272EU, HR-J270, HR-J671, and HR-J470, showcases JVC's commitment to delivering high-quality video recording and playback solutions. Each model comes with unique features and technologies that cater to various user needs while maintaining the standards of performance and reliability for which JVC is known.

Starting with the HR-J672, this VCR is equipped with advanced features such as digital noise reduction, which effectively enhances the quality of playback by minimizing unwanted artifacts. Users can take advantage of its 6-head system, which provides better tracking and improved picture quality. The model's Auto Tracking feature ensures that recordings maintain optimal clarity, even through various playback speeds.

The HR-J272EU, another versatile model, focuses on ease of use without sacrificing quality. It offers a straightforward interface and simple programming functions, making it perfect for families and casual users. The VCR also supports a variety of recording formats, enabling flexible viewing options for different tape types, including EP (Extended Play) mode for longer recording times.

Moving on to the HR-J270, this model is recognized for its compact design and energy-efficient operation. It features JVC's Super VHS technology, providing enhanced resolution and sharper images compared to standard VHS. The integration of an intuitive on-screen menu allows users to easily access and navigate through functions for recording and playback.

The HR-J671 is particularly notable for its robust build and durability, making it a solid choice for frequent use. It includes features like a high-speed rewind option, reducing wait times when preparing tapes for re-watching. In addition, its compatibility with various input sources enables users to connect and record from external devices seamlessly.

Finally, the HR-J470 is designed as a budget-friendly solution without compromising essential functionalities. It incorporates basic editing features, allowing users the ability to insert and delete segments of recorded footage effortlessly. This model also prioritizes user comfort with a remote control, making it easy to operate from a distance.

In summary, the JVC HR series offers a range of VCR models, each tailored to different preferences and requirements. From advanced technologies to user-friendly designs, these VCRs remain valuable options for anyone looking to enjoy the nostalgic experience of videotape recording and playback. JVC has succeeded in blending performance with practicality, ensuring that their devices are suitable for both casual viewers and dedicated enthusiasts alike.