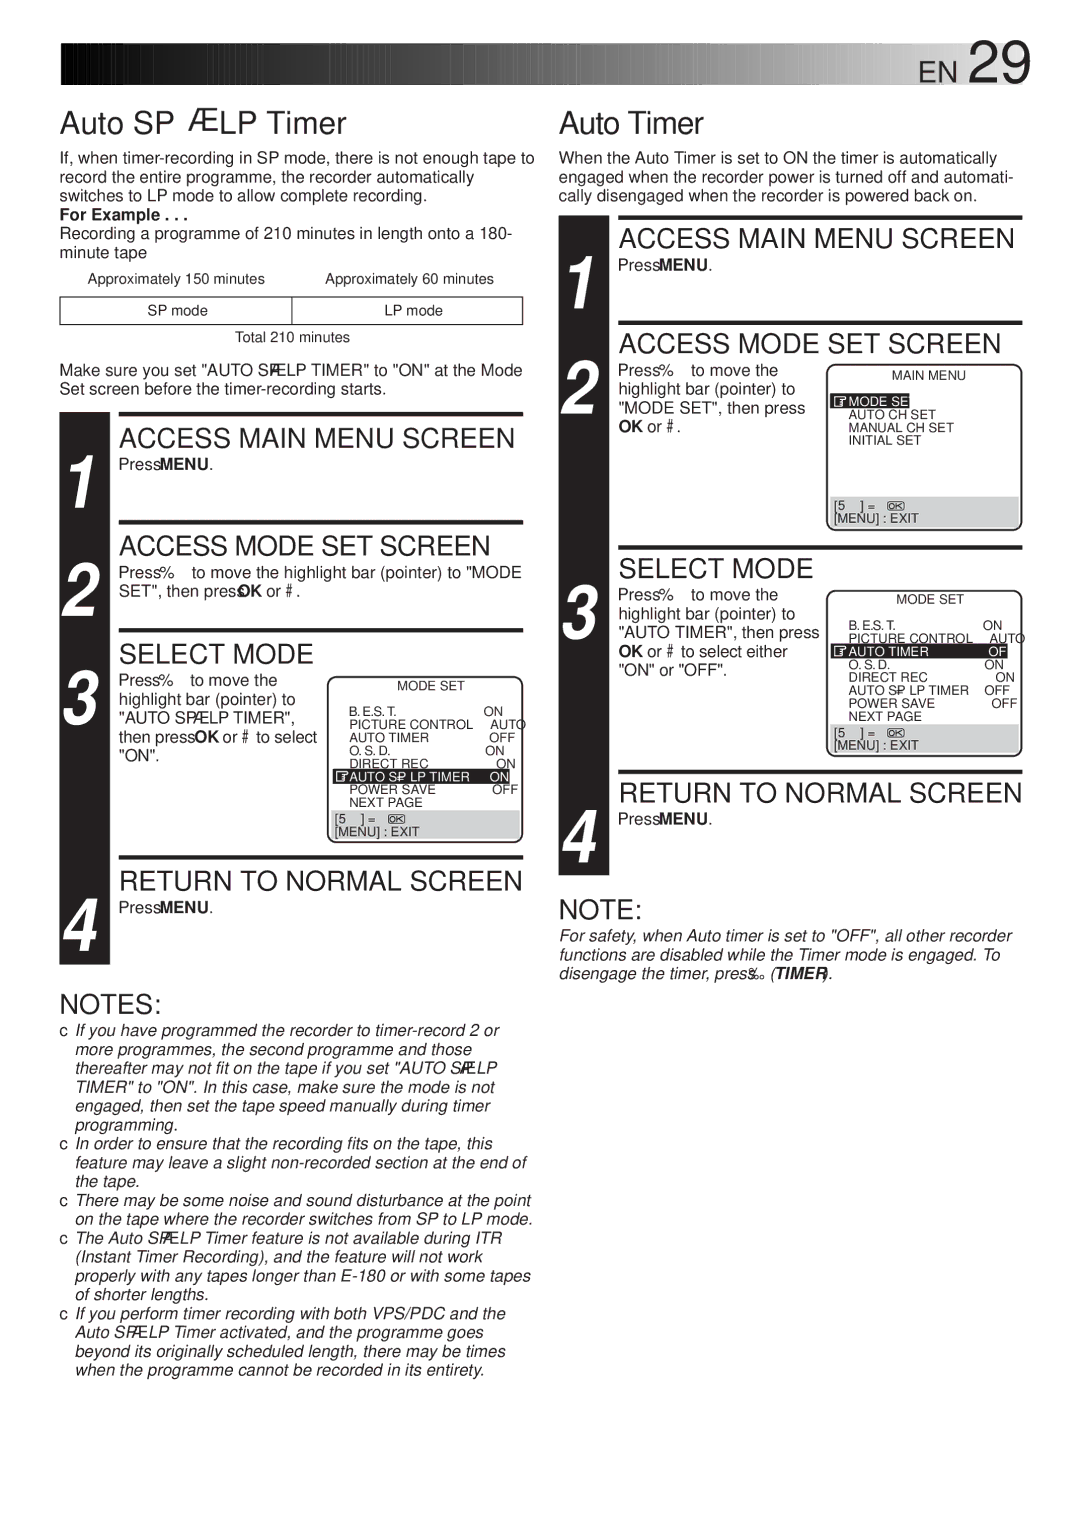
Auto SPLP Timer

If, when timer-recording in SP mode, there is not enough tape to record the entire programme, the recorder automatically switches to LP mode to allow complete recording.

For Example . . .

Recording a programme of 210 minutes in length onto a 180- minute tape

Approximately 150 minutes

Approximately 60 minutes


SP mode

LP mode


Total 210 minutes

Make sure you set "AUTO SPLP TIMER" to "ON" at the Mode Set screen before the timer-recording starts.

ACCESS MAIN MENU SCREEN

1

Press MENU.


2


ACCESS MODE SET SCREEN


Press to move the highlight bar (pointer) to "MODE


SET", then press OK or #.


3


SELECT MODE


Press to move the

MODE SET


highlight bar (pointer) to

B. E. S. T.

ON


"AUTO SPLP TIMER",


PICTURE CONTROL

AUTO


then press OK or #to select

AUTO TIMER

OFF


"ON".

O. S. D.

ON


DIRECT REC

ON


AUTO SP=LP TIMER

ON


POWER SAVE

OFF


NEXT PAGE


[] =


[MENU] : EXIT


4


RETURN TO NORMAL SCREEN

Press MENU.


NOTES:

If you have programmed the recorder to timer-record 2 or

more programmes, the second programme and those thereafter may not fit on the tape if you set "AUTO SPLP TIMER" to "ON". In this case, make sure the mode is not engaged, then set the tape speed manually during timer programming.

In order to ensure that the recording fits on the tape, this feature may leave a slight non-recorded section at the end of the tape.

There may be some noise and sound disturbance at the point on the tape where the recorder switches from SP to LP mode.

The Auto SPLP Timer feature is not available during ITR (Instant Timer Recording), and the feature will not work properly with any tapes longer than E-180 or with some tapes of shorter lengths.

If you perform timer recording with both VPS/PDC and the Auto SPLP Timer activated, and the programme goes beyond its originally scheduled length, there may be times when the programme cannot be recorded in its entirety.

EN29

Auto Timer

When the Auto Timer is set to ON the timer is automatically engaged when the recorder power is turned off and automati- cally disengaged when the recorder is powered back on.

ACCESS MAIN MENU SCREEN

1 Press MENU.


ACCESS MODE SET SCREEN


Press to move the

MAIN MENU


highlight bar (pointer) to


2 "MODE SET", then press

MODE SET


AUTO CH SET


OK or #.

MANUAL CH SET


INITIAL SET


[] =


[MENU] : EXIT


3


SELECT MODE


Press to move the

MODE SET


highlight bar (pointer) to

B. E. S. T.

ON


"AUTO TIMER", then press


PICTURE CONTROL

AUTO


OK or #to select either


AUTO TIMER

OFF


"ON" or "OFF".

O. S. D.

ON


DIRECT REC

ON


AUTO SP=LP TIMER

OFF


POWER SAVE

OFF


NEXT PAGE


[] =


[MENU] : EXIT


RETURN TO NORMAL SCREEN

4 Press MENU.


NOTE:

For safety, when Auto timer is set to "OFF", all other recorder functions are disabled while the Timer mode is engaged. To disengage the timer, press ä (TIMER).

Page 29
Image 29
JVC HR-J768EU specifications Auto SP→LP Timer, Auto Timer

HR-J768EU specifications

The JVC HR-J768EU is a versatile and reliable VCR that was well-loved for its combination of user-friendly features and high-quality performance. Launched in the early 2000s, this VCR made a significant impact during the transition from analog to digital recording formats, bridging the gap for many users who were familiar with VHS technology.

One of the standout features of the HR-J768EU is its Time Base Corrector (TBC), which greatly enhances picture quality by stabilizing video signals. This technology minimizes errors caused by tape degradation and ensures smoother playback for recorded and pre-recorded tapes alike. The TBC feature is especially useful when playing back older tapes that may have accumulated imperfections over time.

The VCR also incorporates JVC's unique Digital Frame Convert technology, which converts interlaced video to progressive scan. This means that the picture is rendered with improved clarity and detail, providing a more visually appealing experience. The result is a sharper image with reduced flicker, making it an excellent choice for those looking to watch movies and home video recordings with better image fidelity.

In terms of connectivity, the HR-J768EU includes various options, such as SCART and composite video outputs. This allows users to easily connect the VCR to TVs and other devices, ensuring compatibility with a wide range of equipment. The RF output also offers flexibility in terms of connection for older television sets.

The user interface of the JVC HR-J768EU is designed with functionality in mind, featuring an intuitive remote control that simplifies navigation through menus and settings. The on-screen display provides essential information at a glance, making it easier to manage recording and playback functions.

Another notable feature is the ability to schedule recordings with its built-in timer. This functionality enables users to record their favorite shows while they are away, making it simpler to follow a TV schedule without needing to be at home.

In summary, the JVC HR-J768EU combines high-quality image processing technologies with user-friendly features, making it a standout choice for fans of VHS recording and playback. With its robust performance and reliable design, this VCR continues to hold a place in the hearts of users who appreciate the charm of analog video formats. As a result, the JVC HR-J768EU remains an enduring option for those looking to bring their old video collections back to life.