EN 13

C Select the language.

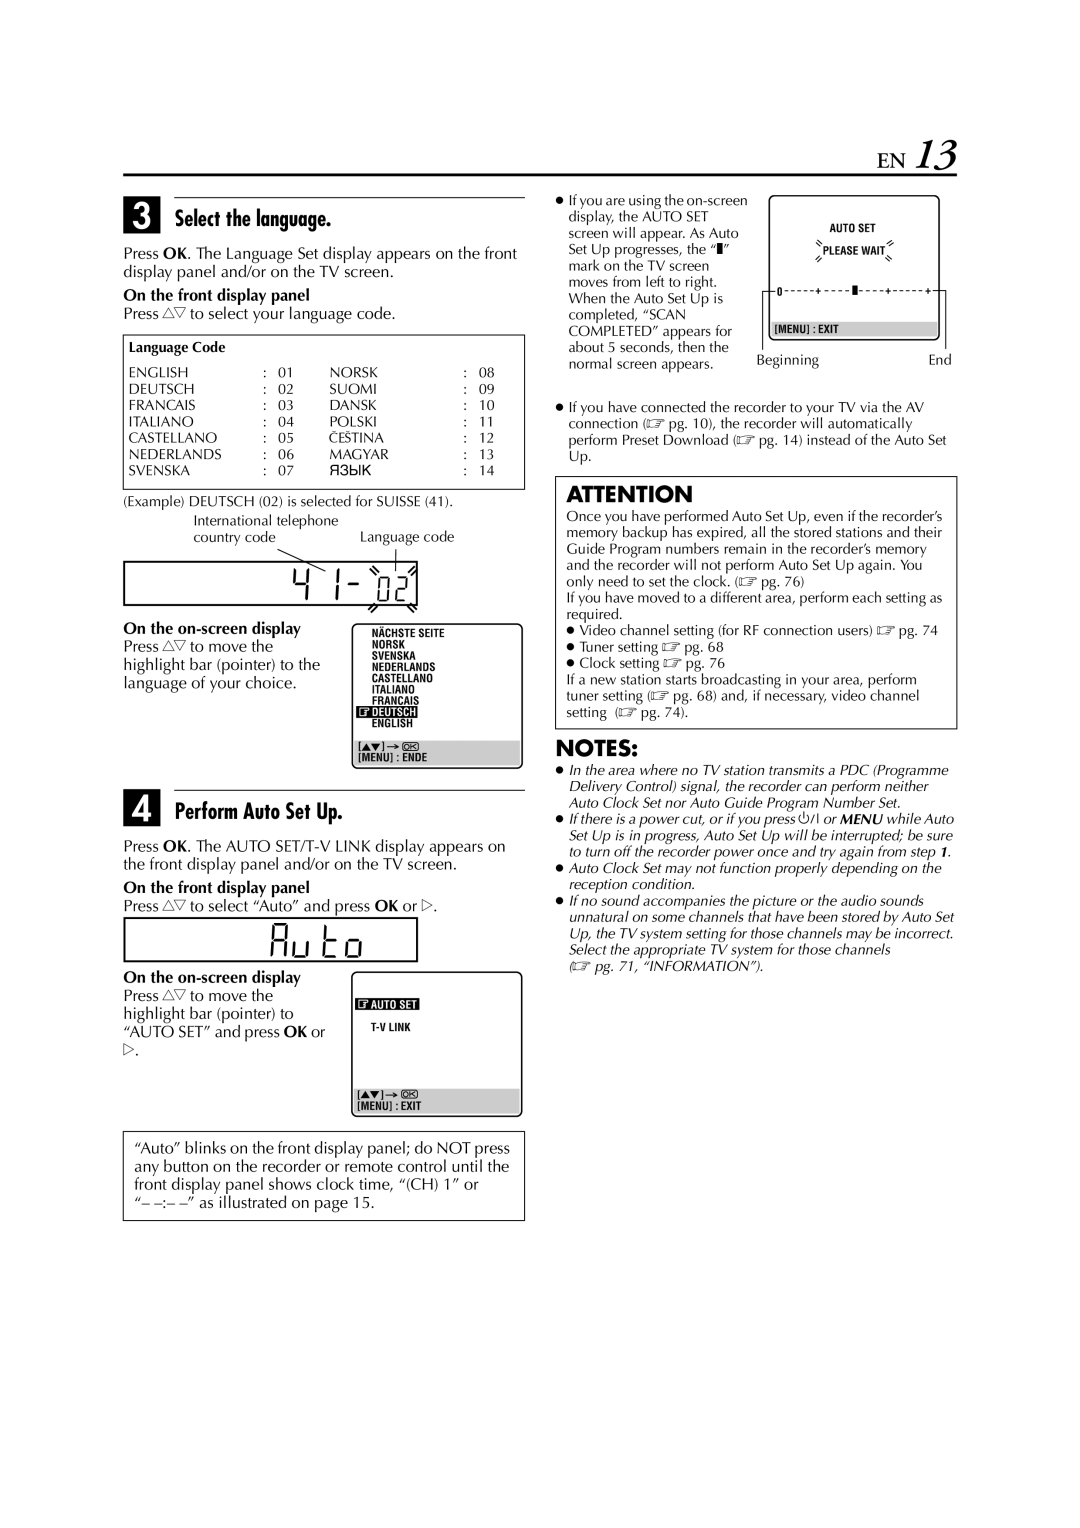
Press OK. The Language Set display appears on the front display panel and/or on the TV screen.

On the front display panel

Press rt to select your language code.

Language Code


ENGLISH

:

01

NORSK

:

08

DEUTSCH

:

02

SUOMI

:

09

FRANCAIS

:

03

DANSK

:

10

ITALIANO

:

04

POLSKI

:

11

CASTELLANO

:

05

CEcTINA

:

12

NEDERLANDS

:

06

MAGYAR

:

13

SVENSKA

:

07

ЯЗЫК

:

14

(Example) DEUTSCH (02) is selected for SUISSE (41).

International telephone

Language code

country code

On the on-screen display

Press rt to move the highlight bar (pointer) to the language of your choice.

D Perform Auto Set Up.

Press OK. The AUTO SET/T-V LINK display appears on the front display panel and/or on the TV screen.

On the front display panel

Press rt to select “Auto” and press OK or e.

On the on-screen display

Press rt to move the highlight bar (pointer) to “AUTO SET” and press OK or

e.

“Auto” blinks on the front display panel; do NOT press any button on the recorder or remote control until the front display panel shows clock time, “(CH) 1” or

“– –:– –” as illustrated on page 15.

If you are using the on-screen display, the AUTO SET

screen will appear. As Auto


Set Up progresses, the “q”


mark on the TV screen


moves from left to right.


When the Auto Set Up is


completed, “SCAN


COMPLETED” appears for


about 5 seconds, then the

Beginning

End

normal screen appears.

If you have connected the recorder to your TV via the AV connection ( pg. 10), the recorder will automatically perform Preset Download ( pg. 14) instead of the Auto Set Up.

ATTENTION

Once you have performed Auto Set Up, even if the recorder’s memory backup has expired, all the stored stations and their Guide Program numbers remain in the recorder’s memory and the recorder will not perform Auto Set Up again. You only need to set the clock. ( pg. 76)

If you have moved to a different area, perform each setting as required.

Video channel setting (for RF connection users)  pg. 74

Tuner setting  pg. 68

Clock setting  pg. 76

If a new station starts broadcasting in your area, perform tuner setting ( pg. 68) and, if necessary, video channel setting ( pg. 74).

NOTES:

In the area where no TV station transmits a PDC (Programme Delivery Control) signal, the recorder can perform neither Auto Clock Set nor Auto Guide Program Number Set.

If there is a power cut, or if you press 1 or MENU while Auto Set Up is in progress, Auto Set Up will be interrupted; be sure to turn off the recorder power once and try again from step 1.

Auto Clock Set may not function properly depending on the reception condition.

If no sound accompanies the picture or the audio sounds unnatural on some channels that have been stored by Auto Set Up, the TV system setting for those channels may be incorrect.

Select the appropriate TV system for those channels ( pg. 71, “INFORMATION”).

Page 13
Image 13
JVC HR-S8700EU Select the language, Perform Auto Set Up, Press rt to select your language code, As illustrated on

HR-S8700EU specifications

The JVC HR-S8700EU is a notable VHS player and recorder that continues to attract attention for its advanced features and performance. This model has made a significant mark in home entertainment systems, particularly for those who appreciate classic VHS tapes.

One of the standout features of the HR-S8700EU is its high-quality video playback and recording capability. This model utilizes JVC's sophisticated Super VHS (S-VHS) technology, which provides a significant enhancement in image quality compared to standard VHS. The S-VHS format offers improved resolution and clarity, allowing users to enjoy a cinematic experience within the comfort of their homes.

The HR-S8700EU is equipped with a 4-head system, which facilitates both high-quality video playback and recording. This technology ensures that tapes are played back with minimal distortion and greater detail, presenting a smoother and clearer picture. The machine also boasts a feature called S-VHS ET (Enhanced Technique), which allows standard VHS tapes to achieve near-S-VHS quality when played on the HR-S8700EU.

Another significant aspect of the HR-S8700EU is its range of connectivity options. With the inclusion of SCART, RCA, and S-Video outputs, users can easily connect the recorder to a variety of television sets and other devices. This versatility is particularly beneficial for those looking to maintain an extensive VHS library while integrating contemporary audio-visual components.

The user-friendly interface and a comprehensive set of programmable features make the HR-S8700EU a highly practical choice for home use. The built-in timer allows for scheduled recordings, making it easy to capture favorite shows without the need for manual operation. Additionally, the on-screen display provides clear navigation through menus, simplifying the recording and playback processes.

Durability and reliability are also hallmarks of the JVC HR-S8700EU. Designed for longevity, this model features robust construction that ensures it can withstand regular use while maintaining consistent performance. As a testament to its popularity, many users still seek out the HR-S8700EU for its blend of classic technology and dependable functionality.

In summary, the JVC HR-S8700EU is a versatile and enduring choice for VHS enthusiasts, featuring high-quality S-VHS playback, a 4-head system, multiple connectivity options, and user-friendly programming capabilities. With its reliable performance and exceptional video quality, it stands out as a valuable addition to any classic media collection.