Installing Batteries
1 Open the battery compartment cover.
2 Insert 2 "AA"-size batteries (provided) in the direction indicated under the battery cover.
3 Replace the cover.
Buttons with a small dot on the left side of the name can also be used to operate your TV while holding down the TV button. pg. 48
MULTI BRAND
REMOTE CONTROL UNIT
1
2
3
4
5
6
7
8
9
0
!
@
#
$
%
^

EN59

REMOTE CONTROL


CABLE/

MBR SET


TV

DBS

A/B

POWER


TV/VCR

ENTER/OSD DISPLAY

1


2


3


2

4


5


6


DBS


DAILY(M-F)

WEEKLY

7


8


9


C. RESET


AUX


CANCEL


0


TIMER 4

START

STOP

DATE

CH


EXPRESS PROGRAMMING


1 PROG

PROG

SP/EP

SKIP SEARCH


CHECK


PLAY


FF


REW


REC


STOP


PAUSE


MENU


3

OK


TV CH +


SHUTTLE


V


PLUS


T


+

V


L

O


O


L


V


V


T


TV CH


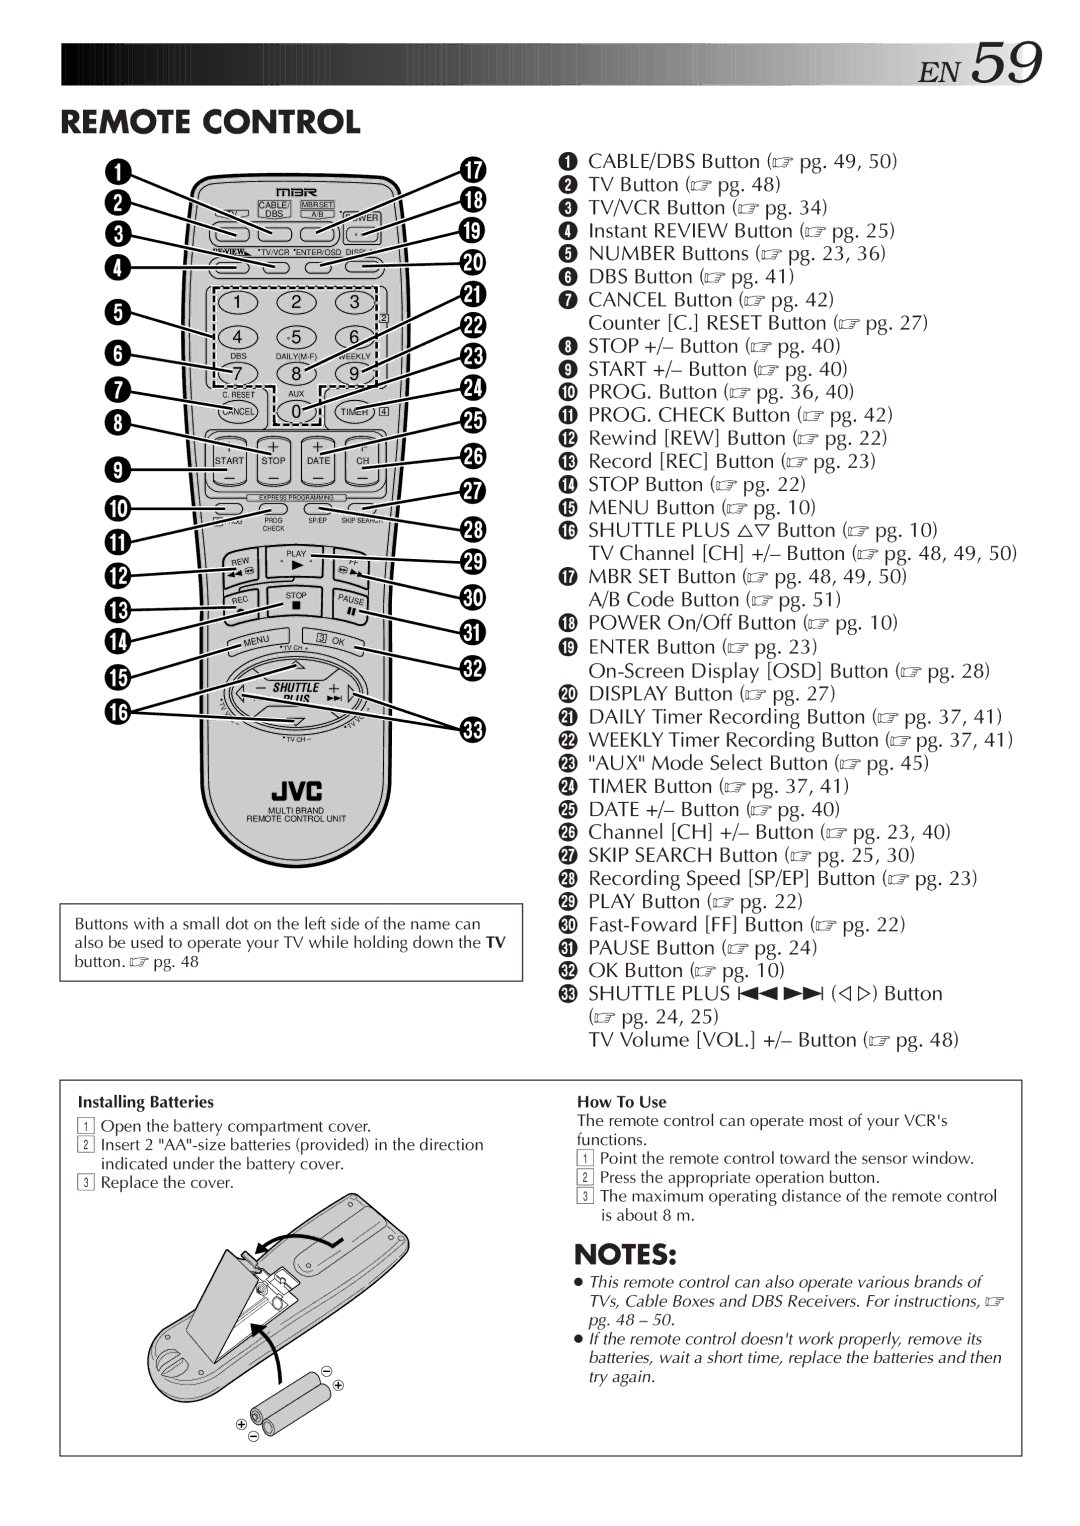
&1 CABLE/DBS Button (pg. 49, 50)

2 TV Button (pg. 48)

* 3 TV/VCR Button (pg. 34)

(4 Instant REVIEW Button (pg. 25)

)

5

NUMBER Buttons (pg. 23, 36)

6

DBS Button (pg. 41)

q

7

CANCEL Button (pg. 42)

wCounter [C.] RESET Button (pg. 27)

e

8

STOP +/– Button (pg. 40)

9

START +/– Button (pg. 40)

r

0

PROG. Button (pg. 36, 40)

t! PROG. CHECK Button (pg. 42)

@Rewind [REW] Button (pg. 22) y # Record [REC] Button (pg. 23)

u$ STOP Button (pg. 22) % MENU Button (pg. 10)

i ^ SHUTTLE PLUS Button (pg. 10)

oTV Channel [CH] +/– Button (pg. 48, 49, 50)

&MBR SET Button (pg. 48, 49, 50)

pA/B Code Button (pg. 51)

Q* POWER On/Off Button (pg. 10) ( ENTER Button (pg. 23)

W

On-Screen Display [OSD] Button (pg. 28)


) DISPLAY Button (pg. 27)

E

q DAILY Timer Recording Button (pg. 37, 41)

w WEEKLY Timer Recording Button (pg. 37, 41)


e "AUX" Mode Select Button (pg. 45)


r TIMER Button (pg. 37, 41)


t DATE +/– Button (pg. 40)


y Channel [CH] +/– Button (pg. 23, 40)


u SKIP SEARCH Button (pg. 25, 30)


i Recording Speed [SP/EP] Button (pg. 23)


o PLAY Button (pg. 22)


p Fast-Foward [FF] Button (pg. 22)


Q PAUSE Button (pg. 24)


W OK Button (pg. 10)


E SHUTTLE PLUS ª£ (Þ%) Button


(pg. 24, 25)


TV Volume [VOL.] +/– Button (pg. 48)

How To Use

The remote control can operate most of your VCR's functions.

1Point the remote control toward the sensor window.

2 Press the appropriate operation button.

3 The maximum operating distance of the remote control is about 8 m.

NOTES:

This remote control can also operate various brands of TVs, Cable Boxes and DBS Receivers. For instructions, pg. 48 – 50.

If the remote control doesn't work properly, remove its batteries, wait a short time, replace the batteries and then try again.

Page 59
Image 59
JVC HR-VP655U manual Remote Control, How To Use

HR-VP655U specifications

The JVC HR-VP655U is a remarkable VHS VCR that showcases the pinnacle of video recording technology available during its time. As part of JVC's extensive lineup of consumer electronics, this model combines functionality with ease of use, catering to both casual viewers and dedicated videophiles.

One of the standout features of the HR-VP655U is its Super VHS capability, which enables higher resolution recording compared to standard VHS formats. Super VHS delivers enhanced picture quality by allowing a wider video bandwidth, resulting in sharper images and greater detail. This feature is particularly beneficial for those looking to archive family videos or enjoy classic films with better clarity.

The HR-VP655U also integrates advanced noise reduction technologies, including JVC's Digital Noise Reduction (DNR) system. This innovative feature helps to minimize graininess and enhance image quality, ensuring that viewers experience clearer and more vibrant playback. This is especially useful when recording from sources with less-than-ideal signal quality.

Another significant characteristic of the HR-VP655U is its compatibility with both standard VHS and Super VHS tapes. This versatility allows users to play and record on a wide variety of media, ensuring that even older tapes can be enjoyed without compatibility issues. Additionally, the VCR supports 4-head recording, which improves tracking and playback quality, providing a smoother viewing experience.

The HR-VP655U is also equipped with a user-friendly on-screen display and easy-to-navigate controls. This simplifies the process of programming recordings and adjusting settings, making it accessible to users of all ages. The model features a built-in timer recording function, allowing users to schedule video recordings at their convenience, ensuring they never miss their favorite shows or important events.

Moreover, the reawakening of nostalgic memories is supported by the VCR's ability to play back a variety of formats, ensuring compatibility with many consumer tapes. The HR-VP655U maintains a solid build quality, reflecting JVC's commitment to durability and longevity in its products.

In summary, the JVC HR-VP655U combines innovative video technology with user-friendly features, ensuring high-quality recordings and playback. Its Super VHS capabilities, integrated noise reduction, and compatibility with various tape formats make it a reliable option for anyone seeking to preserve their video library or enjoy a classic viewing experience. With its blend of performance and convenience, the HR-VP655U remains a noteworthy model in the history of video recording devices.