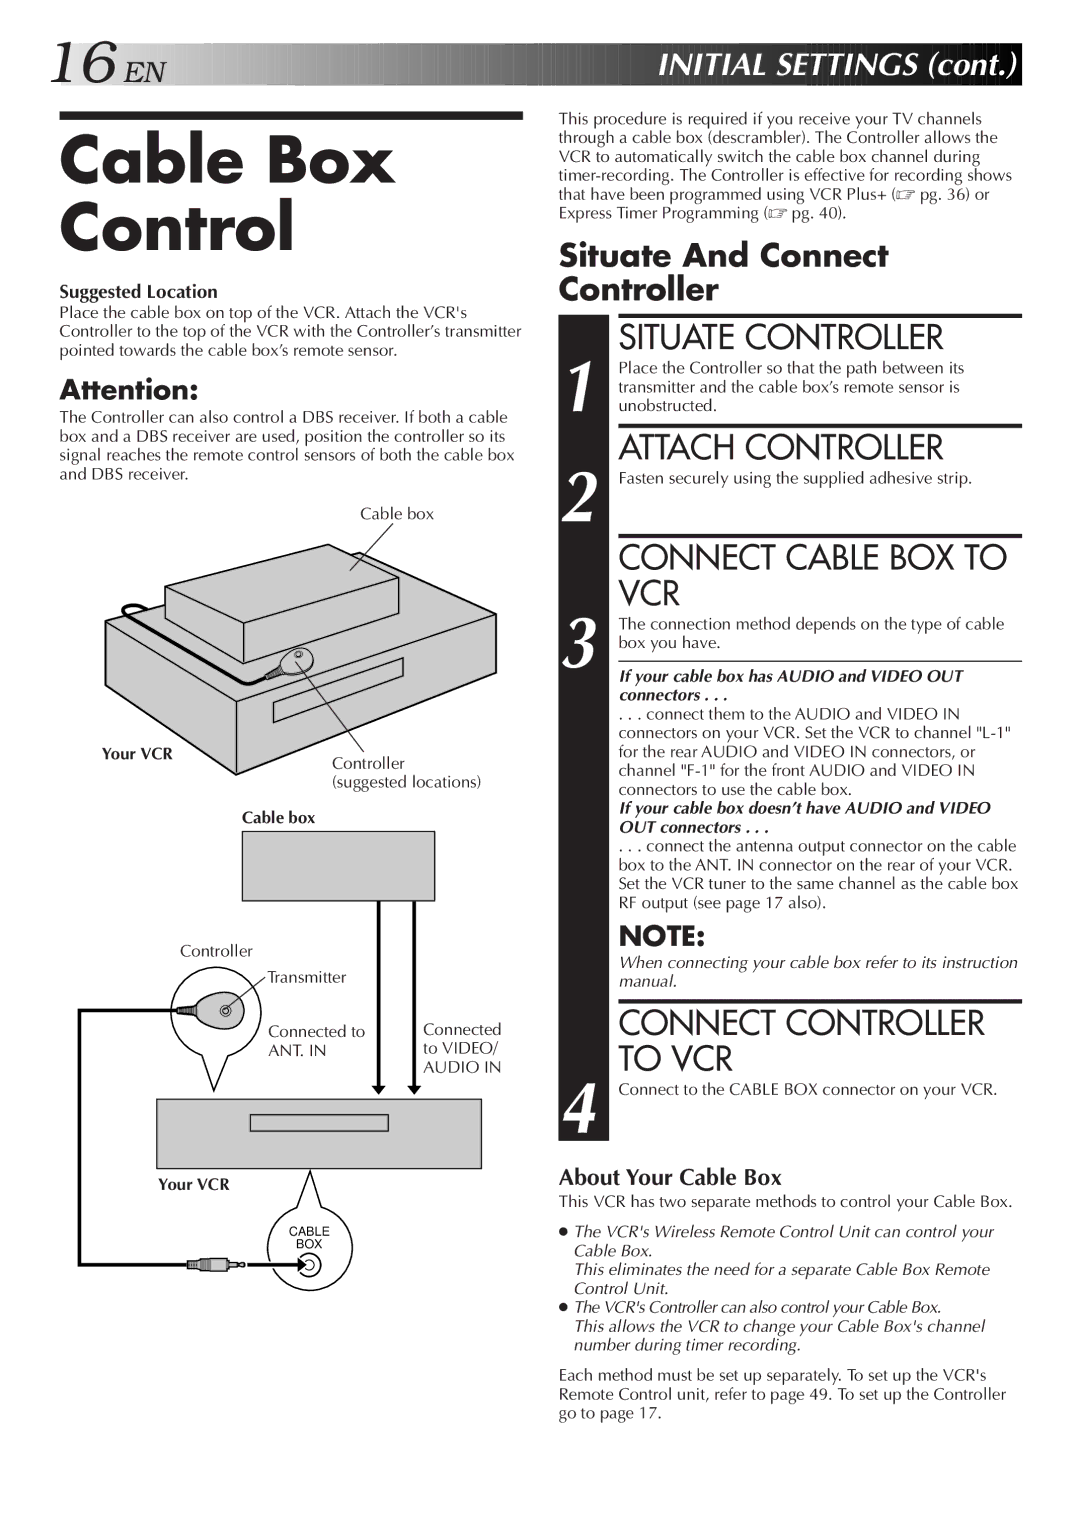
JVC HR-VP656U Cable Box Control, Situate Controller, Attach Controller, Connect Cable BOX to VCR

Models: HR-VP656U

1 64
Download 64 pages 46.3 Kb
Page 16
Image 16

16ENINITIALSETTINGS(cont.)

Cable Box

Control

Suggested Location

Place the cable box on top of the VCR. Attach the VCR's Controller to the top of the VCR with the Controller’s transmitter pointed towards the cable box’s remote sensor.

Attention:

The Controller can also control a DBS receiver. If both a cable box and a DBS receiver are used, position the controller so its signal reaches the remote control sensors of both the cable box and DBS receiver.

Cable box

Your VCR

Controller


(suggested locations)


Cable box


Controller


Transmitter


Connected to

Connected


ANT. IN

to VIDEO/


AUDIO IN


Your VCR

CABLE

BOX

This procedure is required if you receive your TV channels through a cable box (descrambler). The Controller allows the VCR to automatically switch the cable box channel during timer-recording. The Controller is effective for recording shows that have been programmed using VCR Plus+ (pg. 36) or Express Timer Programming (pg. 40).

Situate And Connect

Controller

SITUATE CONTROLLER

1 Place the Controller so that the path between its transmitter and the cable box’s remote sensor is unobstructed.

ATTACH CONTROLLER

2 Fasten securely using the supplied adhesive strip.

CONNECT CABLE BOX TO VCR

3 The connection method depends on the type of cable box you have.

If your cable box has AUDIO and VIDEO OUT connectors . . .

. . . connect them to the AUDIO and VIDEO IN connectors on your VCR. Set the VCR to channel "L-1" for the rear AUDIO and VIDEO IN connectors, or channel "F-1" for the front AUDIO and VIDEO IN connectors to use the cable box.

If your cable box doesn’t have AUDIO and VIDEO OUT connectors . . .

. . . connect the antenna output connector on the cable box to the ANT. IN connector on the rear of your VCR. Set the VCR tuner to the same channel as the cable box RF output (see page 17 also).

NOTE:

When connecting your cable box refer to its instruction manual.

CONNECT CONTROLLER TO VCR

4 Connect to the CABLE BOX connector on your VCR.

About Your Cable Box

This VCR has two separate methods to control your Cable Box.

The VCR's Wireless Remote Control Unit can control your Cable Box.

This eliminates the need for a separate Cable Box Remote Control Unit.

The VCR's Controller can also control your Cable Box.

This allows the VCR to change your Cable Box's channel number during timer recording.

Each method must be set up separately. To set up the VCR's Remote Control unit, refer to page 49. To set up the Controller go to page 17.

Page 16
Image 16
JVC HR-VP656U manual Cable Box Control, Situate Controller, Attach Controller, Connect Cable BOX to VCR

HR-VP656U specifications

The JVC HR-VP656U is a sophisticated VHS VCR that embodies both vintage technology and user-friendly features, making it a standout choice for enthusiasts of analog video recording. Notable for its practicality and functionality, the HR-VP656U is designed to appeal to a wide range of users, from casual viewers to those with a penchant for archiving home videos.

One of the most significant features of the HR-VP656U is its ability to handle a variety of tape formats, including standard VHS and S-VHS. This versatility allows users to play and record in different formats, making it compatible with an extensive library of existing tapes. The device also comes equipped with high-quality playback capabilities, ensuring that both audio and video quality are preserved during playback.

The HR-VP656U employs a unique VHS Hi-Fi audio system that significantly enhances the sound quality of recordings, providing sharp and clear audio that complements the visual experience. Additionally, the unit features a digital noise reduction system, which minimizes static and interference during playback, resulting in a more polished and enjoyable viewing experience.

Another hallmark of the JVC HR-VP656U is its user-friendly interface, which includes an easy-to-navigate on-screen menu system. Features like timer recording are also included, allowing users to schedule recordings with ease. The device supports a variety of recording speeds, giving users control over tape usage and recording length, which is particularly useful for those archiving longer events or shows.

The remote control functionality offers added convenience, enabling users to operate the VCR from a distance. This feature is ideal for those who prefer to sit back and enjoy their movies without the need to get up and manually operate the device.

The sleek, compact design of the HR-VP656U adds to its appeal, allowing it to fit seamlessly into any home entertainment setup. Its reliability and performance have made it a preferred choice for those seeking a dependable VHS recording solution as well as a solid option for nostalgia lovers wishing to relive the glory days of analog video. Overall, the JVC HR-VP656U stands as a notable example of the classic VHS technology, embodying a balance of performance, quality, and user-centric design.