Installing Batteries
1 Open the battery compartment cover.
2 Insert 2 "AA"-size batteries (provided) in the direction indicated under the battery cover.
3 Replace the cover.
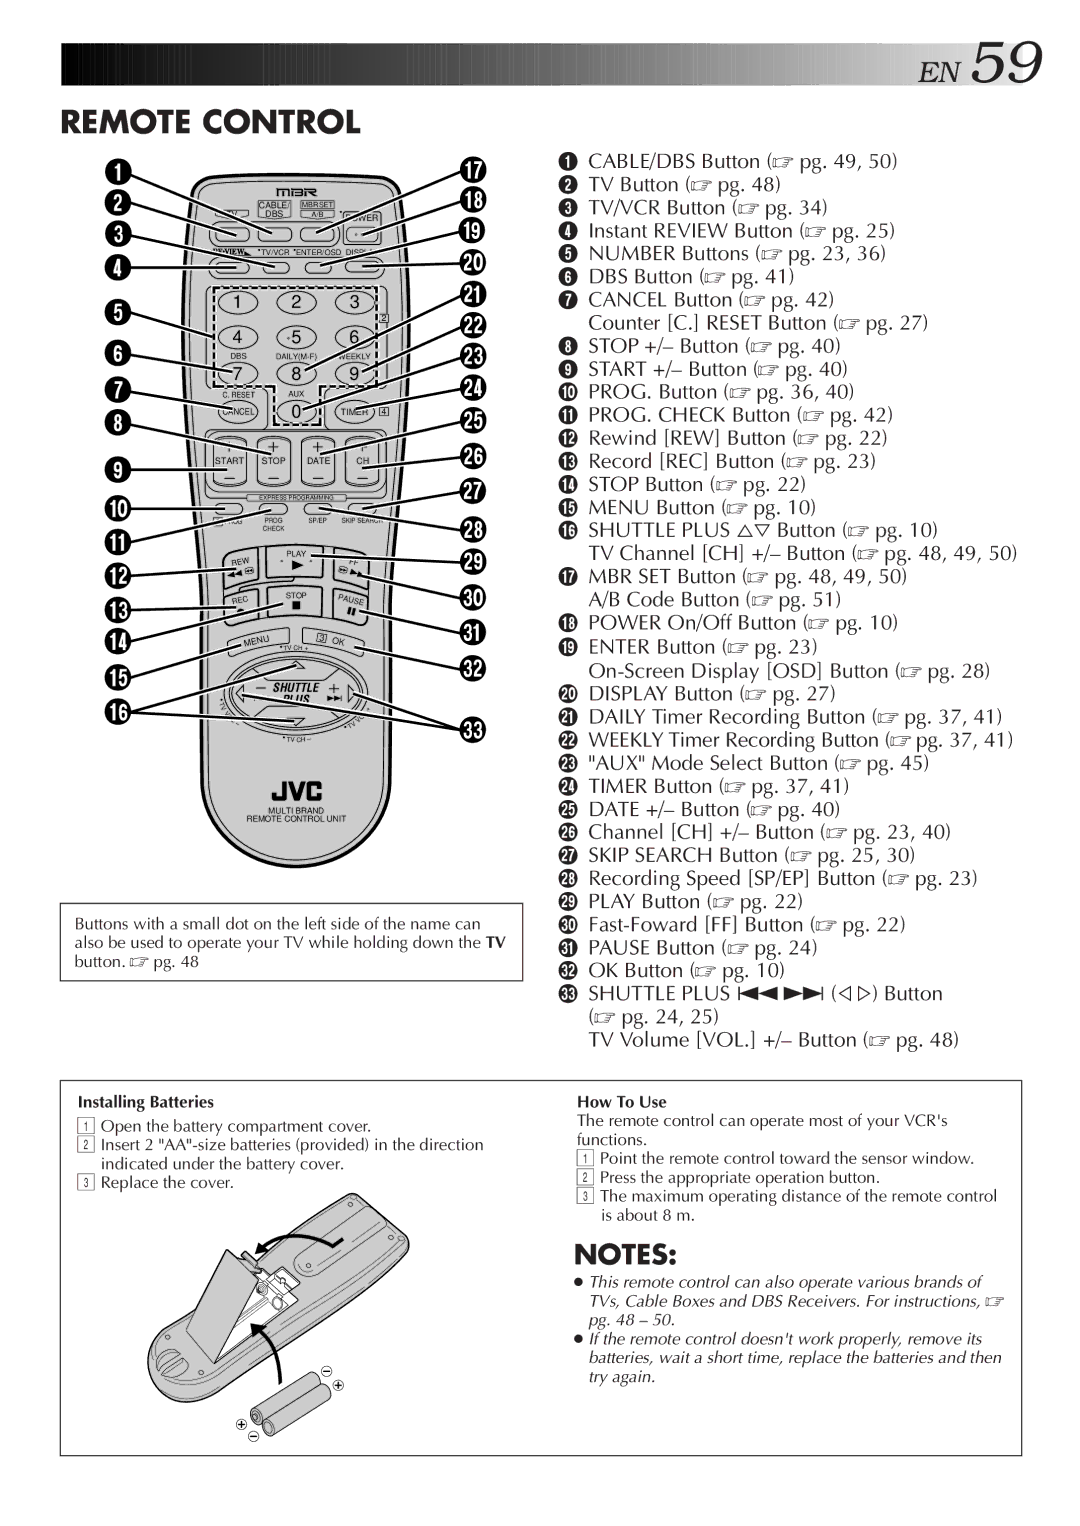
Buttons with a small dot on the left side of the name can also be used to operate your TV while holding down the TV button. pg. 48
MULTI BRAND
REMOTE CONTROL UNIT
1
2
3
4
5
6
7
8
9
0
!
@
#
$
%
^

EN59

REMOTE CONTROL


CABLE/

MBR SET


TV

DBS

A/B

POWER


TV/VCR

ENTER/OSD DISPLAY

1


2


3


2

4


5


6


DBS


DAILY(M-F)

WEEKLY

7


8


9


C. RESET


AUX


CANCEL


0


TIMER 4

START

STOP

DATE

CH


EXPRESS PROGRAMMING


1 PROG

PROG

SP/EP

SKIP SEARCH


CHECK


PLAY


FF


REW


REC


STOP


PAUSE


MENU


3

OK


TV CH +


SHUTTLE


V


PLUS


T


+

V


L

O


O


L


V


V


T


TV CH


&1 CABLE/DBS Button (pg. 49, 50)

2 TV Button (pg. 48)

* 3 TV/VCR Button (pg. 34)

(4 Instant REVIEW Button (pg. 25)

)

5

NUMBER Buttons (pg. 23, 36)

6

DBS Button (pg. 41)

q

7

CANCEL Button (pg. 42)

wCounter [C.] RESET Button (pg. 27)

e

8

STOP +/– Button (pg. 40)

9

START +/– Button (pg. 40)

r

0

PROG. Button (pg. 36, 40)

t! PROG. CHECK Button (pg. 42)

@Rewind [REW] Button (pg. 22) y # Record [REC] Button (pg. 23)

u$ STOP Button (pg. 22) % MENU Button (pg. 10)

i ^ SHUTTLE PLUS Button (pg. 10)

oTV Channel [CH] +/– Button (pg. 48, 49, 50)

&MBR SET Button (pg. 48, 49, 50)

pA/B Code Button (pg. 51)

Q* POWER On/Off Button (pg. 10) ( ENTER Button (pg. 23)

W

On-Screen Display [OSD] Button (pg. 28)


) DISPLAY Button (pg. 27)

E

q DAILY Timer Recording Button (pg. 37, 41)

w WEEKLY Timer Recording Button (pg. 37, 41)


e "AUX" Mode Select Button (pg. 45)


r TIMER Button (pg. 37, 41)


t DATE +/– Button (pg. 40)


y Channel [CH] +/– Button (pg. 23, 40)


u SKIP SEARCH Button (pg. 25, 30)


i Recording Speed [SP/EP] Button (pg. 23)


o PLAY Button (pg. 22)


p Fast-Foward [FF] Button (pg. 22)


Q PAUSE Button (pg. 24)


W OK Button (pg. 10)


E SHUTTLE PLUS ª£ (Þ%) Button


(pg. 24, 25)


TV Volume [VOL.] +/– Button (pg. 48)

How To Use

The remote control can operate most of your VCR's functions.

1Point the remote control toward the sensor window.

2 Press the appropriate operation button.

3 The maximum operating distance of the remote control is about 8 m.

NOTES:

This remote control can also operate various brands of TVs, Cable Boxes and DBS Receivers. For instructions, pg. 48 – 50.

If the remote control doesn't work properly, remove its batteries, wait a short time, replace the batteries and then try again.

Page 59
Image 59
JVC HR-VP656U manual Remote Control, How To Use

HR-VP656U specifications

The JVC HR-VP656U is a sophisticated VHS VCR that embodies both vintage technology and user-friendly features, making it a standout choice for enthusiasts of analog video recording. Notable for its practicality and functionality, the HR-VP656U is designed to appeal to a wide range of users, from casual viewers to those with a penchant for archiving home videos.

One of the most significant features of the HR-VP656U is its ability to handle a variety of tape formats, including standard VHS and S-VHS. This versatility allows users to play and record in different formats, making it compatible with an extensive library of existing tapes. The device also comes equipped with high-quality playback capabilities, ensuring that both audio and video quality are preserved during playback.

The HR-VP656U employs a unique VHS Hi-Fi audio system that significantly enhances the sound quality of recordings, providing sharp and clear audio that complements the visual experience. Additionally, the unit features a digital noise reduction system, which minimizes static and interference during playback, resulting in a more polished and enjoyable viewing experience.

Another hallmark of the JVC HR-VP656U is its user-friendly interface, which includes an easy-to-navigate on-screen menu system. Features like timer recording are also included, allowing users to schedule recordings with ease. The device supports a variety of recording speeds, giving users control over tape usage and recording length, which is particularly useful for those archiving longer events or shows.

The remote control functionality offers added convenience, enabling users to operate the VCR from a distance. This feature is ideal for those who prefer to sit back and enjoy their movies without the need to get up and manually operate the device.

The sleek, compact design of the HR-VP656U adds to its appeal, allowing it to fit seamlessly into any home entertainment setup. Its reliability and performance have made it a preferred choice for those seeking a dependable VHS recording solution as well as a solid option for nostalgia lovers wishing to relive the glory days of analog video. Overall, the JVC HR-VP656U stands as a notable example of the classic VHS technology, embodying a balance of performance, quality, and user-centric design.