EN 47

Remote

1


^

2


CABLE/ MBR SET


&

TV

DBS

A/B

POWER


3


*

4


TV/VCR A. MONITOR DISPLAY


(


5

1

2


3


)

4

5


6


2

q


DBS

DAILY(M-F)

WEEKLY


w

6

7

8


9


e

C. RESET

AUX


7

CANCEL

0


TIMER

4

r


8

START

STOP

DATE

CH


t

9


EXPRESS PROGRAMMING


y

1 PROG

PROG

SP/EP

SKIP SEARCH

u

0


CHECK


i


PLAY


FF


!

REW


STOP


o

@

REC

E

PAUSE


NTER/O


p

#


3

SD


OK


MENU TV CH +


$


SHUTTLE


Q

%

V

PLUS

T


T


+


V


L


W


O


O


L


V


V


TV CH


MULTI BRAND

REMOTE CONTROL UNIT

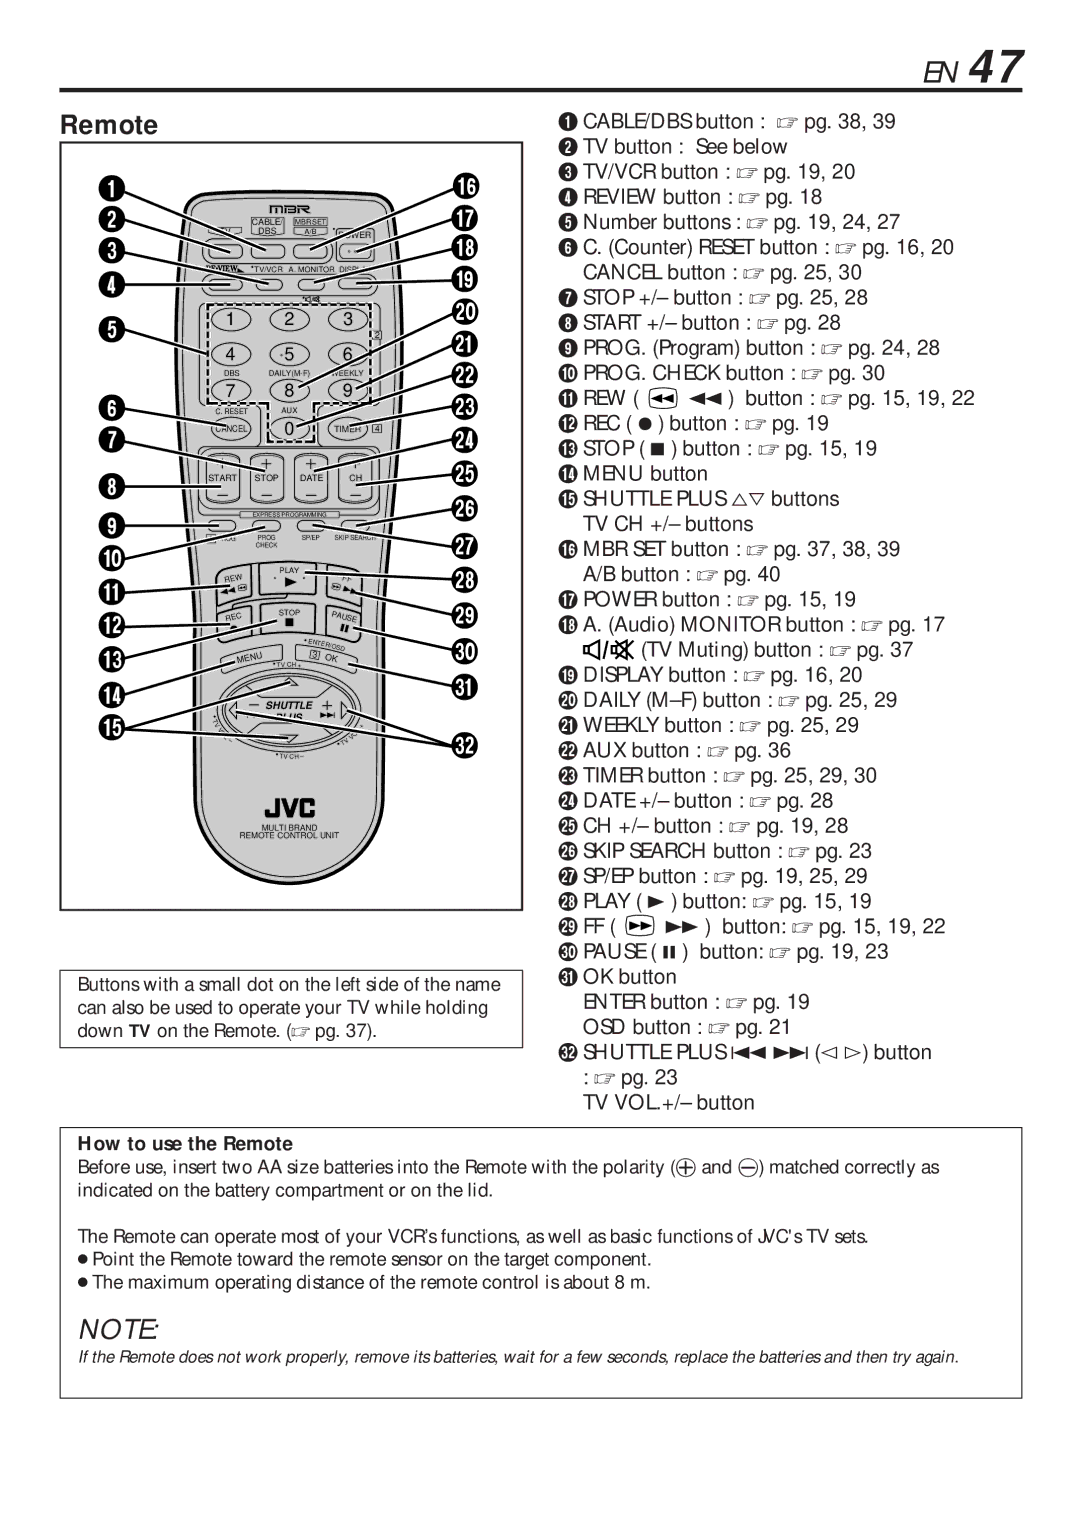
Buttons with a small dot on the left side of the name can also be used to operate your TV while holding down TV on the Remote. (pg. 37).

1CABLE/DBS button : pg. 38, 39

2 TV button : See below

3 TV/VCR button : pg. 19, 20

4 REVIEW button : pg. 18

5 Number buttons : pg. 19, 24, 27

6 C. (Counter) RESET button : pg. 16, 20 CANCEL button : pg. 25, 30

7 STOP +/– button : pg. 25, 28

8 START +/– button : pg. 28

9 PROG. (Program) button : pg. 24, 28

0 PROG. CHECK button : pg. 30

! REW ( 1 ) button : pg. 15, 19, 22

@ REC ( ¦ ) button : pg. 19

# STOP ( 7 ) button : pg. 15, 19 $ MENU button

% SHUTTLE PLUS buttons TV CH +/– buttons

^ MBR SET button : pg. 37, 38, 39 A/B button : pg. 40

& POWER button : pg. 15, 19

* A. (Audio) MONITOR button : pg. 17

(TV Muting) button : pg. 37 ( DISPLAY button : pg. 16, 20

) DAILY (M–F) button : pg. 25, 29

q WEEKLY button : pg. 25, 29

w AUX button : pg. 36

e TIMER button : pg. 25, 29, 30

r DATE +/– button : pg. 28

t CH +/– button : pg. 19, 28

y SKIP SEARCH button : pg. 23

u SP/EP button : pg. 19, 25, 29

i PLAY ( 3 ) button: pg. 15, 19

o FF ( Á ) button: pg. 15, 19, 22

p PAUSE ( 8 ) button: pg. 19, 23 Q OK button

ENTER button : pg. 19

OSD button : pg. 21

W SHUTTLE PLUS 4 ¢ (@ #) button

:pg. 23

TV VOL.+/– button

How to use the Remote

Before use, insert two AA size batteries into the Remote with the polarity (» and á) matched correctly as indicated on the battery compartment or on the lid.

The Remote can operate most of your VCR’s functions, as well as basic functions of JVC's TV sets.

Point the Remote toward the remote sensor on the target component.

The maximum operating distance of the remote control is about 8 m.

NOTE:

If the Remote does not work properly, remove its batteries, wait for a few seconds, replace the batteries and then try again.

Page 47
Image 47
JVC HR-VP680U manual How to use the Remote

HR-VP680U specifications

The JVC HR-VP680U is a versatile VHS VCR that combines classic features with advanced technology, allowing users to enjoy a seamless viewing experience while preserving their favorite memories on tape. Known for its durability and reliability, the HR-VP680U has made a name for itself as an excellent choice for both casual and enthusiast videographers.

One of the standout features of the HR-VP680U is its ability to play back a variety of VHS formats, including standard VHS, S-VHS, and even VHS-C tapes with the help of an adapter. The S-VHS capability enhances the video quality of standard VHS tapes, showcasing the rich colors and fine detail that many film enthusiasts cherish. This versatility ensures that users can enjoy a wide range of video content from various sources.

The HR-VP680U incorporates JVC's unique Digital Frame Synchronizer technology, which significantly reduces video noise and enhances the overall clarity of your recordings. This cutting-edge feature leads to a smoother playback experience, making it perfect for watching movies or old home videos. Additionally, this VCR is equipped with HQ (High Quality) playback, further improving the quality of standard tapes and ensuring that older recordings look their best.

Another notable characteristic of the HR-VP680U is its built-in timer programming capabilities. Users can easily set the timer to record shows or events, ensuring they never miss their favorite programs. The VCR supports up to eight different timer functions, which provides ample flexibility for recording various shows throughout the week.

In terms of connectivity, the JVC HR-VP680U comes with composite video inputs and outputs, allowing seamless integration with other devices such as TVs and external audio systems. The inclusion of an RF output also enables users to connect the VCR to older television sets easily.

Overall, the JVC HR-VP680U represents a marriage of nostalgic video technology with essential modern features. Its ability to playback multiple formats, enhanced viewing technologies, and user-friendly recording options make it a valuable addition to any home entertainment setup. Whether you are looking to convert your old tapes or simply enjoy classic films, the HR-VP680U remains a reliable choice that stands the test of time.