ENGLISH

DEUTSCH

FRANÇAIS

NEDERLANDS

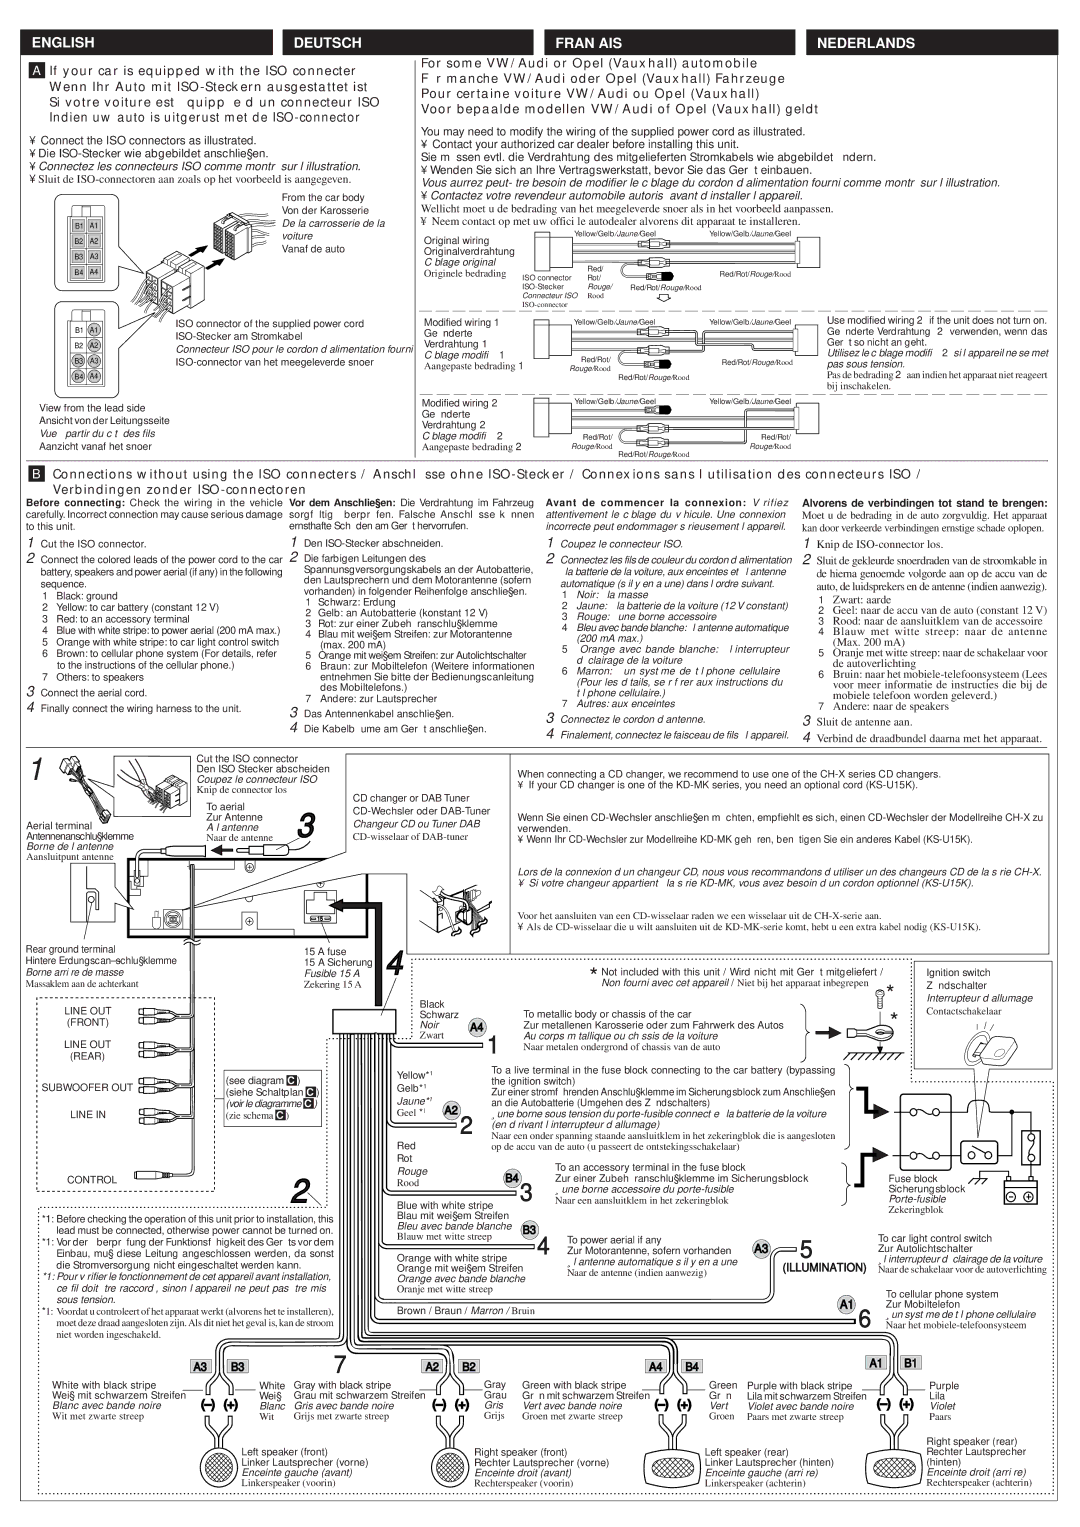
AIf your car is equipped with the ISO connecter Wenn Ihr Auto mit ISO-Steckern ausgestattet ist Si votre voiture est équippée d’un connecteur ISO Indien uw auto is uitgerust met de ISO-connector

Connect the ISO connectors as illustrated.

Die ISO-Stecker wie abgebildet anschließen.

Connectez les connecteurs ISO comme montré sur l’illustration.

Sluit de ISO-connectoren aan zoals op het voorbeeld is aangegeven.

For some VW/Audi or Opel (Vauxhall) automobile

Für manche VW/Audi oder Opel (Vauxhall) Fahrzeuge

Pour certaine voiture VW/Audi ou Opel (Vauxhall)

Voor bepaalde modellen VW/Audi of Opel (Vauxhall) geldt

You may need to modify the wiring of the supplied power cord as illustrated.

• Contact your authorized car dealer before installing this unit.

Sie müssen evtl. die Verdrahtung des mitgelieferten Stromkabels wie abgebildet ändern.

Wenden Sie sich an Ihre Vertragswerkstatt, bevor Sie das Gerät einbauen.

Vous aurrez peut-être besoin de modifier le câblage du cordon d’alimentation fourni comme montré sur l’illustration.

B1 A1

From the car body Von der Karosserie De la carrosserie de la

Contactez votre revendeur automobile autorisé avant d’installer l’appareil.

Wellicht moet u de bedrading van het meegeleverde snoer als in het voorbeeld aanpassen.

Neem contact op met uw offici’le autodealer alvorens dit apparaat te installeren.

B2 A2

B3 A3

B4 A4

B1 A1

B2 A2

B3 A3

B4 A4

voiture

Vanaf de auto

ISO connector of the supplied power cord ISO-Stecker am Stromkabel

Connecteur ISO pour le cordon d’alimentation fourni ISO-connector van het meegeleverde snoer

Original wiring


Yellow/Gelb/Jaune/Geel

Yellow/Gelb/Jaune/Geel


Originalverdrahtung


Câblage original


Red/


Originele bedrading


Red/Rot/Rouge/Rood

ISO connector

Rot/


ISO-Stecker


Rouge/

Red/Rot/Rouge/Rood


Connecteur ISO

Rood


ISO-connector


Modified wiring 1


Yellow/Gelb/Jaune/Geel

Yellow/Gelb/Jaune/Geel

Geänderte


Verdrahtung 1


Câblage modifié 1


Red/Rot/


Red/Rot/Rouge/Rood

Aangepaste bedrading 1


Rouge/Rood


Red/Rot/Rouge/Rood

Use modified wiring 2 if the unit does not turn on.

Geänderte Verdrahtung 2 verwenden, wenn das Gerät so nicht an geht.

Utilisez le câblage modifié 2si l’appareil ne se met pas sous tension.

Pas de bedrading 2aan indien het apparaat niet reageert bij inschakelen.

View from the lead side Ansicht von der Leitungsseite Vue à partir du côté des fils Aanzicht vanaf het snoer

Modified wiring 2

Yellow/Gelb/Jaune/Geel

Yellow/Gelb/Jaune/Geel

Geänderte


Verdrahtung 2


Câblage modifié 2

Red/Rot/

Red/Rot/

Aangepaste bedrading 2

Rouge/Rood

Rouge/Rood


Red/Rot/Rouge/Rood


BConnections without using the ISO connecters / Anschlüsse ohne ISO-Stecker / Connexions sans l’utilisation des connecteurs ISO /

Verbindingen zonder ISO-connectoren

Before connecting: Check the wiring in the vehicle

Vor dem Anschließen: Die Verdrahtung im Fahrzeug

Avant de commencer la connexion: Vérifiez

Alvorens de verbindingen tot stand te brengen:

carefully. Incorrect connection may cause serious damage

sorgfältig überprüfen. Falsche Anschlüsse können

attentivement le câblage du véhicule. Une connexion

Moet u de bedrading in de auto zorgvuldig. Het apparaat

to this unit.


ernsthafte Schäden am Gerät hervorrufen.


incorrecte peut endommager sérieusement l’appareil.

kan door verkeerde verbindingen ernstige schade oplopen.

1 Cut the ISO connector.


1 Den ISO-Stecker abschneiden.


1 Coupez le connecteur ISO.

1 Knip de ISO-connector los.

2 Connect the colored leads of the power cord to the car

2 Die farbigen Leitungen des


2 Connectez les fils de couleur du cordon d’alimentation

2 Sluit de gekleurde snoerdraden van de stroomkable in

battery, speakers and power aerial (if any) in the following

Spannunsgversorgungskabels an der Autobatterie,

à la batterie de la voiture, aux enceintes et à l’antenne

de hierna genoemde volgorde aan op de accu van de

sequence.


den Lautsprechern und dem Motorantenne (sofern

automatique (s’il y en a une) dans l’ordre suivant.

auto, de luidsprekers en de antenne (indien aanwezig).


vorhanden) in folgender Reihenfolge anschließen.

1 Black: ground


1 Noir: à la masse

1 Zwart: aarde


1 Schwarz: Erdung


2 Yellow: to car battery (constant 12 V)


2 Jaune: à la batterie de la voiture (12 V constant)

2 Gelb: an Autobatterie (konstant 12 V)


2 Geel: naar de accu van de auto (constant 12 V)


3 Rouge: à une borne accessoire

3 Red: to an accessory terminal


3 Rot: zur einer Zubehöranschlußklemme


3 Rood: naar de aansluitklem van de accessoire


4 Bleu avec bande blanche: à l’antenne automatique

4 Blue with white stripe: to power aerial (200 mA max.)

4 Blau mit weißem Streifen: zur Motorantenne


4 Blauw met witte streep: naar de antenne


(200 mA max.)

5 Orange with white stripe: to car light control switch


(max. 200 mA)


(Max. 200 mA)


5 Orange avec bande blanche: à l’interrupteur

6 Brown: to cellular phone system (For details, refer

5 Orange mit weißem Streifen: zur Autolichtschalter

5 Oranje met witte streep: naar de schakelaar voor

d’éclairage de la voiture

to the instructions of the cellular phone.)

6 Braun: zur Mobiltelefon (Weitere informationen

de autoverlichting

7 Others: to speakers


entnehmen Sie bitte der Bedienungscanleitung

6 Marron: à un système de téléphone cellulaire

6 Bruin: naar het mobiele-telefoonsysteem (Lees


(Pour les détails, se référer aux instructions du

3 Connect the aerial cord.


des Mobiltelefons.)


voor meer informatie de instructies die bij de


7 Andere: zur Lautsprecher


téléphone cellulaire.)

mobiele telefoon worden geleverd.)

4 Finally connect the wiring harness to the unit.

3 Das Antennenkabel anschließen.


7 Autres: aux enceintes

7 Andere: naar de speakers


3 Connectez le cordon d’antenne.


3 Sluit de antenne aan.


4 Die Kabelbäume am Gerät anschließen.


4 Finalement, connectez le faisceau de fils à l’appareil.

4 Verbind de draadbundel daarna met het apparaat.


1

Cut the ISO connector


Den ISO Stecker abscheiden

When connecting a CD changer, we recommend to use one of the CH-X series CD changers.

Coupez le connecteur ISO


• If your CD changer is one of the KD-MK series, you need an optional cord (KS-U15K).


Knip de connector los


CD changer or DAB Tuner


To aerial


3

CD-Wechsler oder DAB-Tuner


Zur Antenne

Wenn Sie einen CD-Wechsler anschließen möchten, empfiehlt es sich, einen CD-Wechsler der Modellreihe CH-X zu

Aerial terminal

Changeur CD ou Tuner DAB

A l’antenne

verwenden.


Antennenanschlußklemme

Naar de antenne

CD-wisselaar of DAB-tuner

• Wenn Ihr CD-Wechsler zur Modellreihe KD-MK gehören, benötigen Sie ein anderes Kabel (KS-U15K).

Borne de l’antenne


Aansluitpunt antenne


Lors de la connexion d’un changeur CD, nous vous recommandons d’utiliser un des changeurs CD de la série CH-X.


• Si votre changeur appartient à la série KD-MK, vous avez besoin d’un cordon optionnel (KS-U15K).


15

Voor het aansluiten van een CD-wisselaar raden we een wisselaar uit de CH-X-serie aan.


Als de CD-wisselaar die u wilt aansluiten uit de KD-MK-serie komt, hebt u een extra kabel nodig (KS-U15K).

Rear ground terminal

15 A fuse

4


Hintere Erdungscan–schlußklemme

15 A Sicherung


Not included with this unit / Wird nicht mit Gerät mitgeliefert /


Borne arrière de masse

Fusible 15 A


Ignition switch

Massaklem aan de achterkant

Zekering 15 A


* Non fourni avec cet appareil / Niet bij het apparaat inbegrepen

*

Zündschalter

LINE OUT


Black


Interrupteur d’allumage


To metallic body or chassis of the car


*

Contactschakelaar


Schwarz


(FRONT)


Noir

A4


Zur metallenen Karosserie oder zum Fahrwerk des Autos


LINE OUT


Zwart


1

Au corps métallique ou châssis de la voiture


Naar metalen ondergrond of chassis van de auto


(REAR)


(see diagram C )


Yellow*1


To a live terminal in the fuse block connecting to the car battery (bypassing


SUBWOOFER OUT


Gelb*1


the ignition switch)


(siehe Schaltplan C )


Zur einer stromführenden Anschlußklemme im Sicherungsblock zum Anschließen


(voir le diagramme C )


Jaune*1

A2

an die Autobatterie (Umgehen des Zündschalters)


LINE IN

(zie schema C )


Geel *1

À une borne sous tension du porte-fusible connectée à la batterie de la voiture


2

(en dérivant l’interrupteur d’allumage)


Red


Naar een onder spanning staande aansluitklem in het zekeringblok die is aangesloten


op de accu van de auto (u passeert de ontstekingsschakelaar)


Rot


To an accessory terminal in the fuse block


2


Rouge


B4


CONTROL


Zur einer Zubehöranschlußklemme im Sicherungsblock


Fuse block


Rood


3


À une borne accessoire du porte-fusible


Sicherungsblock


Blue with white stripe

Naar een aansluitklem in het zekeringblok


Porte-fusible

*1: Before checking the operation of this unit prior to installation, this


Blau mit weißem Streifen


Zekeringblok


Bleu avec bande blanche

B3


lead must be connected, otherwise power cannot be turned on.


*1: Vor der Überprüfung der Funktionsfähigkeit des Geräts vor dem


Blauw met witte streep


To power aerial if any


To car light control switch

Einbau, muß diese Leitung angeschlossen werden, da sonst


Orange with white stripe

4 Zur Motorantenne, sofern vorhanden

A3

5


Zur Autolichtschalter


À l’interrupteur d’éclairage de la voiture

die Stromversorgung nicht eingeschaltet werden kann.


À l’antenne automatique s’il y en a une


(ILLUMINATION)


Orange mit weißem Streifen

Naar de antenne (indien aanwezig)


Naar de schakelaar voor de autoverlichting

*1: Pour vérifier le fonctionnement de cet appareil avant installation,

Orange avec bande blanche


ce fil doit être raccordé, sinon l’appareil ne peut pas être mis


Oranje met witte streep


To cellular phone system

sous tension.


A1


Brown / Braun / Marron / Bruin


Zur Mobiltelefon

*1: Voordat u controleert of het apparaat werkt (alvorens het te installeren),


À un système de téléphone cellulaire


moet deze draad aangesloten zijn. Als dit niet het geval is, kan de stroom


6 Naar het mobiele-telefoonsysteem

niet worden ingeschakeld.


A3

B3

7

A2

B2


A4

B4


A1

B1

White with black stripe

Weiß mit schwarzem Streifen Blanc avec bande noire Wit met zwarte streep

White

Gray with black stripe


Weiß

Grau mit schwarzem Streifen


Blanc

Gris avec bande noire


Wit

Grijs met zwarte streep


Left speaker (front)

Linker Lautsprecher (vorne)

Enceinte gauche (avant)

Linkerspeaker (voorin)

Gray

Green with black stripe

Grau

Grün mit schwarzem Streifen

Gris

Vert avec bande noire

Grijs

Groen met zwarte streep

Right speaker (front)

Rechter Lautsprecher (vorne) Enceinte droit (avant) Rechterspeaker (voorin)

Green

Purple with black stripe

Grün

Lila mit schwarzem Streifen

Vert

Violet avec bande noire

Groen

Paars met zwarte streep

Left speaker (rear)

Linker Lautsprecher (hinten) Enceinte gauche (arrière) Linkerspeaker (achterin)

Purple

Lila

Violet

Paars

Right speaker (rear) Rechter Lautsprecher (hinten)

Enceinte droit (arrière) Rechterspeaker (achterin)

Page 3
Image 3
JVC KD-SH99R manual Avant de commencer la connexion Vérifiez

KD-SH99R specifications

The JVC KD-SH99R is an innovative car stereo that exemplifies a blend of advanced technology and user-friendly design, making it a preferred choice for music enthusiasts. This high-performance head unit is known for its impressive audio quality and numerous features that cater to both casual listeners and audiophiles.

One of the standout features of the KD-SH99R is its ability to play various media formats, including CDs, MP3, and WMA files. This versatility ensures that users can enjoy their favorite tracks regardless of the medium. The front USB port allows for seamless connectivity with digital devices, giving users the ability to play music directly from USB flash drives. Additionally, the inclusion of an auxiliary input allows for easy connection of smartphones and portable media players, expanding the music options available.

Sound quality is paramount in any car audio system, and the KD-SH99R does not disappoint. It is equipped with a powerful 50 watts per channel output, delivering a robust audio experience that can fill any car interior. The unit features a 3-band parametric equalizer, which allows users to fine-tune their audio settings to achieve the perfect sound that suits their preference. Moreover, the built-in high-pass and low-pass filters offer enhanced control over the frequencies, ensuring that all elements of the music come through clearly.

Another notable feature is the JVC's exclusive K2 Technology, which enhances the quality of compressed audio files, producing a clearer and more dynamic sound. This is particularly beneficial for digital music files which can often lose vibrancy during compression.

For those who value customization, the KD-SH99R offers variable color illumination, allowing users to match the display with their car's interior lighting. This customization is aesthetically pleasing and adds a personal touch to the stereo.

In terms of connectivity, the KD-SH99R is compatible with Bluetooth technology, enabling hands-free calling and wireless music streaming. This feature enhances the driving experience, allowing drivers to stay connected while keeping their focus on the road. The unit also includes AM/FM radio with RDS, providing access to a wide range of radio stations.

In conclusion, the JVC KD-SH99R is a feature-rich car stereo designed to enrich any driving experience. With its high power output, versatile media playback options, advanced sound technologies, and user-friendly design, it stands as an excellent choice for anyone looking to elevate their in-car audio system.