POWER SUPPLY | SPANNUNGSVERSORGUNG | |
|
|
|
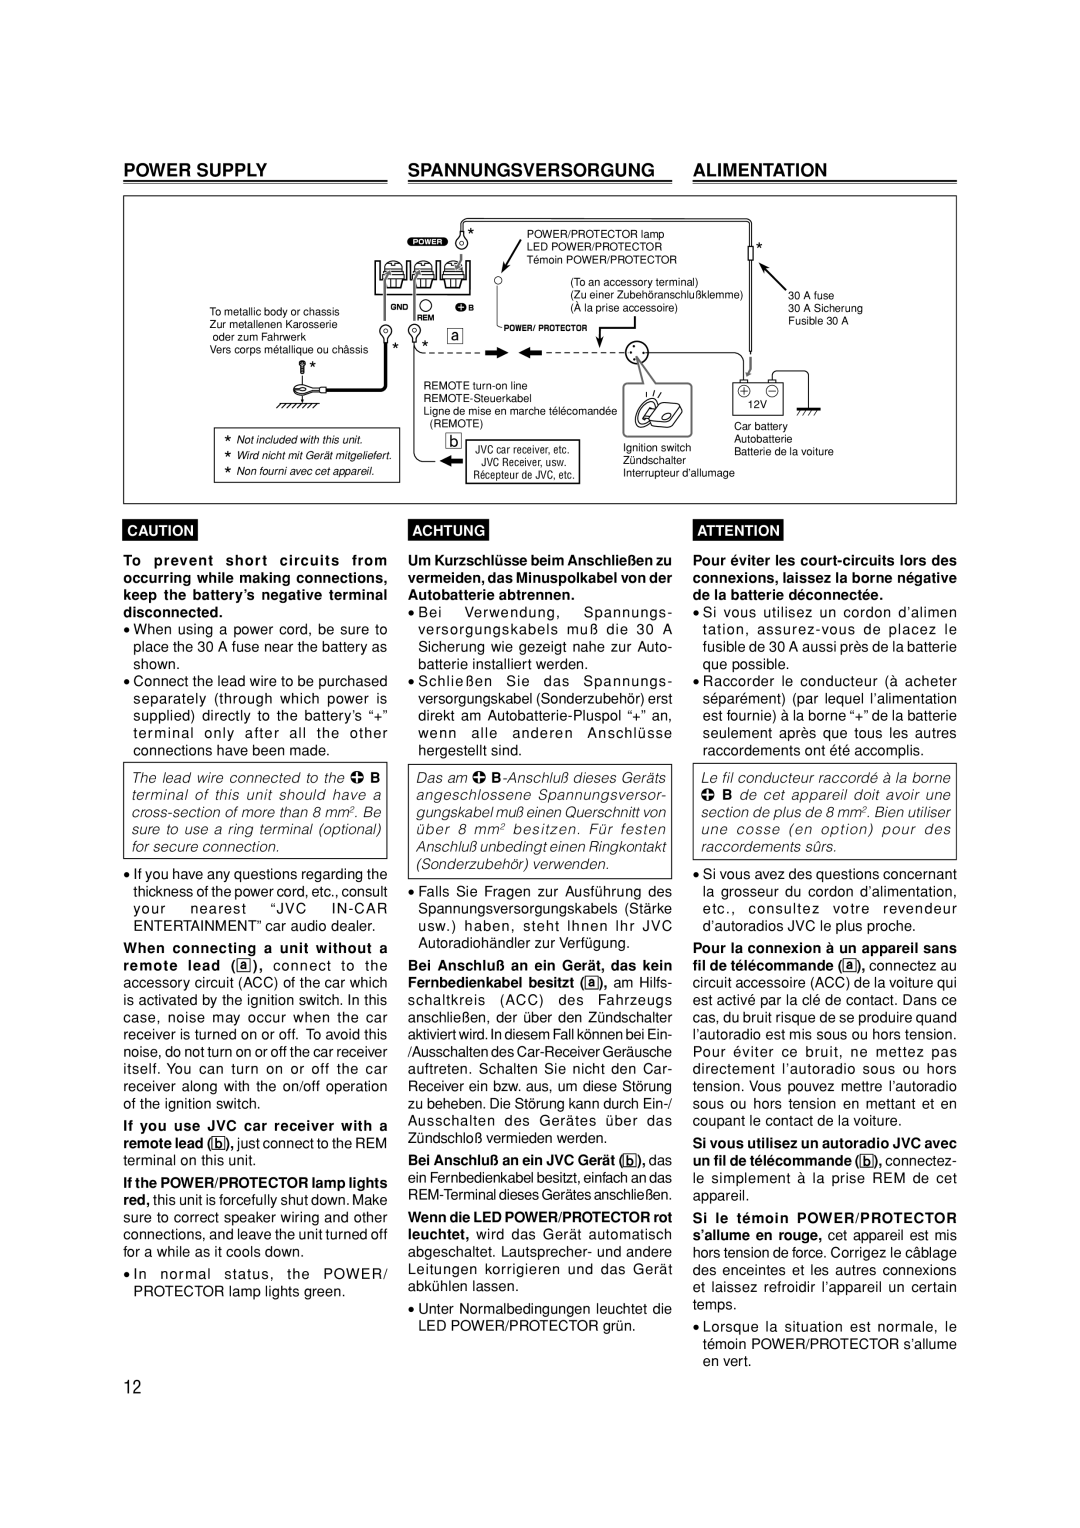
To metallic body or chassis Zur metallenen Karosserie oder zum Fahrwerk
Vers corps métallique ou châssis
![]() *
*
![]()
![]() *
*
* *
POWER/PROTECTOR lamp
LED POWER/PROTECTOR
Témoin POWER/PROTECTOR
(To an accessory terminal)
(Zu einer Zubehöranschlußklemme) (À la prise accessoire)
30 A fuse
30 A Sicherung Fusible 30 A
REMOTE
Ligne de mise en marche télécomandée
|
| (REMOTE) |
| |
* Not included with this unit. |
|
| Ignition switch | |
| JVC car receiver, etc. | |||
* Wird nicht mit Gerät mitgeliefert. |
| JVC Receiver, usw. | Zündschalter | |
* | Non fourni avec cet appareil. |
| Récepteur de JVC, etc. | Interrupteur d’allumage |
|
|
| ||
CAUTION |
| ACHTUNG |
| ATTENTION |
To prevent short circuits from occurring while making connections, keep the battery’s negative terminal disconnected.
•When using a power cord, be sure to place the 30 A fuse near the battery as shown.
•Connect the lead wire to be purchased separately (through which power is supplied) directly to the battery’s “+” ter minal only after all the other connections have been made.
The lead wire connected to the 9 B terminal of this unit should have a
•If you have any questions regarding the thickness of the power cord, etc., consult your nearest “JVC
When connecting a unit without a remote lead (.), connect to the accessory circuit (ACC) of the car which is activated by the ignition switch. In this case, noise may occur when the car receiver is turned on or off. To avoid this noise, do not turn on or off the car receiver itself. You can turn on or off the car receiver along with the on/off operation of the ignition switch.
If you use JVC car receiver with a remote lead (∫), just connect to the REM terminal on this unit.
If the POWER/PROTECTOR lamp lights red, this unit is forcefully shut down. Make sure to correct speaker wiring and other connections, and leave the unit turned off for a while as it cools down.
•In normal status, the POWER/ PROTECTOR lamp lights green.
Um Kurzschlüsse beim Anschließen zu vermeiden, das Minuspolkabel von der Autobatterie abtrennen.
•Bei Verwendung, Spannungs- versorgungskabels muß die 30 A Sicherung wie gezeigt nahe zur Auto- batterie installiert werden.
•Schließen Sie das Spannungs- versorgungskabel (Sonderzubehör) erst direkt am
Das am 9
über 8 mm2 besitzen. Für festen Anschluß unbedingt einen Ringkontakt (Sonderzubehör) verwenden.
•Falls Sie Fragen zur Ausführung des Spannungsversorgungskabels (Stärke usw.) haben, steht lhnen lhr JVC Autoradiohändler zur Verfügung.
Bei Anschluß an ein Gerät, das kein Fernbedienkabel besitzt (.), am Hilfs- schaltkreis (ACC) des Fahrzeugs anschließen, der über den Zündschalter aktiviert wird. In diesem Fall können bei
Bei Anschluß an ein JVC Gerät (∫), das ein Fernbedienkabel besitzt, einfach an das
Wenn die LED POWER/PROTECTOR rot leuchtet, wird das Gerät automatisch abgeschaltet. Lautsprecher- und andere Leitungen korrigieren und das Gerät abkühlen lassen.
•Unter Normalbedingungen leuchtet die LED POWER/PROTECTOR grün.
Pour éviter les
•Si vous utilisez un cordon d’alimen tation,
•Raccorder le conducteur (à acheter séparément) (par lequel l’alimentation est fournie) à la borne “+” de la batterie seulement après que tous les autres raccordements ont été accomplis.
Le fil conducteur raccordé à la borne
9B de cet appareil doit avoir une section de plus de 8 mm2. Bien utiliser une cosse (en option) pour des raccordements sûrs.
•Si vous avez des questions concernant la grosseur du cordon d’alimentation, etc., consultez votre revendeur d’autoradios JVC le plus proche.
Pour la connexion à un appareil sans fil de télécommande (.), connectez au circuit accessoire (ACC) de la voiture qui est activé par la clé de contact. Dans ce cas, du bruit risque de se produire quand l’autoradio est mis sous ou hors tension. Pour éviter ce bruit, ne mettez pas directement l’autoradio sous ou hors tension. Vous pouvez mettre l’autoradio sous ou hors tension en mettant et en coupant le contact de la voiture.
Si vous utilisez un autoradio JVC avec un fil de télécommande (∫), connectez- le simplement à la prise REM de cet appareil.
Si le témoin POWER/PROTECTOR s’allume en rouge, cet appareil est mis hors tension de force. Corrigez le câblage des enceintes et les autres connexions et laissez refroidir l’appareil un certain temps.
•Lorsque la situation est normale, le témoin POWER/PROTECTOR s’allume en vert.
12