ENGLISH
BAHASA INDONESIA
ELECTRICAL CONNECTIONS | PENYAMBUNGAN LISTRIK |
To prevent short circuits, we recommend that you disconnect the battery’s negative terminal and make all electrical connections before installing the unit. If you are not sure how to install this unit correctly, have it installed by a qualified technician.
Note:
This unit is designed to operate on 12 volts DC, NEGATIVE ground electrical systems. If your vehicle does not have this system, a voltage inverter is required, which can be purchased at JVC car audio dealers.
•Replace the fuse with one of the specified rating. If the fuse blows frequently, consult your JVC car audio dealer.
•If noise is a problem...
This unit incorporates a noise filter in the power circuit. However, with some vehicles, clicking or other unwanted noise may occur. If this happens, connect the unit’s rear ground terminal (See connection diagram below.) to the car’s chassis using shorter and thicker cords, such as copper braiding or gauge wire. If noise still persists, consult your JVC car audio dealer.
•Maximum input of the speakers should be more than 40 watts at the rear and 40 watts at the front, with an impedance of 4 to 8 ohms.
•Be sure to ground this unit to the car’s chassis.
•The heat sink becomes very hot after use. Be careful not to touch it when removing this unit.
Untuk mencegah korsleting, kami menyarankan agar Anda memutuskan hubungan terminal negatif baterai dan memasang semua sambungan listrik sebelum memasang unit. Jika Anda tidak yakin bagaimana memasang unit ini dengan benar, sebaiknya pemasangan dilakukan oleh teknisi yang memenuhi syarat.
Catatan:
Unit ini dirancang untuk beroperasi dengan daya 12 volts DC, sistem listrik arde NEGATIF. Jika mobil Anda tidak mempunyai sistem ini, maka Anda memerlukan inverter/pembalik voltase yang dapat Anda peroleh di dealer audio mobil JVC.
•Ganti sekering dengan sekering lain yang sesuai dengan syarat spesifikasi. Jika sekering sering putus, hubungi dealer audio mobil JVC Anda.
•Jika terdengar bunyi yang menggangu...
Unit ini mempunyai filter suara dalam sirkuit dayanya. Tetapi pada beberapa mobil, bunyi klik dan
•Input maksimum speaker sebaiknya tidak lebih dari 40 watt untuk speaker belakang dan 40 watt untuk speaker depan, dengan impedansi 4 sampai 8 ohm.
•Pastikan bahwa unit dihubungkan ke arde di casis mobil.
•Penyerap panas (heat sink) akan menjadi sangat panas sesudah unit digunakan.
Heat sink
Penyerap panas
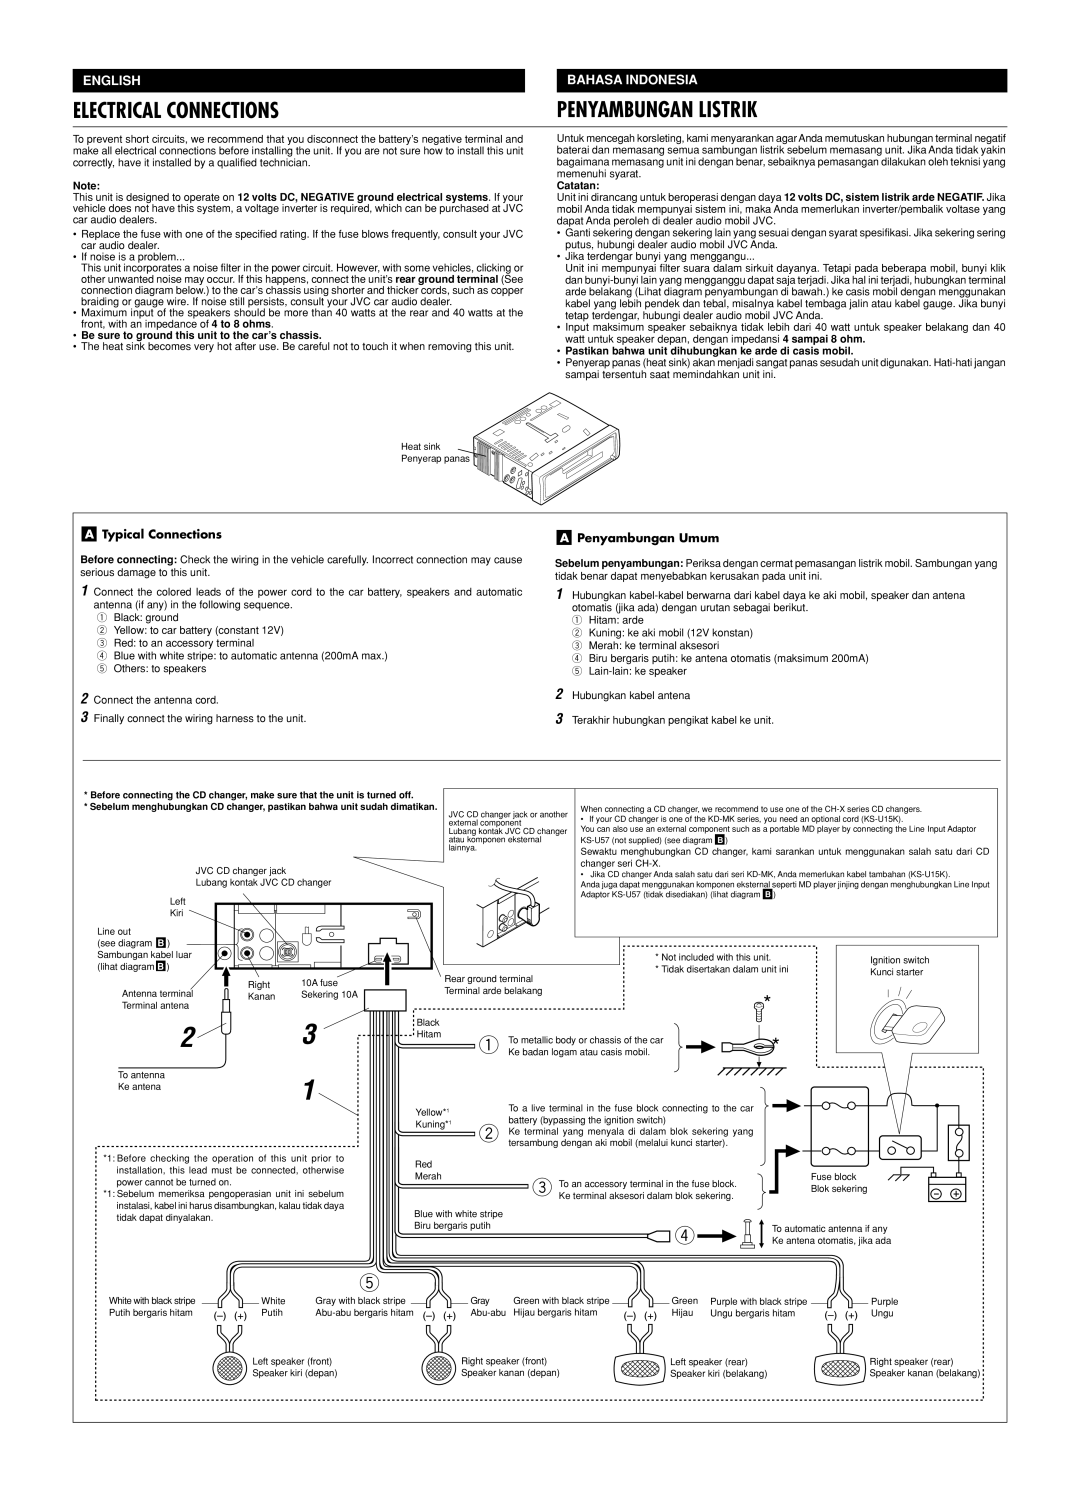
A | Typical Connections |
| Penyambungan Umum | |
A | ||||
|
Before connecting: Check the wiring in the vehicle carefully. Incorrect connection may cause serious damage to this unit.
1Connect the colored leads of the power cord to the car battery, speakers and automatic antenna (if any) in the following sequence.
1 Black: ground
2 Yellow: to car battery (constant 12V)
3 Red: to an accessory terminal
4 Blue with white stripe: to automatic antenna (200mA max.)
5 Others: to speakers
2Connect the antenna cord.
3Finally connect the wiring harness to the unit.
Sebelum penyambungan: Periksa dengan cermat pemasangan listrik mobil. Sambungan yang tidak benar dapat menyebabkan kerusakan pada unit ini.
1Hubungkan
1 Hitam: arde
2 Kuning: ke aki mobil (12V konstan)
3 Merah: ke terminal aksesori
4 Biru bergaris putih: ke antena otomatis (maksimum 200mA)
5
2Hubungkan kabel antena
3Terakhir hubungkan pengikat kabel ke unit.
* Before connecting the CD changer, make sure that the unit is turned off.
* Sebelum menghubungkan CD changer, pastikan bahwa unit sudah dimatikan.
JVC CD changer jack
Lubang kontak JVC CD changer
Left
JVC CD changer jack or another | When connecting a CD changer, we recommend to use one of the | ||||||
• If your CD changer is one of the | |||||||
external component | |||||||
You can also use an external component such as a portable MD player by connecting the Line Input Adaptor | |||||||
Lubang kontak JVC CD changer | |||||||
atau komponen eksternal | B | ) |
|
| |||
lainnya. | Sewaktu menghubungkan CD changer, kami sarankan untuk menggunakan salah satu dari CD | ||||||
|
| ||||||
|
| changer seri | |||||
|
| • Jika CD changer Anda salah satu dari seri | |||||
|
| Anda juga dapat menggunakan komponen eksternal seperti MD player jinjing dengan menghubungkan Line Input | |||||
|
| Adaptor | B | ) | |||
|
| ||||||
Kiri
Line out
(see diagram B ) Sambungan kabel luar (lihat diagram B )
Antenna terminal
Terminal antena
2
To antenna
Ke antena
Right | 10A fuse |
|
Kanan | Sekering 10A |
|
| 3 | Black |
| Hitam | |
|
|
1
* Not included with this unit. | Ignition switch | |
* Tidak disertakan dalam unit ini | ||
Kunci starter |
Rear ground terminal
Terminal arde belakang
![]() *
*
To metallic body or chassis of the car | * |
1 Ke badan logam atau casis mobil. |
Yellow*1
Kuning*1
To a live terminal in the fuse block connecting to the car battery (bypassing the ignition switch)
2Ke terminal yang menyala di dalam blok sekering yang tersambung dengan aki mobil (melalui kunci starter).
*1: Before checking the operation of this unit prior to installation, this lead must be connected, otherwise power cannot be turned on.
*1: Sebelum memeriksa pengoperasian unit ini sebelum instalasi, kabel ini harus disambungkan, kalau tidak daya tidak dapat dinyalakan.
Red
Merah
3 To an accessory terminal in the fuse block. Ke terminal aksesori dalam blok sekering.
Blue with white stripe
Biru bergaris putih
![]() 4
4![]()
![]()
![]()
![]()
Fuse block
Blok sekering
To automatic antenna if any
Ke antena otomatis, jika ada
5
White with black stripe | White | Gray with black stripe | Gray | Green with black stripe | Green | Purple with black stripe | Purple |
Putih bergaris hitam | Putih | Hijau bergaris hitam | Hijau | Ungu bergaris hitam | Ungu | ||
| Left speaker (front) | Right speaker (front) | Left speaker (rear) | Right speaker (rear) | |||
| Speaker kiri (depan) | Speaker kanan (depan) | Speaker kiri (belakang) | Speaker kanan (belakang) | |||