Appendix

How to Replace the Lamp

Please read these instructions fully before attempting to replace the lamp. If you feel unsure about replacing the lamp yourself, call a service technician. Please observe all safety warnings.

1) Turn off the television.

Press the POWER button on the remote control or TV front panel. Wait until the picture has closed and the LAMP LED on the front panel has stopped blinking indicating the lamp cool down is complete.

Warning: The cool-down process cools the lamp from its operating temperature. This does not mean that the lamp will now be cool enough to handle safely. We strongly recommend you wait at least one hour before proceeding.

2) Unplug the television.

Disconnect the power cord from the AC outlet. Make sure that the LAMP LED light has stopped blinking before you unplug the set. Never attempt to replace the lamp with the television plugged in.

3) Remove the lamp cover.

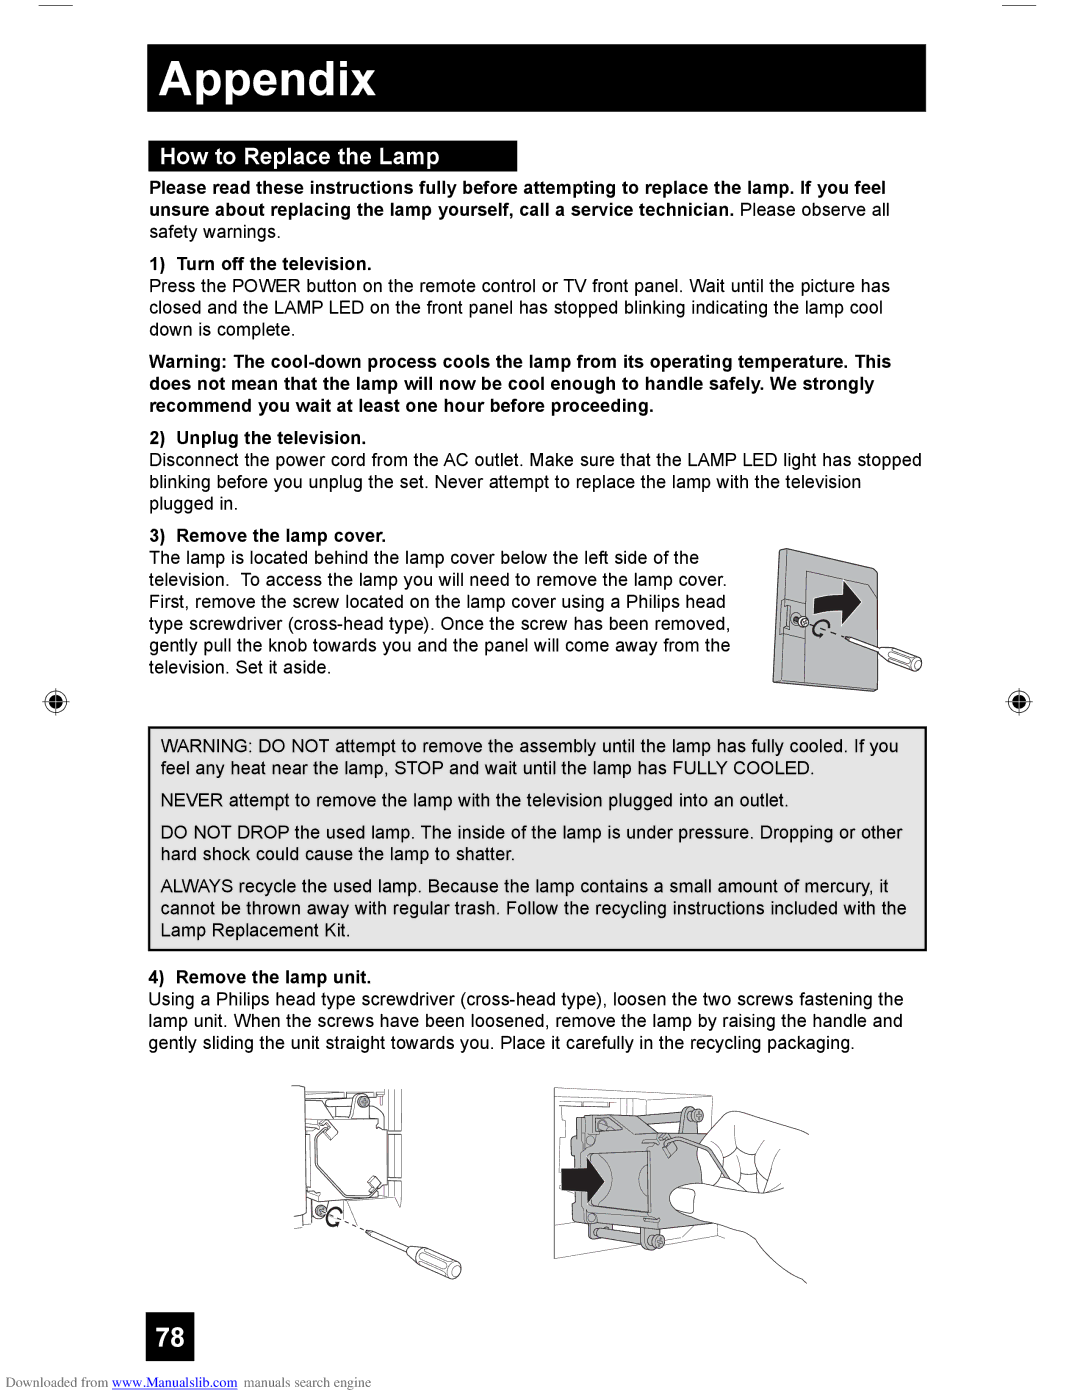
The lamp is located behind the lamp cover below the left side of the television. To access the lamp you will need to remove the lamp cover. First, remove the screw located on the lamp cover using a Philips head type screwdriver (cross-head type). Once the screw has been removed, gently pull the knob towards you and the panel will come away from the television. Set it aside.

WARNING: DO NOT attempt to remove the assembly until the lamp has fully cooled. If you feel any heat near the lamp, STOP and wait until the lamp has FULLY COOLED.

NEVER attempt to remove the lamp with the television plugged into an outlet.

DO NOT DROP the used lamp. The inside of the lamp is under pressure. Dropping or other hard shock could cause the lamp to shatter.

ALWAYS recycle the used lamp. Because the lamp contains a small amount of mercury, it cannot be thrown away with regular trash. Follow the recycling instructions included with the Lamp Replacement Kit.

4) Remove the lamp unit.

Using a Philips head type screwdriver (cross-head type), loosen the two screws fastening the lamp unit. When the screws have been loosened, remove the lamp by raising the handle and gently sliding the unit straight towards you. Place it carefully in the recycling packaging.

78

Downloaded from www.Manualslib.com manuals search engine

Page 78
Image 78
JVC HD-55G466, LCT1928-001A-A How to Replace the Lamp, Unplug the television, Remove the lamp cover, Remove the lamp unit

HD-55G456, HD-55G466, LCT1928-001A-A, HD-61Z456 specifications

JVC HD-61Z456 is a high-definition rear projection television that showcases the blend of cutting-edge technology and user-friendly features. With a 61-inch screen size, this model is built on JVC's D-ILA technology, providing vibrant colors and deep blacks, which enhance the overall viewing experience. One of the standout features of the HD-61Z456 is its 1080p resolution, which delivers stunning clarity and detail, making it an excellent choice for watching movies, sports, and gaming.

Another significant feature of the JVC HD-61Z456 is its advanced image processing capabilities, which minimize motion blur and offer smooth video playback. This technology ensures that fast-paced scenes maintain their sharpness and clarity, providing an immersive experience for viewers. Additionally, the TV comes with multiple HDMI inputs, allowing users to connect various devices such as Blu-ray players, gaming consoles, and sound systems effortlessly.

LCT1928-001A-A is a versatile model that reflects JVC's commitment to delivering quality products. This model is particularly known for its sleek design, which not only saves space but also complements modern home décor. The LCT1928-001A-A utilizes LCD technology, which offers impressive brightness levels and energy efficiency. Built to provide consistent performance, this model features a refresh rate that enhances motion clarity and reduces blurring during dynamic scenes.

The HD-55G466 and HD-55G456 are both part of JVC's line of 55-inch LED televisions, both designed to cater to slightly different user preferences while maintaining core features. The HD-55G466 boasts superior smart functionality, offering direct access to popular streaming services, integrated Wi-Fi, and an intuitive user interface that simplifies navigation.

In contrast, the HD-55G456 focuses more on picture quality, leveraging advanced backlighting technology to enhance color accuracy and contrast ratios. Both models are equipped with multiple connectivity options, ensuring users can connect gaming consoles, set-top boxes, and other peripherals without fuss.

Overall, each of these JVC models showcases a commitment to quality, innovation, and user experience, making them viable choices for anyone looking to upgrade their home entertainment setup.