RECORDING

ÖDuring recording, the ALC (Automatic Level Control) circuit automatically optimizes the recording level, so manual recording level adjustment is unnecessary.

ÖCheck that the safety tab on the cassette tape is not broken off.

Note:

This unit has recording characteristics suitable for normal and CrO2 tapes. Normal and CrO2 tapes have different characteristics from metal tapes.

Synchronized recording with the CD player

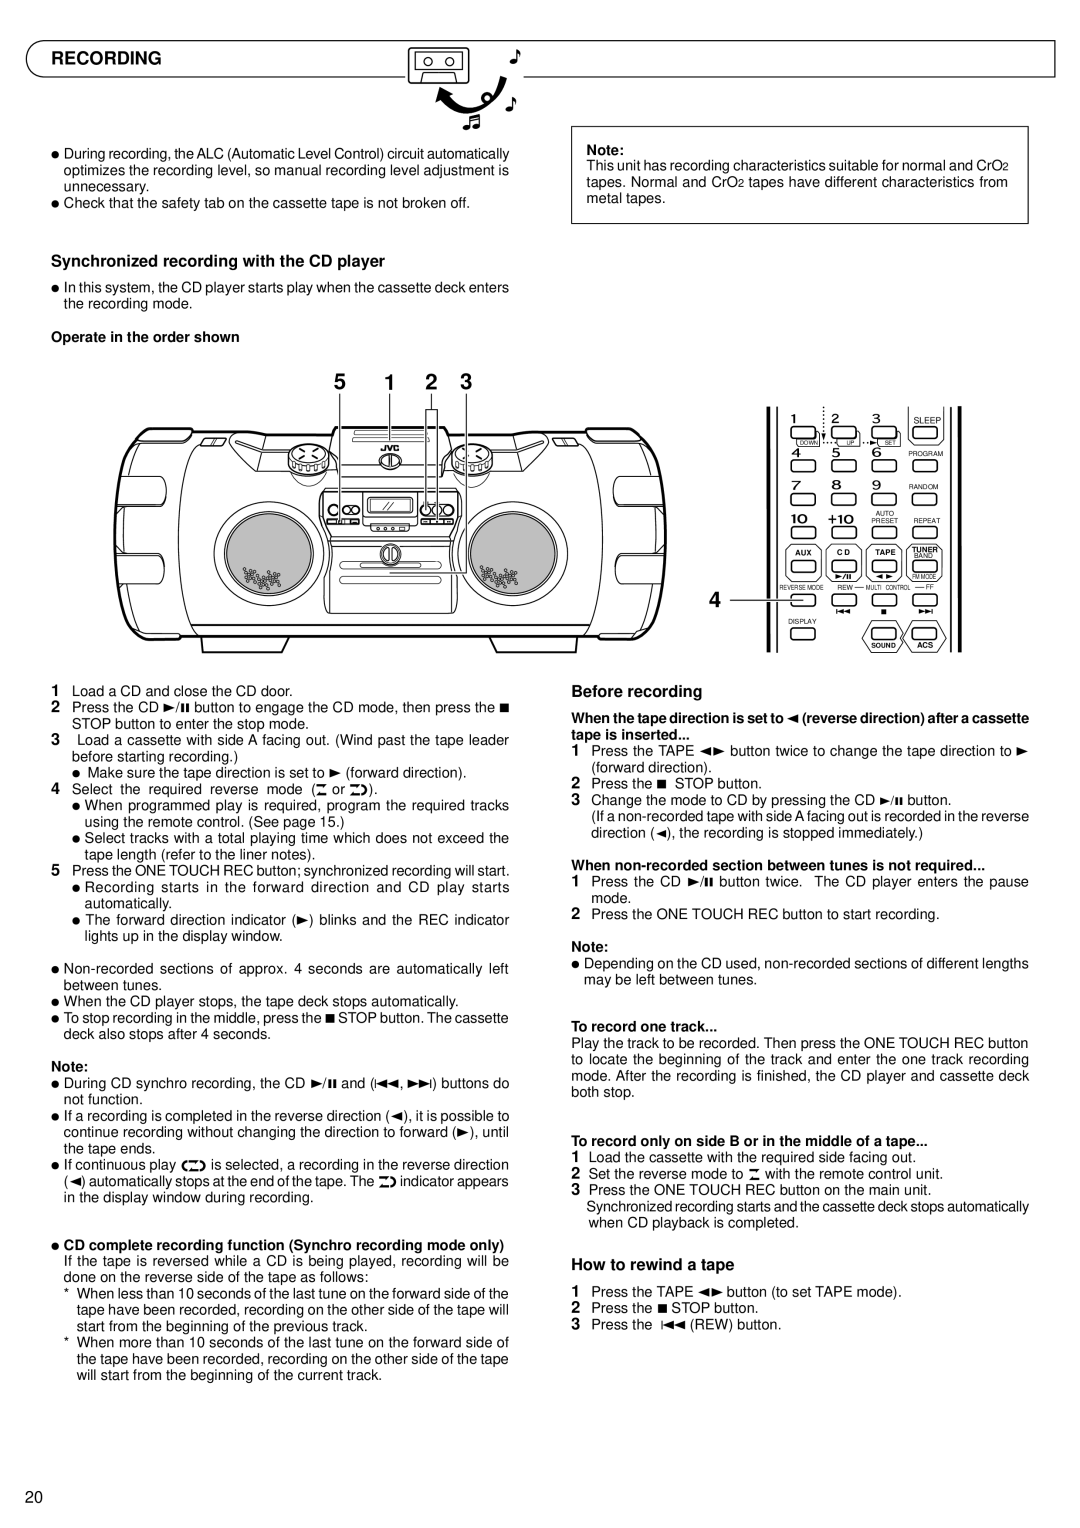
ÖIn this system, the CD player starts play when the cassette deck enters the recording mode.

Operate in the order shown

5

1

2

3

1Load a CD and close the CD door.

2Press the CD 3/8 button to engage the CD mode, then press the 7 STOP button to enter the stop mode.

3Load a cassette with side A facing out. (Wind past the tape leader before starting recording.)

ÖMake sure the tape direction is set to 3 (forward direction).

4Select the required reverse mode ( or ).

ÖWhen programmed play is required, program the required tracks using the remote control. (See page 15.)

ÖSelect tracks with a total playing time which does not exceed the tape length (refer to the liner notes).

5Press the ONE TOUCH REC button; synchronized recording will start.

ÖRecording starts in the forward direction and CD play starts automatically.

ÖThe forward direction indicator (3) blinks and the REC indicator lights up in the display window.

ÖNon-recorded sections of approx. 4 seconds are automatically left between tunes.

ÖWhen the CD player stops, the tape deck stops automatically.

ÖTo stop recording in the middle, press the 7STOP button. The cassette deck also stops after 4 seconds.

Note:

ÖDuring CD synchro recording, the CD 3/8 and (4, ¢) buttons do not function.

ÖIf a recording is completed in the reverse direction (2), it is possible to continue recording without changing the direction to forward (3), until the tape ends.

ÖIf continuous play is selected, a recording in the reverse direction (2) automatically stops at the end of the tape. The indicator appears in the display window during recording.

ÖCD complete recording function (Synchro recording mode only) If the tape is reversed while a CD is being played, recording will be done on the reverse side of the tape as follows:

*When less than 10 seconds of the last tune on the forward side of the tape have been recorded, recording on the other side of the tape will start from the beginning of the previous track.

*When more than 10 seconds of the last tune on the forward side of the tape have been recorded, recording on the other side of the tape will start from the beginning of the current track.


SLEEP

DOWN

UP

SET


PROGRAM


RANDOM


AUTO

REPEAT


PRESET

AUX

C D

TAPE

TUNER

BAND


FM MODE

REVERSE MODE

REW

MULTI CONTROL

FF

4


DISPLAY


SOUND

ACS

Before recording

When the tape direction is set to 2(reverse direction) after a cassette

tape is inserted...

1Press the TAPE 23 button twice to change the tape direction to 3 (forward direction).

2Press the 7 STOP button.

3Change the mode to CD by pressing the CD 3/8 button.

(If a non-recorded tape with side A facing out is recorded in the reverse direction (2), the recording is stopped immediately.)

When non-recorded section between tunes is not required...

1Press the CD 3/8 button twice. The CD player enters the pause mode.

2Press the ONE TOUCH REC button to start recording.

Note:

ÖDepending on the CD used, non-recorded sections of different lengths may be left between tunes.

To record one track...

Play the track to be recorded. Then press the ONE TOUCH REC button to locate the beginning of the track and enter the one track recording mode. After the recording is finished, the CD player and cassette deck both stop.

To record only on side B or in the middle of a tape...

1Load the cassette with the required side facing out.

2Set the reverse mode to with the remote control unit.

3Press the ONE TOUCH REC button on the main unit.

Synchronized recording starts and the cassette deck stops automatically when CD playback is completed.

How to rewind a tape

1Press the TAPE 23button (to set TAPE mode).

2Press the 7 STOP button.

3Press the 4 (REW) button.

20

Page 20
Image 20
JVC RV-B99 BK/BU manual Recording, Synchronized recording with the CD player, Before recording, How to rewind a tape

RV-B99 BK/BU specifications

The JVC RV-B99 BK/BU is a remarkable portable audio solution that appeals to music enthusiasts seeking versatility and quality sound. This device combines cutting-edge technology with practical features, making it a great choice for various listening environments, whether at home, outdoors, or on the go.

One of the standout features of the RV-B99 BK/BU is its advanced CD player. This allows users to enjoy their favorite CDs with exceptional sound clarity. The device also supports MP3 playback, providing flexibility for those who prefer digital music files over traditional discs. Users can simply load their MP3 CDs and enjoy hours of continuous music without interruption.

In addition to CD and MP3 capabilities, the RV-B99 includes a built-in FM/AM radio tuner. This feature enables users to easily tune in to their favorite radio stations, expanding their listening options. With its telescopic antenna, the radio provides enhanced reception for clear sound quality, even in areas with weaker signals.

Another notable characteristic of this portable audio device is its Bluetooth functionality. This technology allows for seamless wireless streaming from smartphones, tablets, or any compatible device, enabling users to play their music without the need for cables. The Bluetooth range is impressive, ensuring that users can enjoy their favorite tracks from a distance.

The JVC RV-B99 BK/BU is not just about sound quality; it also boasts a powerful amplifier which ensures strong and dynamic audio output. The system is designed to deliver a rich sound experience, whether playing soft melodies or high-energy tunes. The built-in speakers are engineered for clarity, providing a well-balanced audio profile that is sure to satisfy discerning listeners.

Additionally, the device features multiple connectivity options, including a USB port for easy playback of digital files and an audio input jack for connecting external devices. This versatility makes it an ideal companion for parties, picnics, and other social gatherings.

In terms of usability, the RV-B99 is designed with user-friendly controls, making it easy for anyone to operate. Its compact and lightweight design allows for easy transport, while its sturdy build ensures durability and resistance to wear and tear.

In conclusion, the JVC RV-B99 BK/BU is a versatile and feature-rich portable audio system that delivers exceptional sound quality and functionality. Its combination of a CD player, FM/AM radio tuner, Bluetooth connectivity, and powerful amplification makes it a must-have for audio enthusiasts looking to enjoy their favorite music wherever they go. Whether for personal use or social gatherings, this device is a reliable choice that meets various auditory needs.