TH-A25
Important for Laser Products
Table of Contents
Front Panel
Parts Identification
Center Unit
Display
Remote Control
Remote Control
Getting Started
Before Installation Putting Batteries in the Remote Control
Checking the Supplied Accessories
Replace the cover
FM antenna connection
Connecting the FM and AM Antennas
AM antenna connection
Speaker Layout Diagram
Getting Started
Connecting speaker cords to the center unit
Connecting the Speakers
Connecting speaker cords to the speakers
When setting the speakers
Turn the power off to all components before connections
Connecting Audio/Video Component
TV connection
Audio component connection
VCR
Press DVD
TV Settings
Changing the Scanning Mode
Press and hold Progressive for a
Control TV
Operating TV
TV/VIDEO
Basic Disc Operations
Turn On the Power
From the remote control Press DVD
Load a Disc
To activate Dolby Digital or DTS Digital Surround
Start Playback
To turn off the sounds temporarily
DVD
To stop playback for a moment
To turn off the power into standby
To stop playback
To remove the disc
Select the Band
Basic Tuner Operations
Tune into a Station
Other Basic Operations
Turning Off the Power with the Timer
Adjusting the Display Brightness
Enjoying Sounds from the External Component
Creating Realistic Sound Fields
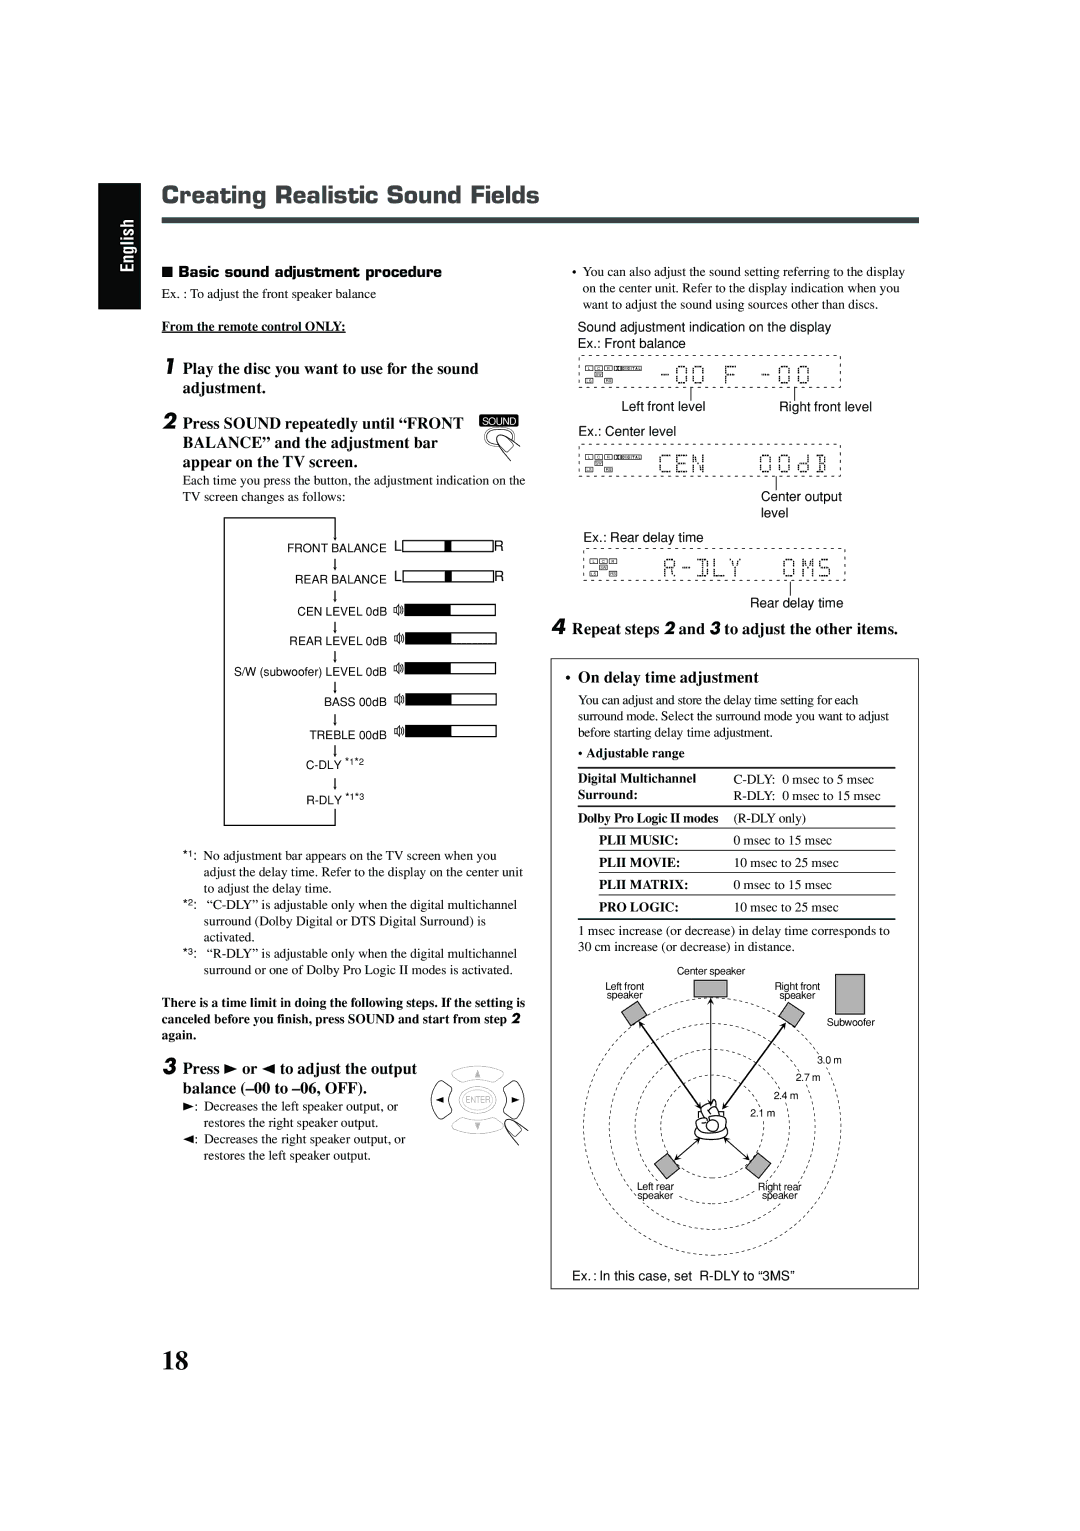
Using the Test Tone
Adjusting the Sound
Press PL II repeatedly to activate all Speakers
Press 3 or 2 to adjust the output balance -00 to -06, OFF
Balance and the adjustment bar Appear on the TV screen
Basic sound adjustment procedure
Dolby Digital
Surround Mode Introduction
Dolby Digital and DTS Digital Surround
DTS Digital Surround
To activate Digital Multichannel Surround
Activating the Surround Mode
Available surround according to the input signal format
To activate Dolby Pro Logic II modes
Disc Introduction-DVD/VCD/SVCD/CD
Discs you can play
Showing the On-Screen Bar
Using the On-Screen Bar
Disc Playback
Enter
Press 5/∞ repeatedly to select Desired option
Press on Screen
Press 3 / 2 repeatedly to select
Press Enter
Press 5/∞ repeatedly to select the desired language
Selecting the Audio Languages
Press 3/2 repeatedly to select
Selecting the Subtitles
Selecting the Multi-Angle Views
Selecting the Playback Channel
For DVD
Press Menu or TOP Menu
Disc Menu-Driven Playback
Enter
Press the number buttons to
Moving to a Particular Portion Directly
Press 3/2 to select one of the icons below
Track, or playing time, then Press Enter
Press 5/∞ repeatedly to select
Repeating Playback
Mode
Point
Press Step repeatedly to advance the picture frame by frame
Special Picture Playback
Press Step once during playback
Press Zoom
MP3/JPEG Introduction
Insert a disc
MP3/JPEG Playback
Starting Playback
Showing the On-Screen Bar
To start playback of the selected file
Operations Using the On-Screen Display
On-screen display
Press 3/2/5/∞ to select the file, then press
Press Menu
Selecting a Particular File/Folder Directly
Browsing Pictures in the Current Folder
Press 3/2/5/∞ to select Desired picture, then press
Tuning in Stations
Tuner Operations
Press ¢or 4to select a preset number
Using Preset Tuning
Selecting the FM Reception Mode
Setting the System Preferences
Setting Up the DVD Preferences
CHOICE/TIME
Press 2 and repeat steps 3 to 6 to set up other items
Press ∞ or 5 to select highlight General SETUP, then press
Press 5/∞ to select the desired setting Press Enter
Press CHOICE/TIME
Press ∞ or 5 to select highlight
Setting the Preferences
Basic procedure to set up preferences
PREFERENCES, then press
To select Change then press Enter
Press 5/∞ to select the desired setting
PWD box to verify the password
Box
Language Code List
To release the parental lock temporarily
General Notes
Maintenance
Cleaning the unit
Handling Discs
Solution
Troubleshooting
Problem
Possible Cause
Specifications
Limited Warranty
Authorized Service Centers
TH-A25 DVD Digital Theater System
Consists of XV-THA25 and SP-THA25
Mises en garde, précautions et indications diverses
For Canada/pour Le Canada
Important Pour LES Produits Laser
English
English
Remote Control
Getting Started
AM Loop antenna supplied
Getting Started
Connecting the Speakers
Connecting Audio/Video Component
VCR
English
Operating TV
Basic Disc Operations
Start Playback
Playback stops
Basic Tuner Operations
Other Basic Operations
Enter
Sound adjustment indication on the display
DTS and DTS Digital Surround are registered trademarks
Analog Linear PCM Dolby Digital Multichannel
Disc Introduction-DVD/VCD/SVCD/CD
English
English
Disc Playback
Checking the Remaining Time
Disc Menu-Driven Playback
Moving to a Particular Portion Directly
Repeating Playback
Special Picture Playback
This system is incorporated with an MP3 decoder and Jpeg
MP3/JPEG Playback
MP3/JPEG Playback
English
Tuner Operations
Press ¢ or 4 to select a preset number
Setting Up the DVD Preferences
DRC gets dark and the adjustment tab becomes adjustable
Main Italian Others
Press 5/∞ to select the desired setting
Enter CHOICE/TIME
Maintenance
Troubleshooting
Specifications
EN, FR 0903TMMMDWSAM Victor Company of JAPAN, Limited