SECTION3STEP BY STE P G UIDES TO INSTALL
D. CONNECT VALVE AND SALT TANK DRAINS
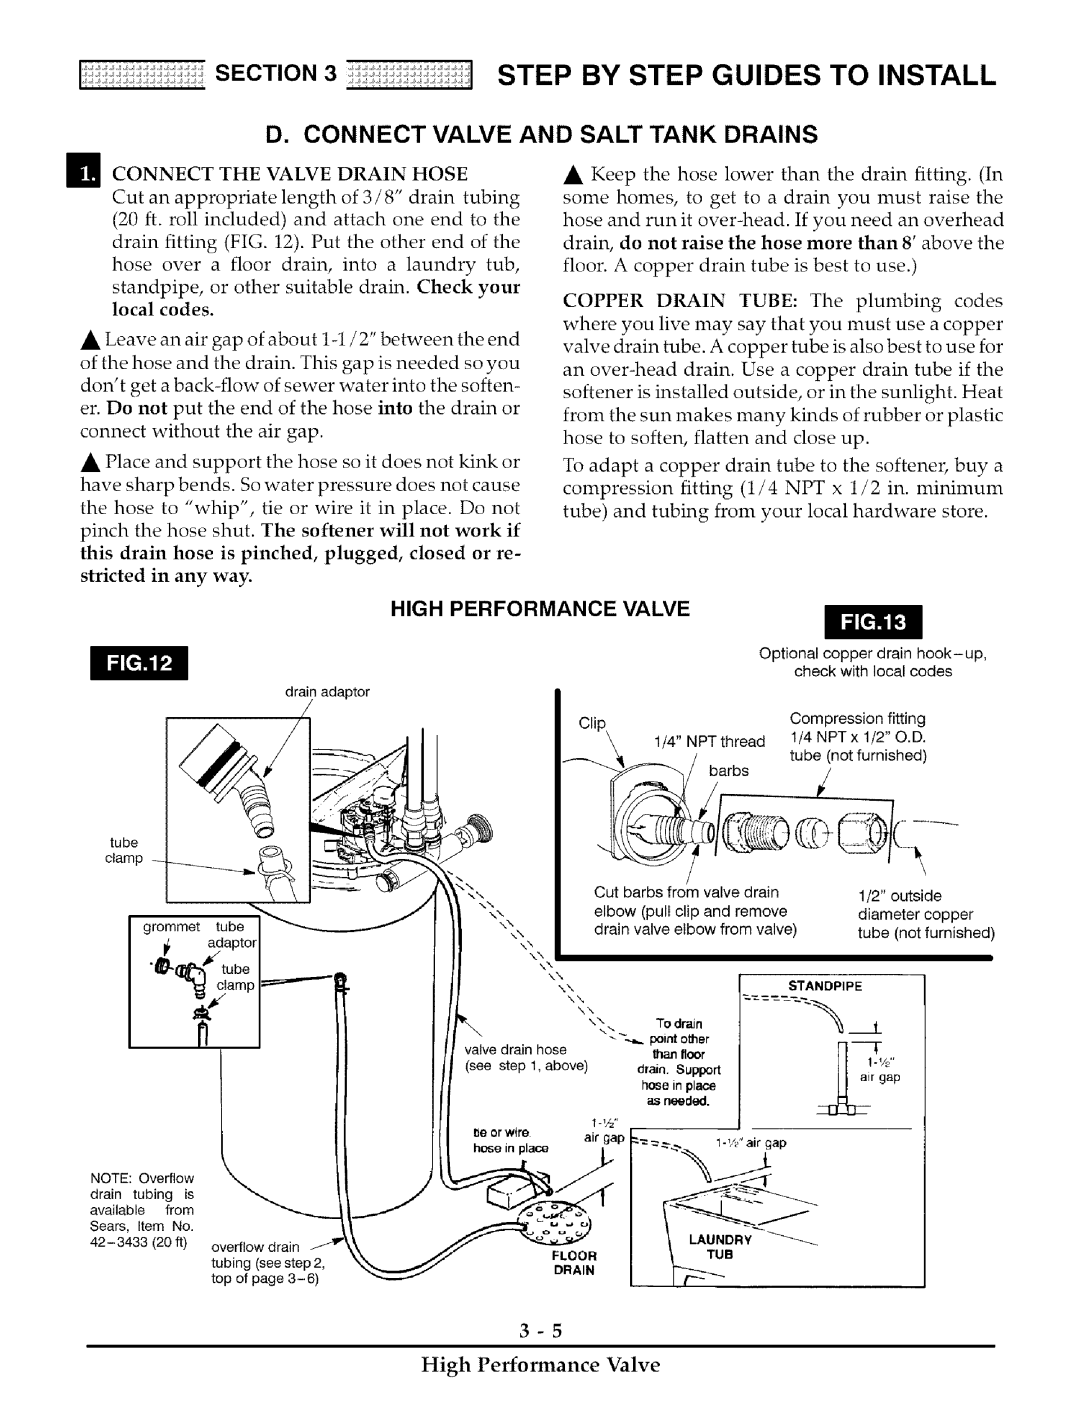
_1_ CONNECT THE VALVE DRAIN HOSE
Cut an appropriate length of 3/8" drain tubing
(20 ft. roll included) and attach one end to the drain fitting (FIG. 12). Put the other end of the
hose over a floor drain, into a laundry tub,
standpipe, or other suitable drain. Check your local codes.
•Leave an air gap of about
of the hose and the drain. This gap is needed so you
don't get a
connect without the air gap.
•Place and support the hose so it does not kink or
have sharp bends. So water pressure does not cause
the hose to "whip", tie or wire it in place. Do not
pinch the hose shut. The softener will not work if
this drain hose is pinched, plugged, closed or re- stricted in any way.
•Keep the hose lower than the drain fitting. (In
some homes, to get to a drain you must raise the
hose and run it
COPPER DRAIN TUBE: The plumbing codes where you live may say that you must use a copper valve drain tube. A copper tube is also best to use for
an
To adapt a copper drain tube to the softener, buy a
compression fitting (1/4 NPT x 1/2 in. minimum
tube) and tubing from your local hardware store.
drain adaptor
tube |
|
clamp | ,_ |
NOTE: Overflow drain tubing is
HIGH PERFORMANCE VALVE
Optional copper drain
Compression fitting
1/4" NPT thread 1/4 NPT x 1/2" O.D. tube (not furnished)
barbs
|
|
| Cut barbs from valve drain | 1/2" outside | |
\\ |
|
|
|
| |
|
| elbow | (pull clip and remove | diameter copper | |
\\ | ,,.x |
| |||
|
| drain | valve elbow from valve) | tube (not furnished) | |
| |||||
| NN |
|
|
| |
|
| \N |
|
|
|
|
| NX |
|
| |
|
|
| K\ | STANDPIPE |
|
|
|
| \\ |
| |
|
|
| \\ |
|
|
|
|
| NX | To drain |
|
|
|
| \\ |
| |
|
|
| _ | point other |
|
valve | drain | hose | flaanfleer |
| |
(see | step | 1, above) | drain. Support |
| |
|
|
|
| hose in place |
|
|
|
|
| as needed. | r gap |
|
|
| t _1/_,, |
|
|
l_e or wire |
| air gap |
| ||
hose in place | l |
| |||
|
| ||||
available from Sears, Item No.
overflow drain
tubing (see step 2, top of page
ILAUNDRY
DRAIN
