5.Select the desired OPTIONS. Not all Options are available with all cycles. See "Options."
6.Select the desired MODIFIERS. Not all Modifiers are available with all Cycles and Options. See "Modifiers."
7.If desired, select the CYCLE SIGNAL. The signal is helpful when you are washing items that should be removed from the washer as soon as it stops. Press CYCLE SIGNAL once to turn it on. The indicator light will illuminate. Press again to turn it off.
8.To begin the wash cycle immediately
Select and hold START (for approximately 1 second).
•If you do not select START within 5 minutes of choosing a cycle, the washer automatically shuts off.
•When the wash cycle is complete, the CLOTHES CLEAN status light illuminates, the door unlocks, and the wash load can be removed from the washer. The washer powers down automatically 5 minutes after the cycle is complete and the CLOTHES CLEAN light goes off. To power down the washer manually after the wash cycle is complete, select STOP once.
9.To begin the wash cycle later
Select DELAY START until the desired delay time (in hours) shows in the Estimated Time Remaining display. Select START. The countdown to the wash cycle will show in the display window.
IMPORTANT: When delaying a cycle, use only powdered detergents in the main wash compartment since liquid detergents may seep out of the compartment during Delay, before the wash cycle begins.
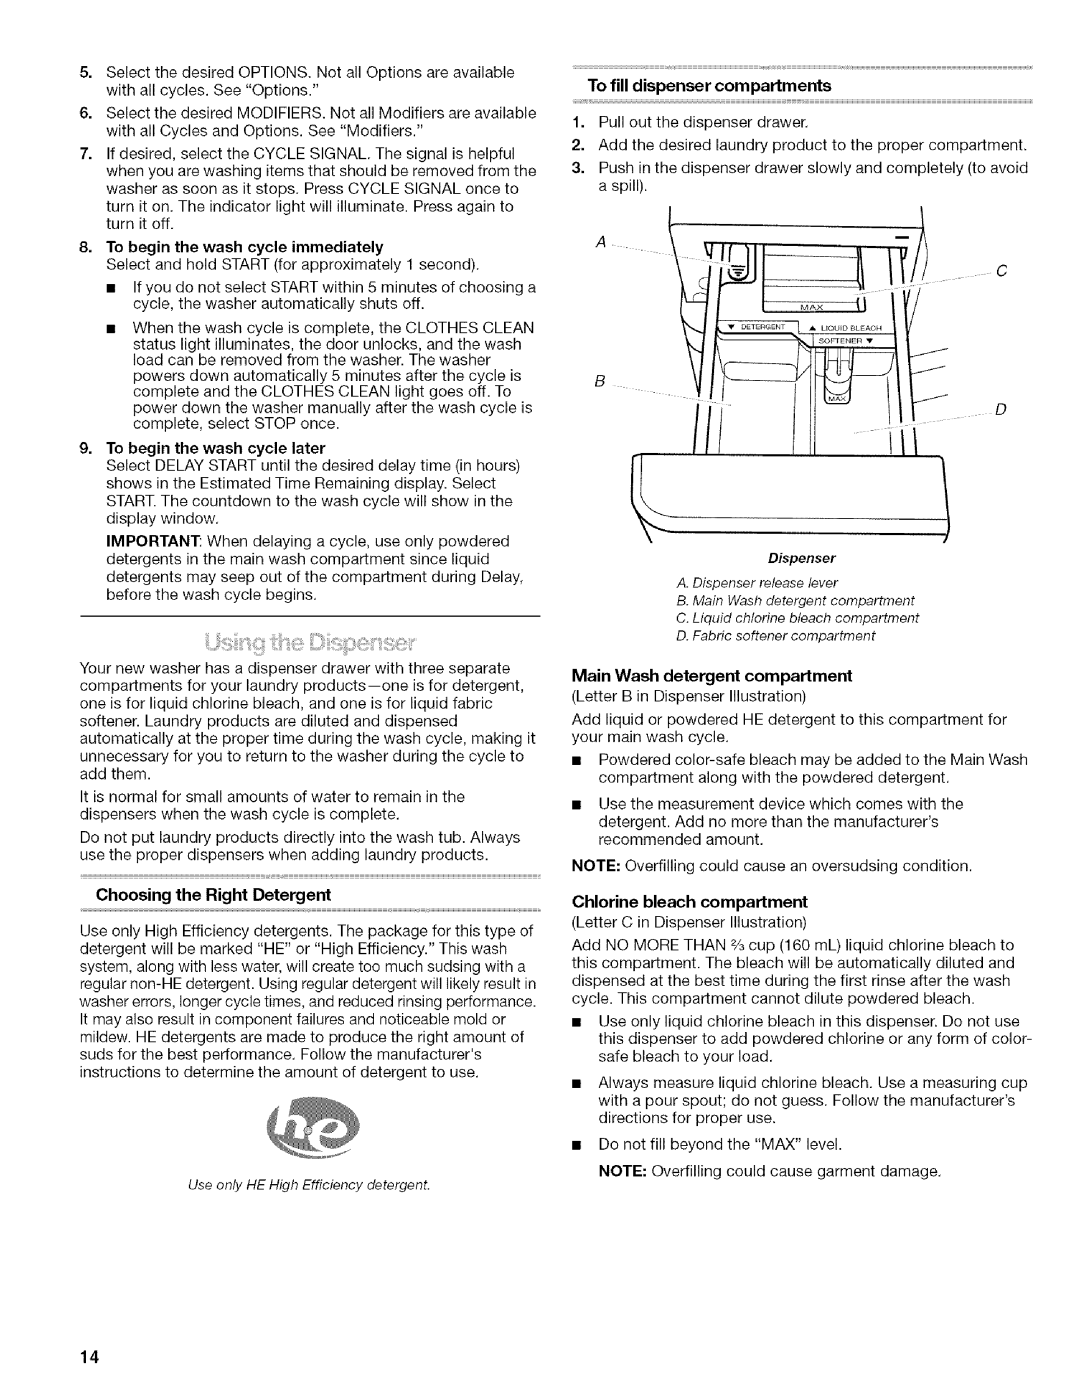
Your new washer has a dispenser drawer with three separate compartments for your laundry
It is normal for small amounts of water to remain in the dispensers when the wash cycle is complete.
Do not put laundry products directly into the wash tub. Always use the proper dispensers when adding laundry products.
Choosing the Right Detergent
Use only High Efficiency detergents. The package for this type of detergent will be marked "HE" or "High Efficiency." This wash system, along with less water, will create too much sudsing with a regular
Use only HE High Efficiency detergent.
To fill dispenser compartments
1.Pull out the dispenser drawer.
2.Add the desired laundry product to the proper compartment.
3.Push in the dispenser drawer slowly and completely (to avoid a spill).
A
L_QUFD BLEACH lSOFTENER •
D
Dispenser
A. Dispenser release lever
B. Main Wash detergent compartment
C. Liquid chlorine bleach compartment
D. Fabric softener compartment
Main Wash detergent compartment
(Letter B in Dispenser Illustration)
Add liquid or powdered HE detergent to this compartment for your main wash cycle.
•Powdered
•Use the measurement device which comes with the
detergent. Add no more than the manufacturer's recommended amount.
NOTE: Overfilling could cause an oversudsing condition.
Chlorine bleach compartment (Letter C in Dispenser Illustration)
Add NO MORE THAN ¾ cup (160 mL) liquid chlorine bleach to this compartment. The bleach will be automatically diluted and dispensed at the best time during the first rinse after the wash cycle. This compartment cannot dilute powdered bleach.
•Use only liquid chlorine bleach in this dispenser. Do not use this dispenser to add powdered chlorine or any form of color- safe bleach to your load.
•Always measure liquid chlorine bleach. Use a measuring cup with a pour spout; do not guess. Follow the manufacturer's directions for proper use.
•Do not fill beyond the "MAX" level.
NOTE: Overfilling could cause garment damage.
14
