Compartiments
USA
We Service What We Sell
ARecognize this symbol as a safety alert indicator
Full One Year Warranty on Refrigerator
Full Five Year Warranty on Sealed Refrigeration System
Recognize Safety Symbols, Words, Labels
About Safety Instructions
Ten Year Parts Warranty on Compressor
What You Need to Know
ElectricalRequirements MaintenanceAgreement Warranbj
Drawers FreezerFeatures
HowtoCleanYourUnit
Service
Installing Your Refrigerator
How to Transport Your Unit
How to Select the Best Location
How to Remove and install Panels
In,oscrewhales bottom rill
Installing Your Refrigerator
How to Remove the Doors and Hinges
Installing Your Refrigerator
How to Install and Remove Handles
How to Level Your Refrigerator
Ffa
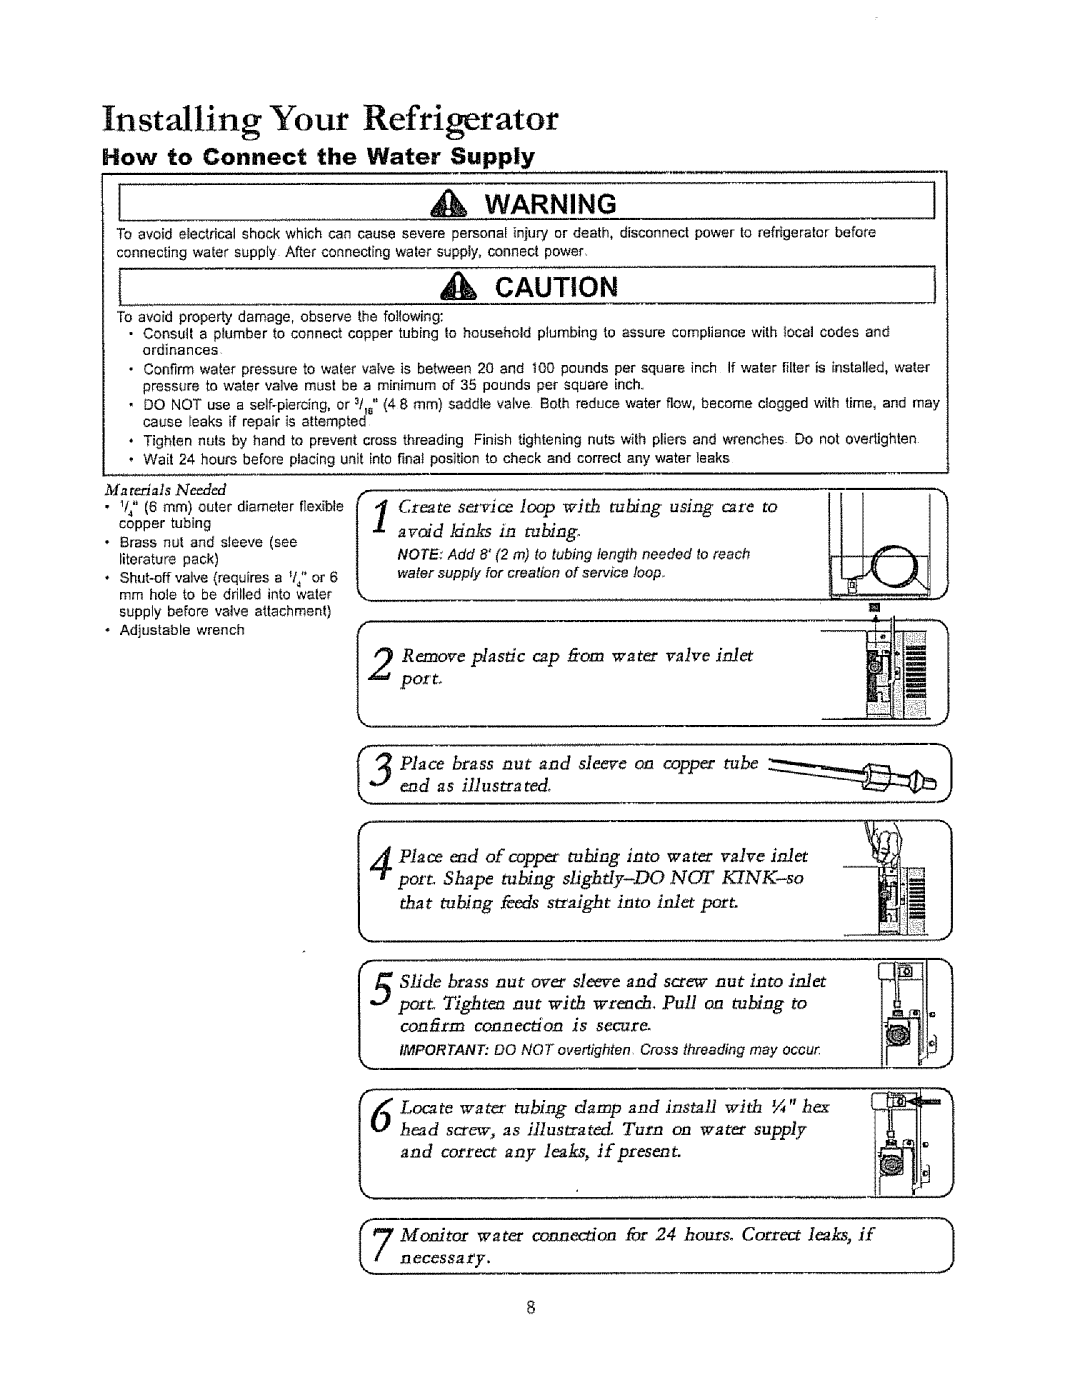
How to Connect the Water Supply
Installing Your
How Adjust Temperature Controls
Water Filter Removal and Installation
When do I change the water filter?
About Your Filtration System
How do I order a
Refrigerator Features
Door Storage ,oatiaued
Door Storage
Shelves
Humidity-Controlled Crisper
Temperature.Controlled Meat Drawer
Rawe rs
Freezer Features
Primary Features
Dispenser Features
Dispenser Light ,ot sZ,o
Dispenser Pad
Removable Tray
Five-Button Centre! Features
Filter Status indicator Light
Sabbath Mode
Auto Light
Light Function
Electronic Control Features
Temperature Keystemperatures
Display OnlOff
Electronic Control Features o.e, ue
Max Freeze
Hidden Electronic Control Features
Temperature Conversion Mode
Auto Display
Hidden Lockout for Upper Keypad
How to Clean Your Unit
Care
Hints
How do Remove
How to Remove and Replace Light Bulbs
Hints and Care
Most Out Your Energy Dollar
Freezer Section
Clicking
Whirring
Gurgling or boiling
Sound
Troubleshooting
Food temperature
Loud Temperature Controlled meat drawer
Refrigerator runs too frequently
Ago
Troubleshooting
PERATIONcontnued
Ice bln is not installed property
Water appears cloudy
Performance Data
Specifications
Water Filter Data
Safety.Oodefor Thefd Icing Healt h laomtm Inanta
Trade-narldModel Dionion
Manufacturer .PezrXmLcor#omted Thewater
Ical Q3ntami Nants Cys OrGanic
Page
Mantenemos Io que vendemos
Reconozca este simbolo como precauciSn de seguridad
Instrucclones Para Conexi6n-Este
Linea
Reconozca los simbolos, las palabras y las etiquetas de
Lo que necesita saber acerca De las instrucciones de
La puerta
Control
Instalad6n, del refrigerador
Cbmo transportar la unidad
Cbmo seleccionar la ubicacibn ideal
Cbmo quitar e instalar los paneles En algunos modeos
Instalad6n dd refrigerador
Cbmo quitar las puertas y las bisagras
C6mo volver a colocar las puertas
Como instalar y quitar las asas
Del Refrigerador
Dehopla=
Cbmo instalar y quitar las asaso,,i,,,,.d6
Cbmo nivear el refrigerador
Instalaci6n Del refrlgerado
Como conectar el suministro de agua
Aite la Taloa De plstico deI puerto de
Extremo de la m/xa de cobre se ilus
Instalad6n del refrlgerador
Como ajustar los controles de temperatura
Sistema de filtrad6n
Remocion e instalaci6n de! filtro de agua
DCuindo Debo Cambiar Filtro?
Agua pare enjuagar el Sistema. En d6nde est El agua?
Caracteristicas de la secci6n
Del refrigerador
Almacenaje Puerta
Almacenaje en ia puerta0
Organizador Para Bebidas
Caracteristicas de la secci6n del refrigerador
Cajones
Caracteristicas del congelador
Primarias Caracteristicas
Repisa
Almacenamiento en la puerta
Caracterisdcas del surtidor
Funcionamiento Del surtidor de Agu a
Caracteristicas principales Del surtidoro semua
Aimohadilla de surtido
Caracteristicas del surtidor
Acteristicas Del surtidor
Caracteristicas IElectronico Del Control
Traba del surtidor
Del dispensador
Caracteristicas del surtidor
Caracteristicas Electr6nico Del Controlcon,,d
Max Cool Mximo Frio
Display On/Off Visualizacibn Active/Inactive
Caracteristicas Ocultadas Electr6nico Dei Control
Consejos y cuidado
Cbmo limpiar la unidad
C6mo puedo e!iminar El real olor de mil Refrigerador?
Puertas y exterior tnxtudzados
Consejos Cuidado
Cbmo Quitar Reempazar Los Feces
Puedo
Conservar Energia
Diagn6stico De averias
Diagn6stico de averias
Cajones
Eatn cercanos
Preptetario
Dlagnostlco de averlas
Confinuad6n
La temperatura del congelader estfi may alta
Lnstalaci6n o ala eonexidn de agua incorrectas
El ague del surtidor no estfi
En el tanque de almacenamIento se enfris
Datos de Rendimiento
Datos del filtro de agua
Especificaciones
DispositNo de tratamiento de aEua Ceti ficado Ndmer o
Daklnaci de modlo ¢mtode rm plaz
Page
Ce symbole signate une mesure de scurt
Contrat Dentretien
Nous r parons ce que nous vendons
Garantie de dix ans des pices du compresseur
Des matibres
Les
Consignes de scurit
Tmportantes consignes de securite
Installation du r6frig4rateur
Sdlection du meilleur emplacement
Install ?
Transport de Pappareil
Installation du rfrig rateur
Retrait des portes et des charnieres
Des portes
Ddmontage et pose des poignees
Installation du rfifrig rateur
Demontage et pose des poign6es o
Mise de niveau du r6frig6rateur
MngeTmret Foi Mso 1Dggger h gamimredutut deh
Installation du rfifrigfirateur
Raccordement a Ialimentation en eau
Reglage des thermostats
Comment vfidfie-t
On la terntxramre &ij Laide des Thermostats ?
Quelles pour -oir t
Propos du syst me de filtration
Ddmontage et pose du filtre a eau
Du rfiffig rateur
Caract ristiques
An,g,em,ents de ia,,porte
Rangements de la porte
Caract&istiques du r frig rateur
Tiroirs
Canettes
Tiroir a viandes froides/ldgumes
Carac t ristiques du cong lateur
Primaires Dispositifs
Rangement de la porte
Cllayettes
Caract ristiques
Lumiere du distributeur o,tJz
Touche du distributeur
Plateau amovible
Caractfiristiques du distributeur
Contr61ez les dispositifs des cinq boutons
Dispositifs Electronique De Commande
Dispositifs lectronique De Commande conu
IAlarm Off Arrt dalarme
Max Cool Maximum Frais
Max Freeze Maximum Gel
Dispositifs Caches IElectronique De Commande
Caract ristiques Du distributeur
Affichage De Capteur
Cache Pour suprieur Bloc Touches
Et entretien
Comment Nettoyer Lappareil
Comment supprimer
Une odeur dens Le rfrigrateur?
Conseits et entretien
Pannage
Sates
Etc
Obstrue peuFtrele tiroir
Vritier ta temperaturedu congelateur
Ddpannage
Suite
Le rfdgrateur se met en
Dpannage
Un tuyauen plasiiquea 6to, utitiso, pour raccorder feau
La pressiondeauest trop faible
Le do,bitdeauest plus lent
Donn es Sur le filtre 5. eau
Fiche Technique
Donndes De rendernent
Ieau contenant des spores
I5ala sodff, or 21 sarambm
@ignation de mod61/d la marqudecommerce Elantsderchang
Fabricant N
Rva*ad
No matter who made It, no matter who sold ltJ
E- FO YE R 888,-SU-HOGAW
Call anytime, day or night U S A. and Canada
Call anytime, dayor night U S a only