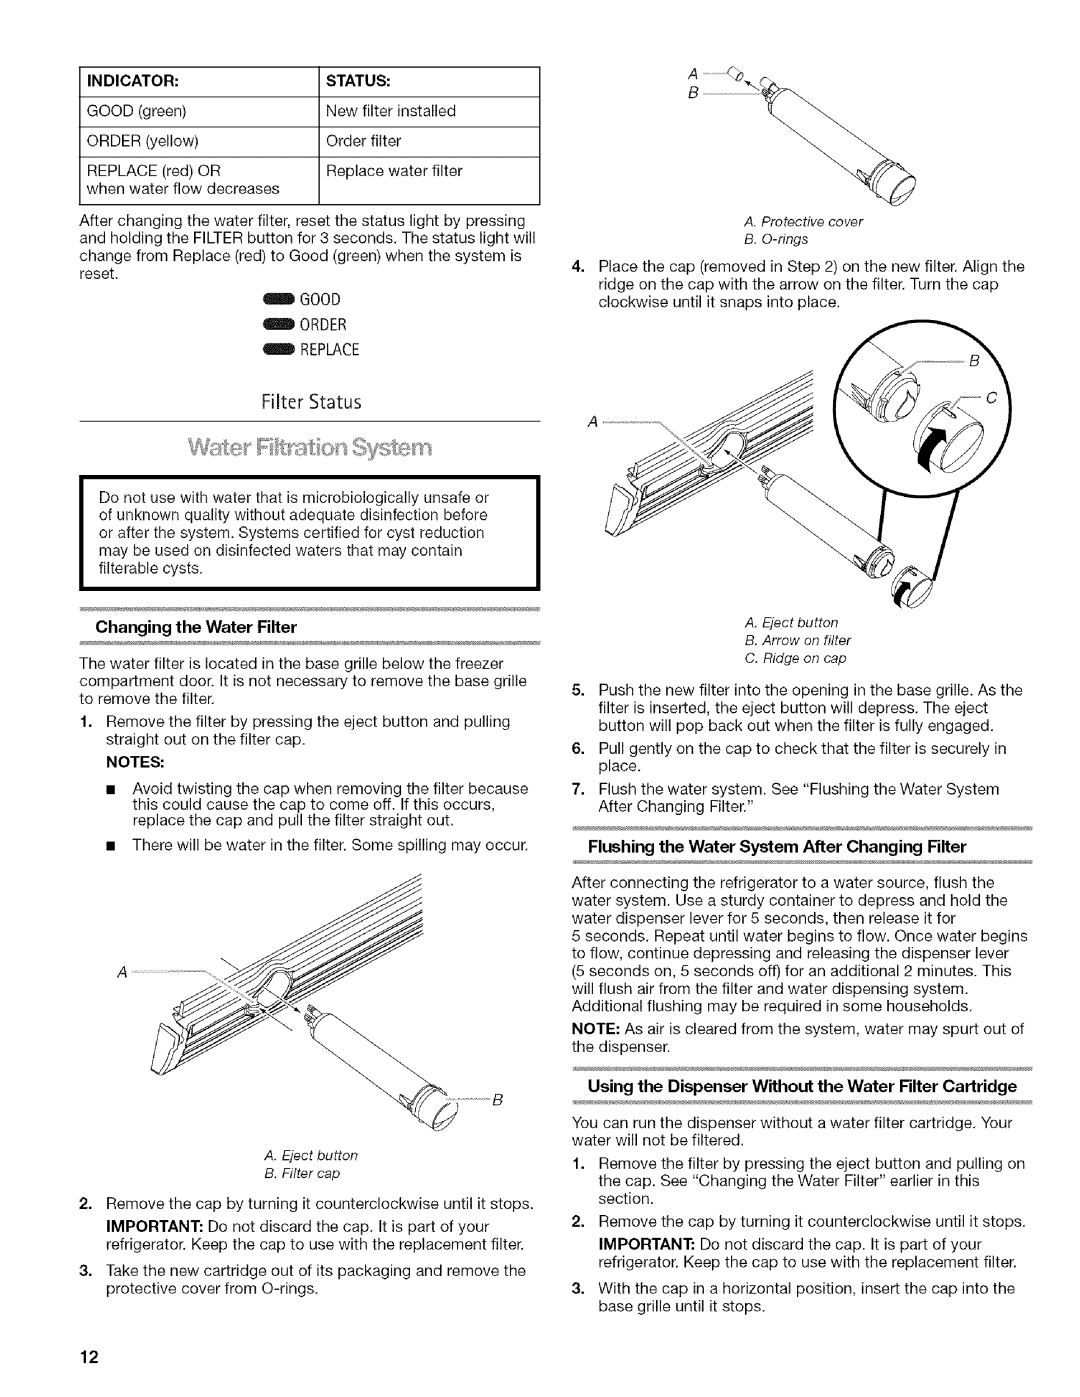
INDICATOR:

STATUS:

A


GOOD (green)

New filter installed


ORDER (yellow)

Order filter


REPLACE (red) OR

Replace water filter


when water

flow

decreases


After changing the

water filter, reset the status

light by pressing

A. Protective cover

and holding

the FILTER button for 3 seconds.

The status light will

B. O-rings

change from Replace (red) to Good (green) when the system is

Place the cap (removed in Step 2) on the new filter. Align the

reset.


4.


ridge on the cap with the arrow on the filter. Turn the cap


GOOD


clockwise until it snaps into place.

ORDER

REPLACE

Filter Status

Sy

Do not use with water that is microbiologically unsafe or of unknown quality without adequate disinfection before or after the system. Systems certified for cyst reduction may be used on disinfected waters that may contain filterable cysts.

Changing the Water Filter

The water filter is located in the base grille below the freezer compartment door. It is not necessary to remove the base grille to remove the filter.

1.Remove the filter by pressing the eject button and pulling straight out on the filter cap.

NOTES:

Avoid twisting the cap when removing the filter because this could cause the cap to come off. If this occurs, replace the cap and pull the filter straight out.

There will be water in the filter. Some spilling may occur.

A

......... B

A. Eject button

B. Filter cap

2= Remove the cap by turning it counterclockwise until it stops.

IMPORTANT: Do not discard the cap. It is part of your refrigerator. Keep the cap to use with the replacement filter.

3= Take the new cartridge out of its packaging and remove the

protective cover from O-rings.

A.Eject button

B.Arrow on filter

C.Ridge on cap

5.Push the new filter into the opening in the base grille. As the filter is inserted, the eject button will depress. The eject button will pop back out when the filter is fully engaged.

6.Pull gently on the cap to check that the filter is securely in place.

7.Flush the water system. See "Flushing the Water System After Changing Filter."

Flushing the Water System After Changing Filter

After connecting the refrigerator to a water source, flush the water system. Use a sturdy container to depress and hold the water dispenser lever for 5 seconds, then release it for

5 seconds. Repeat until water begins to flow. Once water begins to flow, continue depressing and releasing the dispenser lever (5 seconds on, 5 seconds off) for an additional 2 minutes. This will flush air from the filter and water dispensing system. Additional flushing may be required in some households.

NOTE: As air is cleared from the system, water may spurt out of the dispenser.

Using the Dispenser Without the Water Filter Cartridge

You can run the dispenser without a water filter cartridge. Your water will not be filtered.

1.Remove the filter by pressing the eject button and pulling on the cap. See "Changing the Water Filter" earlier in this section.

2.Remove the cap by turning it counterclockwise until it stops.

IMPORTANT: Do not discard the cap. It is part of your refrigerator. Keep the cap to use with the replacement filter.

3.With the cap in a horizontal position, insert the cap into the base grille until it stops.

12

Page 12
Image 12
Kenmore WIOI67097A manual Changing the Water Filter, Using the Dispenser Without the Water Filter Cartridge, Indicator

WIOI67097A specifications

The Kenmore WIOI67097A is a top-of-the-line built-in wall oven designed to enhance cooking efficiency while providing modern elegance to kitchens. Produced by Kenmore, a renowned name in home appliances, this oven features a sleek design that seamlessly integrates with contemporary kitchen aesthetics.

One of the standout features of the WIOI67097A is its advanced convection cooking technology. This innovation circulates hot air evenly throughout the oven, ensuring consistent baking results and reducing cooking times. Whether baking cookies, roasting a chicken, or preparing a multi-course meal, home cooks can expect uniform results, eliminating cold spots that can often occur in traditional ovens.

Additionally, the oven is equipped with a smart control panel featuring a digital display. This user-friendly interface allows for easy navigation through various cooking settings, temperature adjustments, and a timer function. The panel also offers pre-programmed cooking settings for specific dishes, simplifying the cooking process for users of all skill levels.

Another notable characteristic of the WIOI67097A is its spacious interior. With multiple rack positions, it offers flexibility when cooking large meals, allowing users to arrange dishes according to their individual needs. The oven's ability to accommodate multiple trays at once means that family gatherings or dinner parties can be handled with ease.

In terms of safety, Kenmore has incorporated several features into the WIOI67097A. The oven includes a self-cleaning function that simplifies maintenance and ensures that the interior remains hygienic without the need for harsh chemicals. Additionally, it comes with a cooling fan feature that prevents the exterior from becoming too hot, reducing the risk of burns and improving safety during use.

Energy efficiency is another strong attribute of the WIOI67097A. Designed with modern energy standards in mind, it minimizes power consumption while providing powerful heating capabilities. This makes it an eco-friendly option for environmentally conscious consumers.

In summary, the Kenmore WIOI67097A combines modern technology and design to deliver a superior cooking experience. With features like convection cooking, a smart control panel, and a spacious interior, it meets the demands of today’s busy kitchens while prioritizing safety and energy efficiency. Whether you're a novice or an experienced chef, this wall oven is poised to elevate your culinary endeavors.