Align the Doors

IMPORTANT: First level the back of the refrigerator as described in "Door Closing."

The doors may be uneven after leveling the refrigerator. See Graphic 9 in "Refrigerator Doors." The doors are preset at the factory so that the refrigerator door is higher than the freezer door by approximately the thickness of a quarter. Once the doors are loaded with food, they should be even. If the door height needs to be adjusted after the doors have been loaded with food, follow these steps.

1.Use a hex-head wrench to adjust the front roller leveling screws until the doors are even. Turn the front roller leveling screw to the right to raise that side of the refrigerator or turn the leveling screw to the left to lower that side. See Graphic 10 in "Refrigerator Doors."

NOTE: Open and close both the refrigerator and freezer doors after each adjustment to check the door alignment.

2.Open the doors and replace the base grille. Line up the grille support tabs with the metal clips. Push the grille firmly to snap it into place.

NOTE: Be sure to refasten the Tech Sheet behind the base grille.

Read all directions before you begin.

IMPORTANT: If you turn the refrigerator on before the water line is connected, turn the ice maker OFF

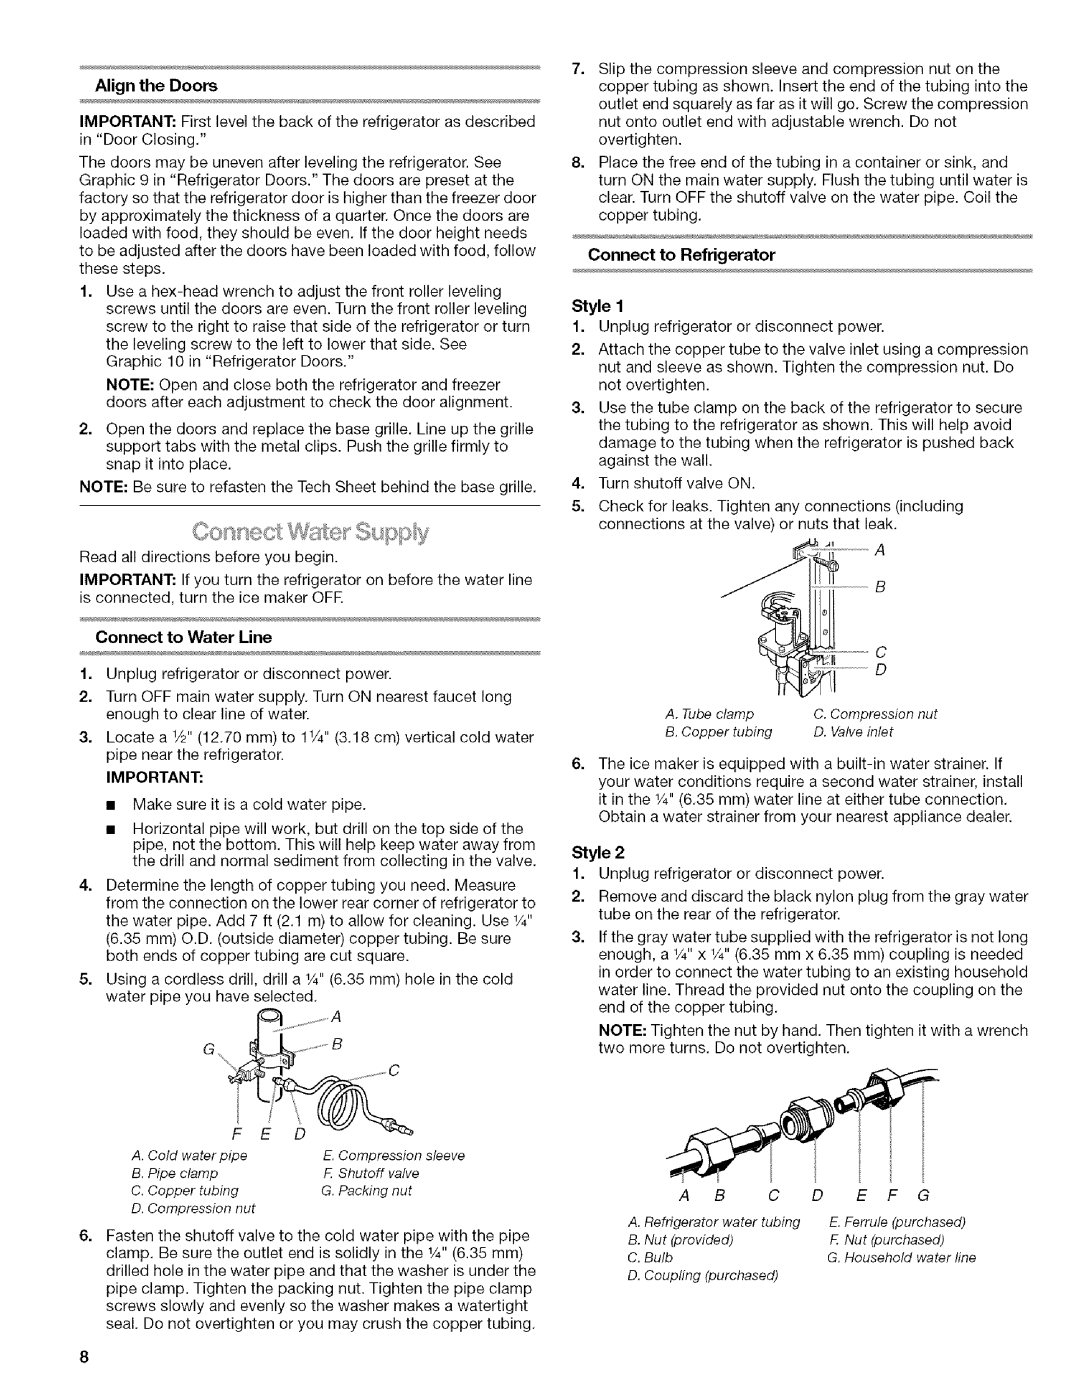
7.Slip the compression sleeve and compression nut on the copper tubing as shown. Insert the end of the tubing into the outlet end squarely as far as it will go. Screw the compression nut onto outlet end with adjustable wrench. Do not overtighten.

8.Place the free end of the tubing in a container or sink, and turn ON the main water supply. Flush the tubing until water is clear. Turn OFF the shutoff valve on the water pipe. Coil the copper tubing.

Connect to Refrigerator

Style 1

1.Unplug refrigerator or disconnect power.

2.Attach the copper tube to the valve inlet using a compression nut and sleeve as shown. Tighten the compression nut. Do not overtighten.

3.Use the tube clamp on the back of the refrigerator to secure the tubing to the refrigerator as shown. This will help avoid damage to the tubing when the refrigerator is pushed back against the wall.

4.Turn shutoff valve ON.

5.Check for leaks. Tighten any connections (including connections at the valve) or nuts that leak.

A

Connect to Water Line

1.Unplug refrigerator or disconnect power.

2.Turn OFF main water supply. Turn ON nearest faucet long enough to clear line of water.

3.Locate a 1/2" (12.70 mm) to 11/4''(3.18 cm) vertical cold water pipe near the refrigerator.

IMPORTANT:

Make sure it is a cold water pipe.

Horizontal pipe will work, but drill on the top side of the pipe, not the bottom. This will help keep water away from the drill and normal sediment from collecting in the valve.

4.Determine the length of copper tubing you need. Measure from the connection on the lower rear corner of refrigerator to the water pipe. Add 7 ft (2.1 m) to allow for cleaning. Use 1/4" (6.35 mm) O.D. (outside diameter) copper tubing. Be sure both ends of copper tubing are cut square.

5.Using a cordless drill, drill a 1/4"(6.35 mm) hole in the cold water pipe you have selected.

A. Tube clamp

C. Compression nut

B. Copper tubing

D. Valve inlet

6, The ice maker is equipped with a built-in water strainer. If your water conditions require a second water strainer, install it in the 1/4"(6.35 mm) water line at either tube connection. Obtain a water strainer from your nearest appliance dealer.

Style 2

1.Unplug refrigerator or disconnect power.

2.Remove and discard the black nylon plug from the gray water tube on the rear of the refrigerator.

3.If the gray water tube supplied with the refrigerator is not long enough, a 1/4"x 1/4"(6.35 mm x 6.35 mm) coupling is needed in order to connect the water tubing to an existing household water line. Thread the provided nut onto the coupling on the end of the copper tubing.

NOTE: Tighten the nut by hand. Then tighten it with a wrench two more turns. Do not overtighten.


F

E

D


A. Cold

water pipe


E. Compression sleeve

B. Pipe

clamp


E Shutoff

valve

C. Copper tubing


G. Packing

nut

D. Compression nut


6, Fasten the shutoff valve to the cold water pipe with the pipe clamp. Be sure the outlet end is solidly in the 1/4"(6.35 mm) drilled hole in the water pipe and that the washer is under the pipe clamp. Tighten the packing nut. Tighten the pipe clamp screws slowly and evenly so the washer makes a watertight seal. Do not overtighten or you may crush the copper tubing.

A

B

C

D

E

F

G

A. Refrigerator

water

tubing


E. Ferrule

(purchased)

B. Nut (provided)


F. Nut (purchased)

C. Bulb


G. Household

water line

D. Coupling (purchased)


Page 8
Image 8
Kenmore WIOI67097A manual Align the Doors, Connect to Water Line, Connect to Refrigerator

WIOI67097A specifications

The Kenmore WIOI67097A is a top-of-the-line built-in wall oven designed to enhance cooking efficiency while providing modern elegance to kitchens. Produced by Kenmore, a renowned name in home appliances, this oven features a sleek design that seamlessly integrates with contemporary kitchen aesthetics.

One of the standout features of the WIOI67097A is its advanced convection cooking technology. This innovation circulates hot air evenly throughout the oven, ensuring consistent baking results and reducing cooking times. Whether baking cookies, roasting a chicken, or preparing a multi-course meal, home cooks can expect uniform results, eliminating cold spots that can often occur in traditional ovens.

Additionally, the oven is equipped with a smart control panel featuring a digital display. This user-friendly interface allows for easy navigation through various cooking settings, temperature adjustments, and a timer function. The panel also offers pre-programmed cooking settings for specific dishes, simplifying the cooking process for users of all skill levels.

Another notable characteristic of the WIOI67097A is its spacious interior. With multiple rack positions, it offers flexibility when cooking large meals, allowing users to arrange dishes according to their individual needs. The oven's ability to accommodate multiple trays at once means that family gatherings or dinner parties can be handled with ease.

In terms of safety, Kenmore has incorporated several features into the WIOI67097A. The oven includes a self-cleaning function that simplifies maintenance and ensures that the interior remains hygienic without the need for harsh chemicals. Additionally, it comes with a cooling fan feature that prevents the exterior from becoming too hot, reducing the risk of burns and improving safety during use.

Energy efficiency is another strong attribute of the WIOI67097A. Designed with modern energy standards in mind, it minimizes power consumption while providing powerful heating capabilities. This makes it an eco-friendly option for environmentally conscious consumers.

In summary, the Kenmore WIOI67097A combines modern technology and design to deliver a superior cooking experience. With features like convection cooking, a smart control panel, and a spacious interior, it meets the demands of today’s busy kitchens while prioritizing safety and energy efficiency. Whether you're a novice or an experienced chef, this wall oven is poised to elevate your culinary endeavors.