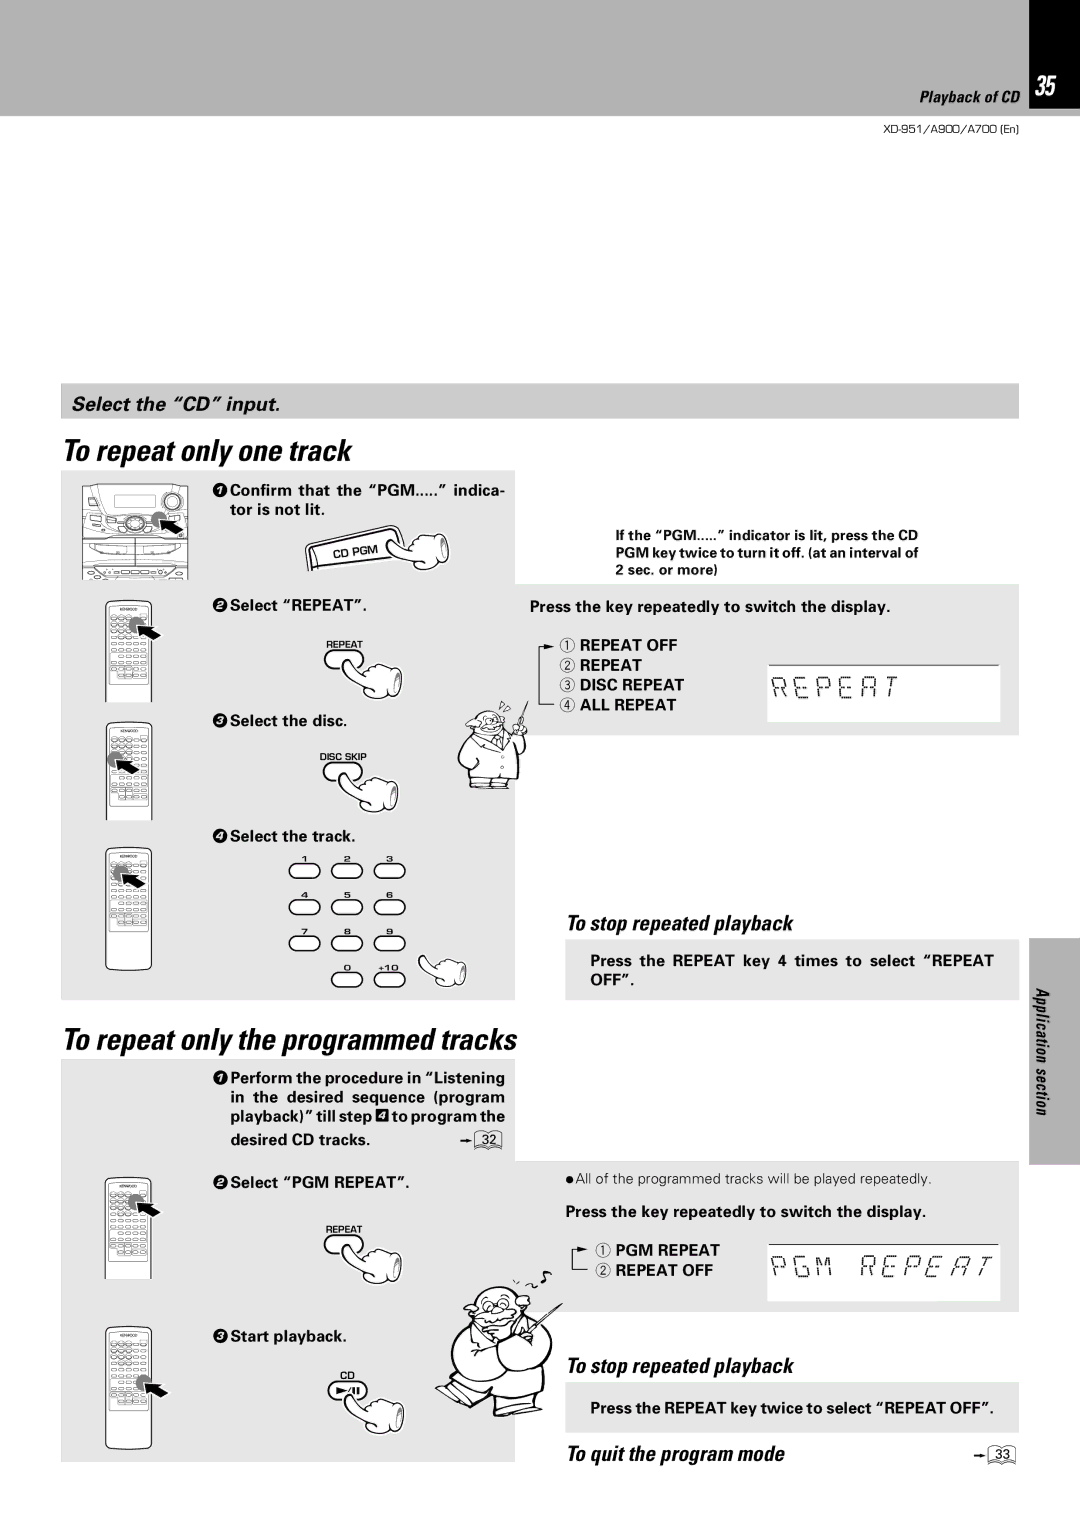
COMPONENT SYSTEM/COMPACT HI-FISYSTEM
XD-951 XD-A900 XD-A700
KENWOOD CORPORATION
Except for some areas
2Before applying power
Safety precautions
The marking of products using lasers
Timer operation
Contents
Effective Sound Adjustment
Clock adjustment
DOLBY Pro Logic Surround
Special features
Accessories
Demonstration
Discs which can be played with this unit
Disc handling precautions
CD accessories
Handling of discs and tapes
AM loop antenna
Connection of the System Accessories
Power cord
6System connection XD-951/XD-A900
FM indoor antenna
Before connecting the Front Speakers
Caution regarding placement Except for U.S.A. and
Canada
Power cord
8System connection XD-A700
Speaker right
Connection of the System Accessories
FM indoor antenna
Caution regarding placement
Speaker left
Before connecting the Front Speakers
Dolby Pro Logic
Connection of the surround speakers
Recommended speaker installation
How to use the speaker stabilizer cushions
Application section
Connection of Options Optional Parts
FM outdoor antenna
DIGITAL OUT jack OPTICAL
Main Unit
12Controls and indicators
Receiver
Cassette deck unit
CD player unit
Display
Remote control Unit
Loading batteries
16Operation of remote control unit
CHANNEL SPACE setting
FM10 0/ A M 1 FM 5 0/ A M9
MULTI CONTROL jog dial
Reception mode switching of FM broadcast
For Russia
POLA R PILO T
Basic use method
1.Switching the power ON OFF
3.Volume adjustment
18Let’s put out some sound
CD
Sub woofer level adjustment
VO L
LE V E L
Time display on the CD player
Playback of CD
1. Load a disc
2.Start playback
To stop playback
Skipping tracks
Playback from desired track
To pause playback
3.Start playback
Playback of tape
1.Load a cassette tape
2.Select the deck to be used for playback
TAPE B
Transport direction indicators
TAPE
TAPE B 0 0
section
Relay play
A tip for use of the tape counter
TAPE B
Lets put out some sound
Searching for the desired music program DPSS
1 2 7 3 Á
1 2 7 3 Á
2.Select a station
Receiving broadcast station
1.Select the broadcast band
03 F M 8 9O
Collective presetting of stations auto preset
One-by-onepresetting manual preset
Select the tuning mode
B
28Let’s record
1. Load a tape in deck B
2. Select the tape transport direction
5.Start recording
TAPE B
4.Select the source to be recorded
CD
Points in CD recording
F W D
A DI R
TAPE
Copying tape Tape dubbing
ENTE R
32Playback of CD
P01 DI s C
P01 TN O O
P12 D3 T O
P12 CL E A R
PGM0
P01 D2 T
DIsC R E P E A
Repeated playback
To repeat a disc
To repeat all discs
PGM RE P E A T
To repeat only one track
REPE AT A C K
To repeat only the programmed tracks
DIsC R A N D
1Confirm that the “PGM.....” indicator is not lit
To cancel random playback
2Select the RANDOM mode
Note before the use of RDS
To switch the display contents
01 F M1
section
Searching for a desired program type PTY search
1Select the PTY search mode
2Select the desired program type
R.D.S
3Start the search
To change to a different program type
Set the reception band to FM
1Auto preset the stations
2Select the desired information
3Receive an RDS station
Application section
TP Traffic Program indicator
4Wait for the desired information
CD ONE TRACK RECORD
42Convenient CD recording
Selection of the convenient CD recording type
Recording only desired titles
T R A
Recording only desired titles CD ONE TRACK RECORD
CD O NE
CD 0 3 0
1Press the DUBBING key
Recording of an entire CD CD RECORD
DIsC
CD R EC O R D
CD EDIT
CD E DI T
EDIT
A T
2Select “CD PGM RECORD”
Recording the programmed titles CD PGM RECORD
CD P GM RE C
3Program the desired tracks
3Adjust
Effective Sound Adjustment
Adjustment of balance and input level
Balance adjustment 1Press the MODE/DEMO key
ROCK
Switching the spectrum analyzer display mode
Selecting an equalizer pattern
MANU AL E Q
Creation and memorizing of an equalizer pattern
LEVE L +
ENTE A
sRs LE V E L LEVE L +
To cancel SRS 3D
Enjoying Sound Field Effects
sRs 3D O N
DOLB Y P R O
DOLBY PRO LOGIC surround adjustment
Delay time
Setting using the remote control unit
DOLB Y P R O
2Adjust the volume balance
3Adjust the volume
TEsT L
DOLB Y 3 s T
DOLBY 3 STEREO adjustment
To cancel DOLBY 3 STEREO play
DOLBY 3 STEREO play
DIsC O
DSP Digital Signal Processor playback
To cancel DSP play
Set the DSP mode
3Sing along with the accompaniment
Enjoying Karaoke Except for some areas
1Connect a microphone
2Play the music
AM
56Clock adjustment
1Activate the clock adjustment mode
AM
Adjust the clock before setting the timer
Timer operation
Sleep timer SLEEP
To cancel
PROG
Timer programming
2Adjust the listening volume
3Press the TIMER key
TUNE R
For timer playback or AI timer playback
For timer recording
8Press the TIMER key
PROG O N / O
When timer operation is not required
To set the same timer program again
Set the POWER switch to OFF STANDBY position
Memory backup function
Maintenance
Maintenance of the set
In regardto contact cleaner
Receiver, speakers
Operation to reset
Remote control unit
62In case of difficulty
Knowledge sections
General
Cassette deck
Preparation section Application section
Knowledge sections
CD player
WARNING NOTICE
Application section
Fronts speakers LS-N851
Specifications XD-951/XD-A900
Main unit
Surround speaker system CRS-N851
For U.S.A. , Canada , Europe and Ruusia
66Specifications XD-A700
Surround speaker system CRS-N551
Fronts speakers LS-N451 For U.S.A. and Canada
Knowledge sections
Surround speaker system CRS-N851 For Australia
Specifications XD-A700
Preparation section Application section
For your records