10:00PM
e. Repeat the procedure above in steps b & c to set your desired OFF time.
SECTION 3
CLEANING & MAINTENANCE
SET
READY AUTO OFF
MENU
d.To cancel the
hour at a time until ‘OFF’ is displayed.
3.Program your Brewer for a specific Auto On/Off Time.
NOTE: To use this programming feature, the clock must be set to the correct time. The clock will not be displayed unless the
f.To complete the process, press the Menu Button one more time to exit the programming mode. The Control Center will now indicate that you have set an AUTO ON time and/or AUTO OFF time.
‘ON OFF TIME’ will be displayed if you have set both options. ‘ON TIME’ will be displayed if you have set only the AUTO ON time and ‘OFF TIME’ will be displayed if you have set only the AUTO OFF time.
g. The AUTO ON time and AUTO OFF time
functions operate independently from one another. To cancel either set function, follow the steps above and use the H and
Cleaning External Parts
Regular cleaning of the Brewer’s external components is recommended.
1.Never immerse the base unit in water or other liquids. The Housing and other external components may be cleaned with a soapy, damp,
2.The Drip Tray can accumulate up to 8 ounces of overflow. The Drip Tray and Drip Tray Plate should be periodically inspected and rinsed clean. To remove the Drip Tray Assembly, simply slide it toward you, keeping it level at all times to avoid spilling. The Drip Tray and Drip Tray Plate are dishwasher safe.
3. Cleaning the Exit Needle
The Exit Needle is located on the inside bot- tom of the
CAUTION: There are sharp needles that puncture the
time is set. See page 9 to set the clock.
a. After setting the correct time (required),
press the Menu Button three times to program the Auto On time feature. The LCD Control Center will show ‘SET ON TIME’ with a small arrow next to it.
6:15AM
SET CLOCK SET AUTO OFF
ÁSET ON TIME
H MENU M
b. Press or hold the black button under the H to scroll through the hours to your desired ON time.
c.Press or hold the black button under the M to scroll through the minutes to your desired ON time.
d.After setting the desired time, press the Menu Button to save the On Time and move to the SET OFF TIME.
10:00PM
SET CLOCK SET AUTO OFF
ÁSET OFF TIME
H MENU M
M buttons to advance to 12:00AM. When you reach 12:00AM, the Control Center will display ‘OFF’ at the top and the function will be disabled.
EXAMPLE: If you chose to set the On Time at 6:15 AM and the Off Time for 10:00 PM, then the Brewer will be ‘ON’ and maintain hot water in the tank during that time so that it is always ready for you to brew a cup of coffee or tea. If you wanted a cup at a time outside this window, simply press the Power Button and you can brew as soon as the water is heated and the ‘READY’ indicator is displayed on the LCD Control Center.
10:00PM
SET
READY AUTO OFF
ON OFF TIME
MENU
NOTE: The AUTO OFF Timer and the AUTO ON/OFF Time programming options operate independently, but can also be programmed to work together. For example, you can set the AUTO ON Time function to turn on at 7:00 AM and then set the AUTO OFF Timer function to turn off the Brewer two hours after the last brew.
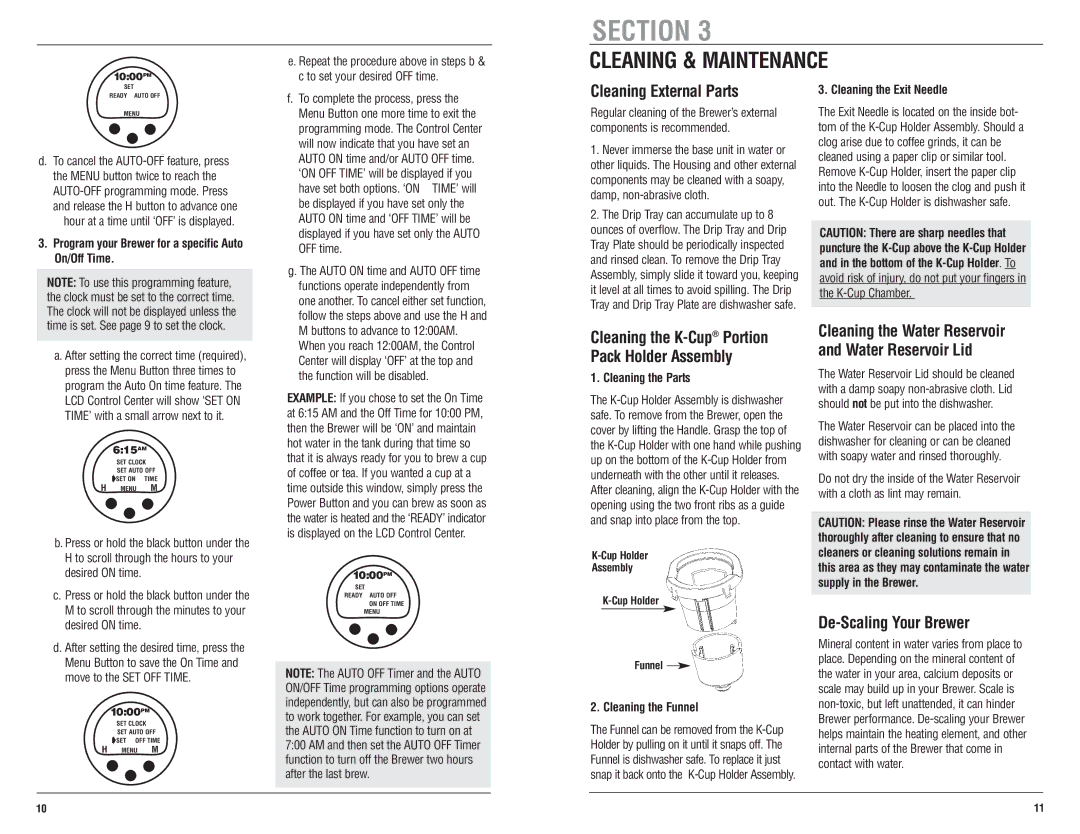
Cleaning the K-Cup® Portion Pack Holder Assembly
1. Cleaning the Parts
The
Assembly
Funnel ![]()
2. Cleaning the Funnel
The Funnel can be removed from the
Cleaning the Water Reservoir and Water Reservoir Lid
The Water Reservoir Lid should be cleaned with a damp soapy
The Water Reservoir can be placed into the dishwasher for cleaning or can be cleaned with soapy water and rinsed thoroughly.
Do not dry the inside of the Water Reservoir with a cloth as lint may remain.
CAUTION: Please rinse the Water Reservoir thoroughly after cleaning to ensure that no cleaners or cleaning solutions remain in this area as they may contaminate the water supply in the Brewer.
De-Scaling Your Brewer
Mineral content in water varies from place to place. Depending on the mineral content of the water in your area, calcium deposits or scale may build up in your Brewer. Scale is
10 | 11 |