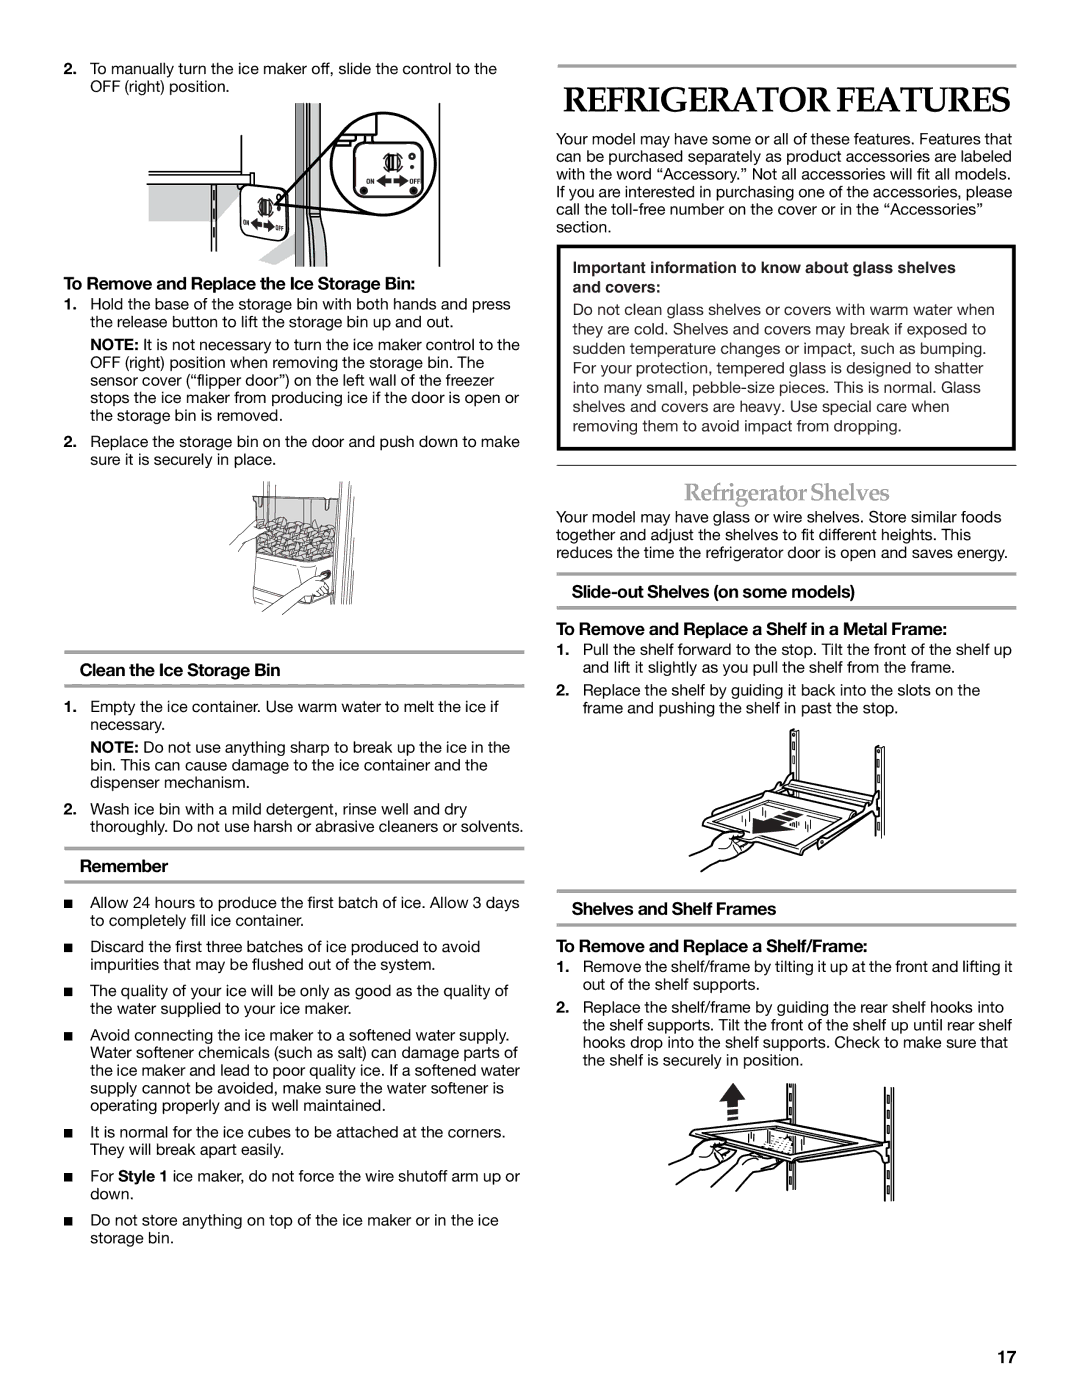
2.To manually turn the ice maker off, slide the control to the OFF (right) position.

To Remove and Replace the Ice Storage Bin:

1.Hold the base of the storage bin with both hands and press the release button to lift the storage bin up and out.

NOTE: It is not necessary to turn the ice maker control to the OFF (right) position when removing the storage bin. The sensor cover (“flipper door”) on the left wall of the freezer stops the ice maker from producing ice if the door is open or the storage bin is removed.

2.Replace the storage bin on the door and push down to make sure it is securely in place.

Clean the Ice Storage Bin

1.Empty the ice container. Use warm water to melt the ice if necessary.

NOTE: Do not use anything sharp to break up the ice in the bin. This can cause damage to the ice container and the dispenser mechanism.

2.Wash ice bin with a mild detergent, rinse well and dry thoroughly. Do not use harsh or abrasive cleaners or solvents.

Remember

Allow 24 hours to produce the first batch of ice. Allow 3 days to completely fill ice container.

Discard the first three batches of ice produced to avoid impurities that may be flushed out of the system.

The quality of your ice will be only as good as the quality of the water supplied to your ice maker.

Avoid connecting the ice maker to a softened water supply. Water softener chemicals (such as salt) can damage parts of the ice maker and lead to poor quality ice. If a softened water supply cannot be avoided, make sure the water softener is operating properly and is well maintained.

It is normal for the ice cubes to be attached at the corners. They will break apart easily.

For Style 1 ice maker, do not force the wire shutoff arm up or down.

Do not store anything on top of the ice maker or in the ice storage bin.

REFRIGERATOR FEATURES

Your model may have some or all of these features. Features that can be purchased separately as product accessories are labeled with the word “Accessory.” Not all accessories will fit all models. If you are interested in purchasing one of the accessories, please call the toll-free number on the cover or in the “Accessories” section.

Important information to know about glass shelves and covers:

Do not clean glass shelves or covers with warm water when they are cold. Shelves and covers may break if exposed to sudden temperature changes or impact, such as bumping. For your protection, tempered glass is designed to shatter into many small, pebble-size pieces. This is normal. Glass shelves and covers are heavy. Use special care when removing them to avoid impact from dropping.

Refrigerator Shelves

Your model may have glass or wire shelves. Store similar foods together and adjust the shelves to fit different heights. This reduces the time the refrigerator door is open and saves energy.

Slide-out Shelves (on some models)

To Remove and Replace a Shelf in a Metal Frame:

1.Pull the shelf forward to the stop. Tilt the front of the shelf up and lift it slightly as you pull the shelf from the frame.

2.Replace the shelf by guiding it back into the slots on the frame and pushing the shelf in past the stop.

Shelves and Shelf Frames

To Remove and Replace a Shelf/Frame:

1.Remove the shelf/frame by tilting it up at the front and lifting it out of the shelf supports.

2.Replace the shelf/frame by guiding the rear shelf hooks into the shelf supports. Tilt the front of the shelf up until rear shelf hooks drop into the shelf supports. Check to make sure that the shelf is securely in position.

17

Page 17
Image 17
KitchenAid 2318581 manual Refrigerator Features, Refrigerator Shelves, To Remove and Replace the Ice Storage Bin, Remember

2318581 specifications

The KitchenAid 2318581 is an innovative stand mixer attachment designed to enhance the functionality of KitchenAid stand mixers. This attachment is specifically engineered for users who want to broaden their culinary capabilities without investing in additional appliances. The 2318581 attachment brings several main features that cater to both casual cooks and professional chefs alike.

One of the standout characteristics of the KitchenAid 2318581 is its versatility. It is compatible with a wide range of KitchenAid stand mixer models, allowing users to easily connect it to their existing equipment. This means that home chefs can take advantage of the powerful motor and multiple speed settings of their stand mixer, making food preparation more efficient and enjoyable.

The design of the 2318581 attachment is also noteworthy. It is crafted from durable materials that ensure longevity and reliable performance over time. The sleek and modern aesthetic not only fits seamlessly into any kitchen décor but also provides ease of use in terms of attachment and detachment.

In terms of technology, the KitchenAid 2318581 offers a user-friendly interface. Its simple design allows for quick and hassle-free setup, ensuring that users can start creating delicious dishes with minimal delay. This attachment also features multiple operating speeds, providing precision control for various food processing needs, from mixing dough to making sauces and purees.

Another notable technology in this attachment is the integrated safety mechanism. It is designed to operate safely without risk of accidental disconnection while in use, ensuring that users can focus on their cooking without distractions or worries about equipment failure.

The KitchenAid 2318581 is ideal for those who want to streamline their cooking processes, reduce preparation time, and achieve consistent results every time. It transforms the stand mixer into a multifunctional kitchen tool, making it easier to experiment with new recipes and techniques.

In conclusion, the KitchenAid 2318581 is a must-have accessory for any KitchenAid stand mixer owner looking to elevate their culinary experience. With its robust features, advanced technologies, and thoughtful design, it stands out as an essential tool for both novice and experienced cooks alike.