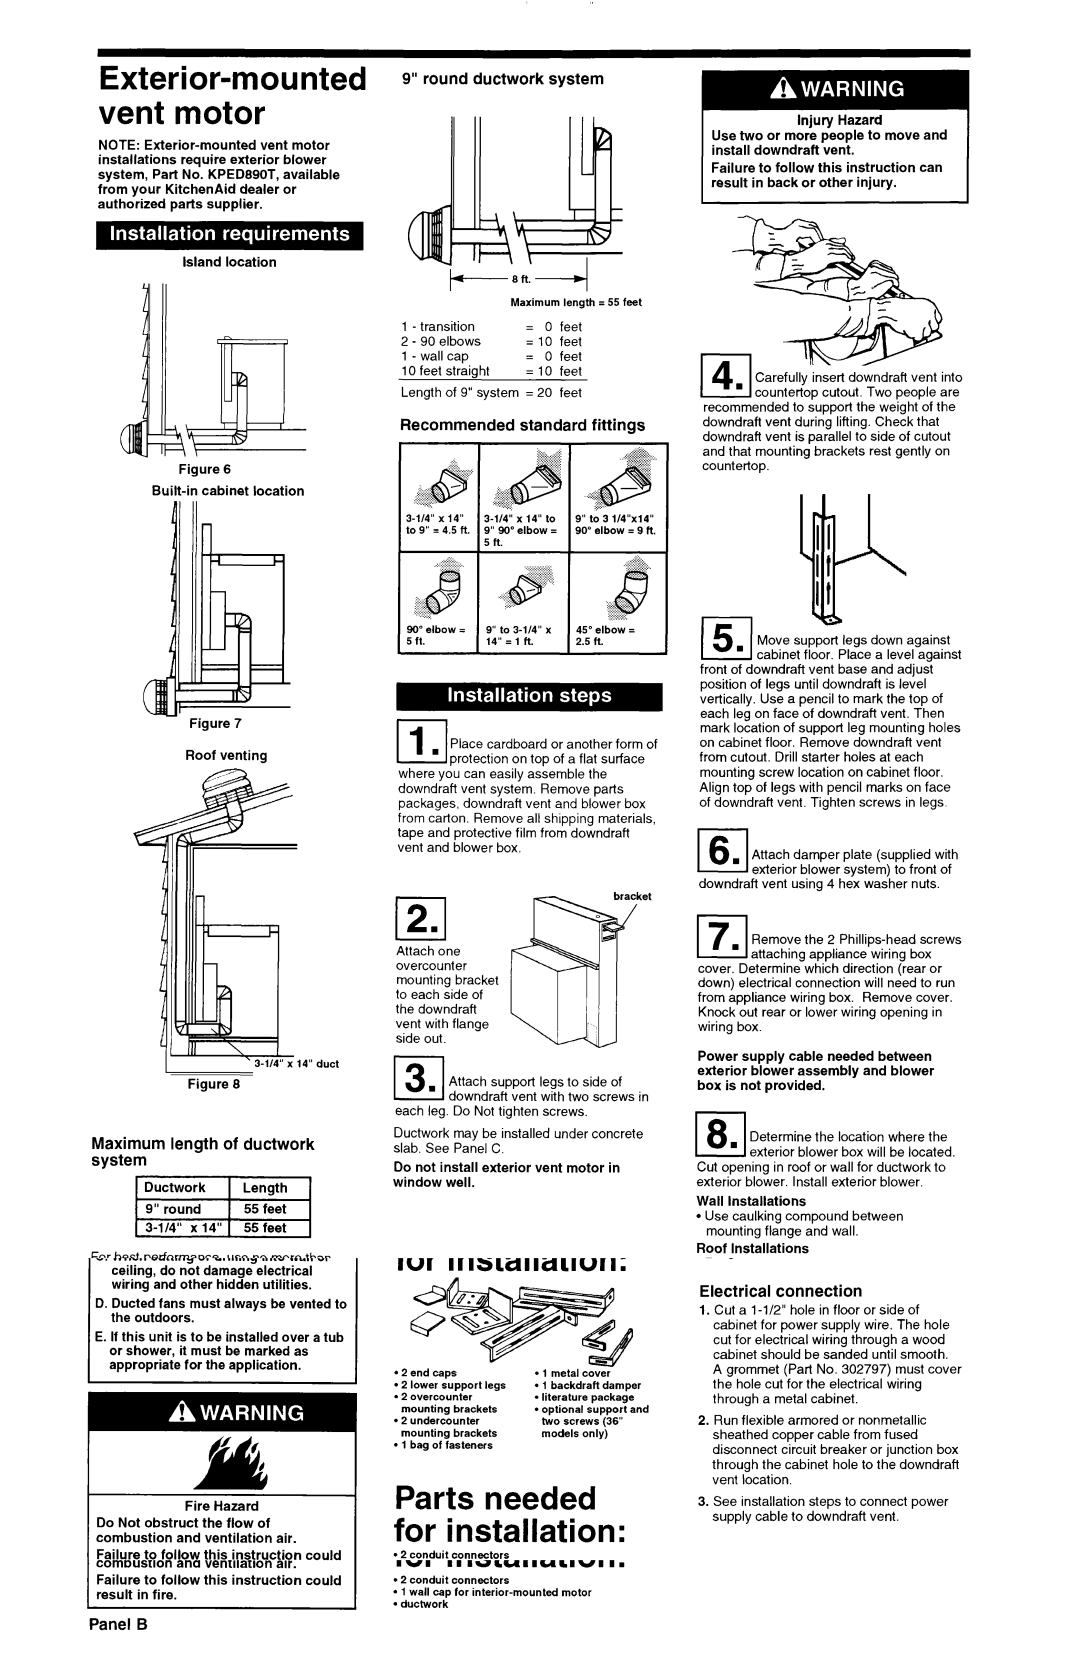
Exterior-mounted vent motor

NOTE: Exterior-mounted vent motor installations require exterior blower system, Part No. KPED890T, available from your KitchenAid dealer or authorized parts supplier.

Island location

Figure 6

Built-in cabinet location

9” round ductwork system

Injury Hazard

Use two or more people to move and install downdraft vent.

Failure to follow this instruction can result in back or other injury.


Maximum length = 55 feet


1 - transition


=

0

feet


2 - 90 elbows


= 10

feet


1 - wall

cap


=

0

feet


10 feet

straight


= 10

feet


Carefully insert downdraft vent into


Length of 9” system = 20 feet


recommended to support the weight of the


Recommended


standard


fittings

downdraft vent during lifting. Check that


..-,.,:.:


downdraft vent is parallel to side of cutout


:::::::zy;::::::>-..-


::-.


j:::::::::::::::::. ..-:j:::::::..

and that mounting brackets rest gently on


.:.-.-.A..


i- . . . .


-


countertop.


-


:..


..,..Q


...;::..-


j:: .::~


..+::o....


:..-


.:::::::::y‘7::.


,:;:~:. .....,.,.


.


<;;$P=


.;+;;L’$;:;::z.


3-114”

x

14”

3-l/4”

x 14”

to

9”


to 3 1/4”xl4”


to 9”

= 4.5 ft.

9”

90”

elbow

=

90”

elbow = 9 ft.


5

ft.


Figure 7

Roof venting

1

E3-114” x 14” duct

Figure 8

Maximum length of ductwork system

For best performance, use no more than three 90” elbows. If more than one elbow is used, make sure that there is a minimum of 24 inches of straight duct between any two elbows. Do Not install two elbows together. It is recommended that you use round duct instead of rectangular duct, especially if elbows are required. If rectangular duct is required, it should be transitioned to 9” round duct as soon as possible.

Determining the length of system you need:

To calculate the length of system you need, add the equivalent feet for each duct piece that will be needed. See example for 9” round ductwork system.

--. ....:.::::: :$::.PT~:.. -

90” elbow =

9” to 3-114” x

45”

elbow =

5 ft.

14” = 1 ft.

2.5

ft.

IIPlace cardboard or another form of

protection on top of a flat surface where you can easily assemble the downdraft vent system. Remove parts packages, downdraft vent and blower box from carton. Remove all shipping materials, tape and protective film from downdraft vent and blower box.

12.1

L1

Attach one overcounter mounting bracket to each side of the downdraft vent with flange side out.

I,

b-. lAttach support legs to side of downdraft vent with two screws in

each leg. Do Not tighten screws,

Ductwork may be installed under concrete slab. See Panel C.

Do not install exterior vent motor in window well.

front of downdraft vent base and adjust position of legs until downdraft is level vertically. Use a pencil to mark the top of each leg on face of downdraft vent. Then mark location of support leg mounting holes on cabinet floor. Remove downdraft vent from cutout. Drill starter holes at each mounting screw location on cabinet floor. Align top of legs with pencil marks on face of downdraft vent. Tighten screws in legs.

16Attach.1damper plate (supplied with exterior blower svstem) to front of

downdraft vent using 4 hex washer nuts.

171. Remove the 2 Phillips-head screws attaching appliance wiring box

cover. Determine which direction (rear or down) electrical connection will need to run from appliance wiring box. Remove cover. Knock out rear or lower wiring opening in wiring box.

Power supply cable needed between exterior blower assembly and blower box is not provided.

Is Determine the location where the ’ exterior blower box will be located.

Cut opening in roof or wall for ductwork to exterior blower. Install exterior blower.

Wall Installations

l Use caulking compound between mounting flange and wall.

Roof Installations

l Follow standard roofing procedures.

l The flashing sheet should be entered over the roof opening.

l Lower edge of flashing should lie on top shingles and upper edge underneath shingles.

l Seal assembly between roof, fan and flashing with roofing mastic to prevent leaks.

Panel E

Page 6
Image 6
KitchenAid 30 and 36 Retractable Downdraft Vent Systems Exterior-mounted vent motor, $P=, $.Pt~, Panel E

30" and 36" Retractable Downdraft Vent Systems specifications

KitchenAid has long been recognized for its commitment to quality and innovation in kitchen appliances, and its 30" and 36" Retractable Downdraft Vent Systems are prime examples of this dedication. Designed to enhance kitchen functionality while maintaining a sleek aesthetic, these downdraft vent systems effectively capture smoke, steam, and odors from cooking without obstructing kitchen sightlines.

One of the main features of KitchenAid’s downdraft vent systems is their powerful ventilation capability. With a robust airflow performance, these vents can efficiently remove unwanted cooking byproducts, improving air quality in the kitchen and making cooking a more enjoyable experience. The retractable design allows the vent to only be present when needed, maintaining a clean visual appeal when not in use. This seamless integration into the countertop is especially beneficial in open-concept kitchens where maintaining an uncluttered look is essential.

Both the 30" and 36" models are equipped with an easy-to-use control interface, offering multiple fan speeds to cater to different cooking situations. The low speed setting is ideal for simmering, while higher speeds can be activated for frying or grilling, capturing even the most challenging odors and smoke. The noise level is designed to be minimal, ensuring that conversations and kitchen activities can continue without disruption.

Another stand-out feature is the filter system. The downdraft vents utilize dishwasher-safe grease filters, making maintenance convenient and straightforward. This feature not only promotes effective grease capture but also ensures that the system remains hygienic over time.

Moreover, KitchenAid incorporates advanced technologies in its downdraft vent systems, such as the powerful motor that offers a reliable performance even in high-demand cooking scenarios. The models also come with adjustable height options, allowing users to customize the vent's exposure based on their cooking needs.

In terms of design, both the 30" and 36" systems are available in various finishes to match different kitchen styles, from sleek stainless steel to more contemporary options. This versatility allows homeowners to choose a model that complements their kitchen aesthetics while benefiting from its functional features.

In conclusion, KitchenAid's 30" and 36" Retractable Downdraft Vent Systems exemplify the brand's focus on blending form and function. With their powerful ventilation capabilities, user-friendly controls, and efficient design, these downdraft systems are perfect for discerning cooks who seek both performance and style in their kitchens.