Water requirements
Product Damage
l All solder connections must be made before the water line is connected
to the dishwasher to prevent damage to the inlet valve.
l Do Not solder within 6 inches of the inlet valve. The plastic part of the water inlet valve could be damaged.
Failure to follow these instructions may result in product damage.
Hot water line to dishwasher must provide
Use l/2” O.D. copper tubing or 3/8” galvanized pipe inlet line. Dishwasher inlet valve has 3/8” internal pipe thread.
Water line connection ,vt
:i FFDisconnect electrical supply. I ‘ib
i~“n,i.”Rough in water line through the 1” hole in cabinet rear wall or floor to dishwasher cabinet opening.
‘$;
.> dInstall a shutoff valve in the water line where it can be easily used.
t Flush water line into a bucket to get rid ny particles that may clog the inlet
valve. Turn shutoff valve to “OFF” position.
$Check that there are no sharp bends or kinks in the water line that may restrict water flow.
Drain requirements
Product Damage
l The drain line connection to the house plumbing must be a minimum of 20” above the floor. A lower drain connection may result in siphoning.
l If drain line is routed to a connection point less than 20” above the floor, the drain line must form a loop 20” above the floor.
l Do Not kink hose and copper tubing.
l Do Not use a drain line or fittings that are less than l/2” I.D.
Failure to follow these instructions could result in poor drainage or damage to the product.
The drain hose should be 9/l 6” minimum I.D. flexible hose or S/8” O.D. copper tubing. A minimum of 22” flexible drain hose, or a 12” length of copper drain line with a 12” length of flexible hose, is needed. Flexible hose must be resistant to heat and detergent. Do Not use a drain or fittings less than l/2” I.D. Flexible hose is available through your local plumbing, hardware or automotive supply stores.
If drain line is copper, clamp a 12” length of 9/l 6” I.D. flexible, heat- and detergent- resistant hose to the end of the copper drain line to connect to dishwasher valve.
. | S/8” | O.D. | copper | tubing |
| ||||
| 20” | min. | above | floor |
I |
| I\ |
|
|
| I \ |
|
|
Am
-
+ e+ ‘valve area
If drain line is routed to a connection point less than 20” above floor, use S/8”
O.D. copper tubing to form a loop 20” above the floor. Make sure there are no kinks in hose or copper tubing.
NOTE: An air gap MUST be used in the high drain loop if the drain line is connected to the house plumbing at a point lower than 20” above the floor.
If connection to an air gap is required, air gap kits are available from local plumbing supply sources.
l Install air gap according to kit instructions.
lEntry must be above trap and at least 20” above the floor.
l Remove disposer knockout or plug before connecting drain line.
Note: Most disposers have 7/8” connectors. Connectors that adapt from the drain line to disposer are available from local plumbing supply sources.
Drain connection
Important:
Remove the disposer knockout plug before connecting the drain hose.
2
&
Aa”Rough in drain line to cabinet opening through 1’ hole in rear wall or floor.
Recommended methods:
Connect air gap to a waste tee or waste disposer using a rubber connector.
Waste Tee Connection
above trap.
Waste Disposer Connection
Alternate methods:
If local plumbing codes permit, dishwasher drain line may be connected directly to waste tee or waste disposer. Do Not cut hose connector to fit when connecting directly to a disposer.
Direct Connection to Waste Tee
Direct Connection to Waste Disposer
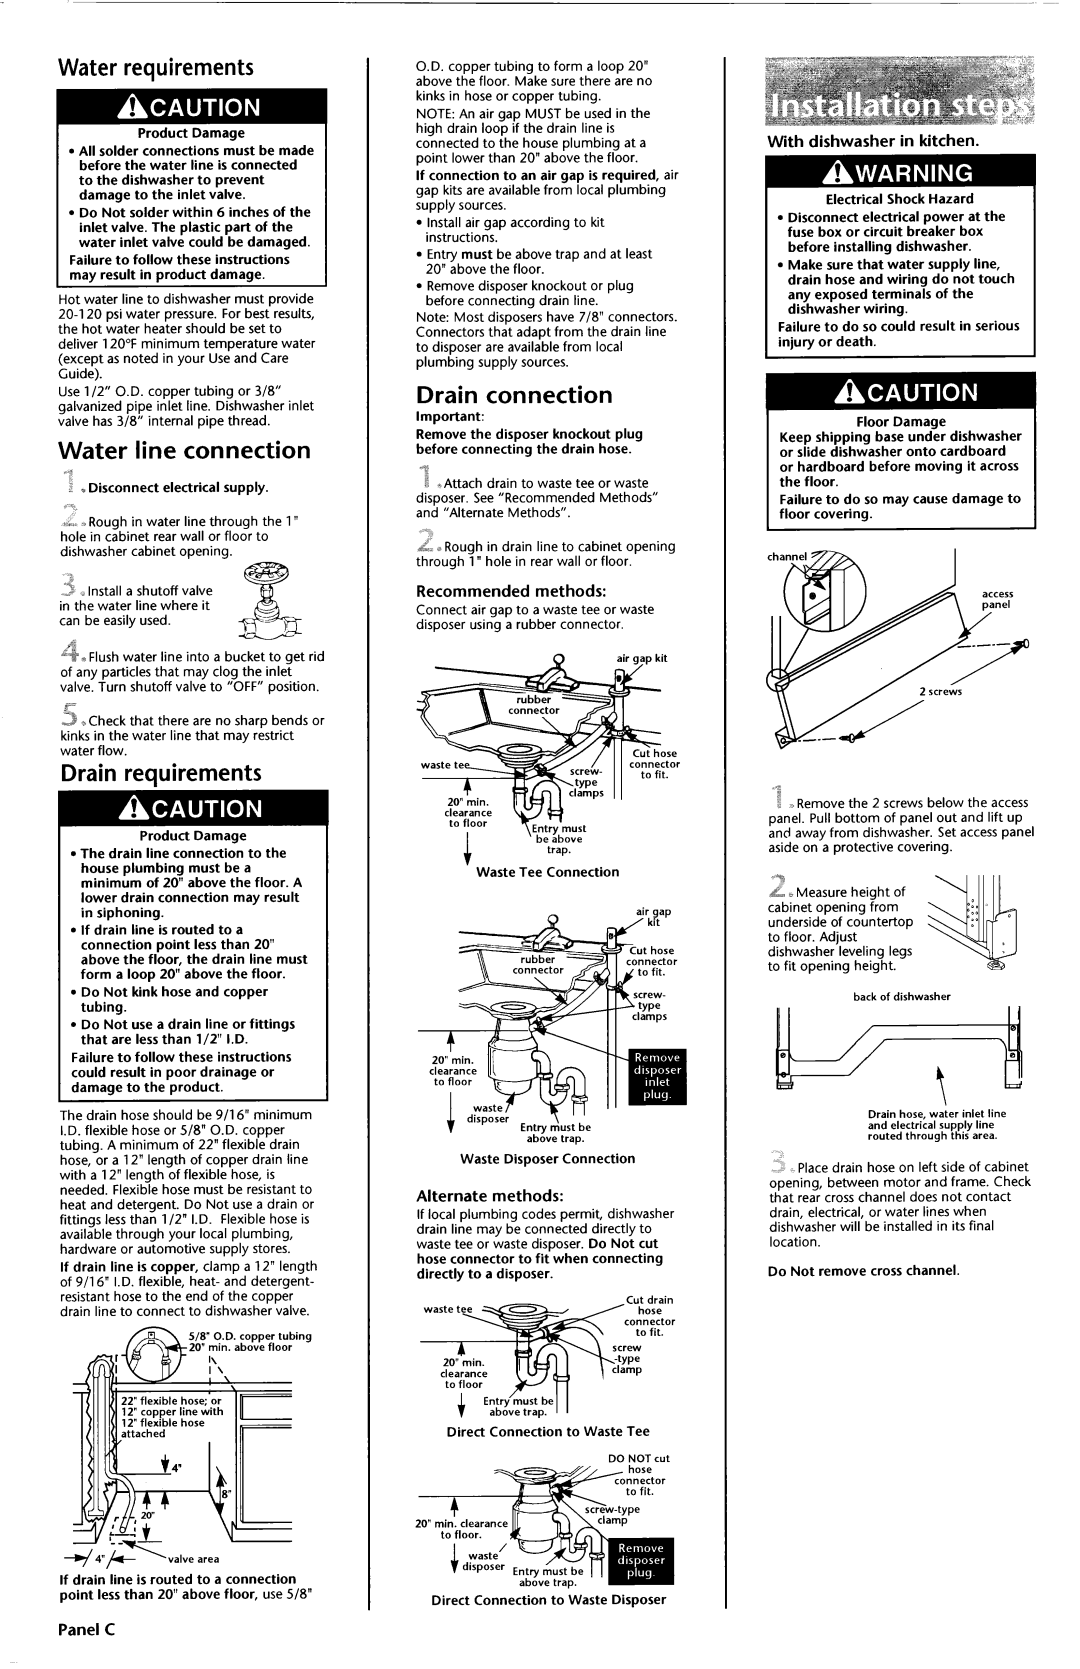
With dishwasher in kitchen.
Electrical Shock Hazard
l Disconnect electrical power at the fuse box or circuit breaker box before installing dishwasher.
l Make sure that water supply line, drain hose and wiring do not touch any exposed terminals of the dishwasher wiring.
Failure to do so could result in serious injury or death.
Floor Damage
Keep shipping base under dishwasher or slide dishwasher onto cardboard
or hardboard before moving it across the floor.
Failure to do so may cause damage to floor covering.
L
a 3 Remove the 2 screws below the access panel. Pull bottom of panel out and lift up and away from dishwasher. Set access panel aside on a protective covering.
b Measure height of inet opening from
underside of countertop to floor. Adjust dishwasher leveling legs to fit opening height.
back of dishwasher
*
Drain hose, water inlet line and electrical supply line routed through this area.
‘,
Place drain hose on left side of cabinet opening, between motor and frame. Check that rear cross channel does not contact drain, electrical, or water lines when dishwasher will be installed in its final location.
Do Not remove cross channel.