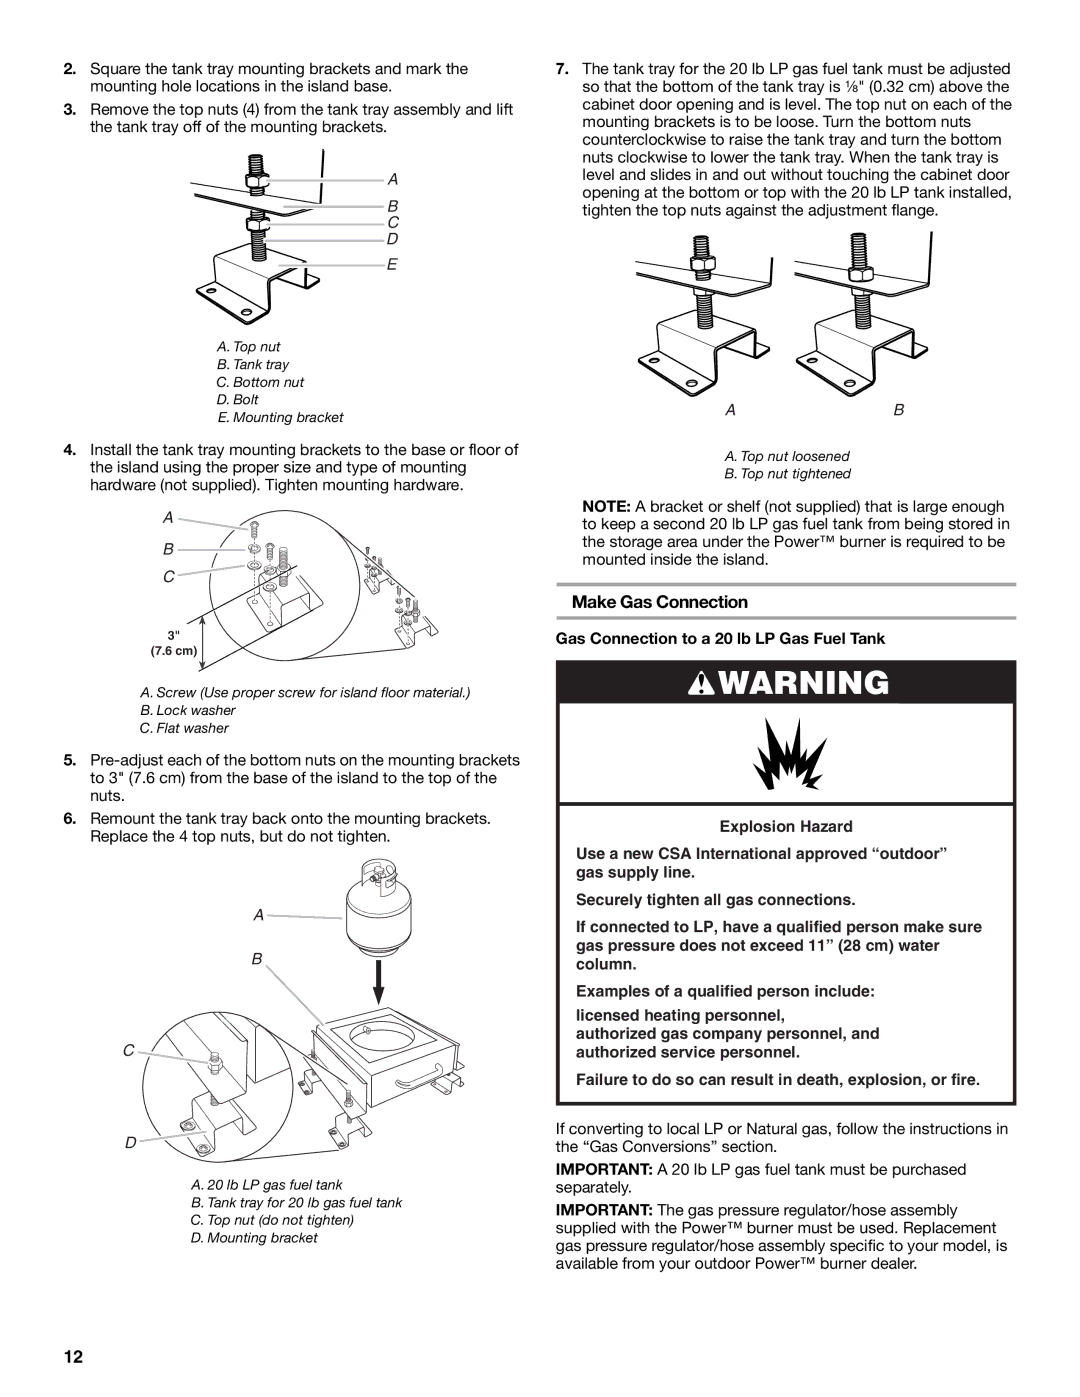
2.Square the tank tray mounting brackets and mark the mounting hole locations in the island base.

3.Remove the top nuts (4) from the tank tray assembly and lift the tank tray off of the mounting brackets.

A

B

C

D

E

7.The tank tray for the 20 lb LP gas fuel tank must be adjusted so that the bottom of the tank tray is ¹⁄₈" (0.32 cm) above the cabinet door opening and is level. The top nut on each of the mounting brackets is to be loose. Turn the bottom nuts counterclockwise to raise the tank tray and turn the bottom nuts clockwise to lower the tank tray. When the tank tray is level and slides in and out without touching the cabinet door opening at the bottom or top with the 20 lb LP tank installed, tighten the top nuts against the adjustment flange.

A. Top nut

B. Tank tray

C. Bottom nut

D.Bolt

E.Mounting bracket

4.Install the tank tray mounting brackets to the base or floor of the island using the proper size and type of mounting hardware (not supplied). Tighten mounting hardware.

A

B

C

3"

(7.6 cm)

A. Screw (Use proper screw for island floor material.)

B. Lock washer

C. Flat washer

5.Pre-adjust each of the bottom nuts on the mounting brackets to 3" (7.6 cm) from the base of the island to the top of the nuts.

6.Remount the tank tray back onto the mounting brackets. Replace the 4 top nuts, but do not tighten.

A

B

C

D

A. 20 lb LP gas fuel tank

B. Tank tray for 20 lb gas fuel tank

C. Top nut (do not tighten)

D. Mounting bracket

AB

A. Top nut loosened

B. Top nut tightened

NOTE: A bracket or shelf (not supplied) that is large enough to keep a second 20 lb LP gas fuel tank from being stored in the storage area under the Power™ burner is required to be mounted inside the island.

Make Gas Connection

Gas Connection to a 20 lb LP Gas Fuel Tank

WARNING

Explosion Hazard

Use a new CSA International approved “outdoor” gas supply line.

Securely tighten all gas connections.

If connected to LP, have a qualified person make sure gas pressure does not exceed 11” (28 cm) water column.

Examples of a qualified person include:

licensed heating personnel,

authorized gas company personnel, and authorized service personnel.

Failure to do so can result in death, explosion, or fire.

If converting to local LP or Natural gas, follow the instructions in the “Gas Conversions” section.

IMPORTANT: A 20 lb LP gas fuel tank must be purchased separately.

IMPORTANT: The gas pressure regulator/hose assembly supplied with the Power™ burner must be used. Replacement gas pressure regulator/hose assembly specific to your model, is available from your outdoor Power™ burner dealer.

12

Page 12
Image 12
KitchenAid KBPU182VSS installation instructions Make Gas Connection

KBPU182VSS specifications

The KitchenAid KBPU182VSS is a standout appliance that perfectly combines style and functionality for modern kitchens. This built-in refrigerator is designed to enhance the food storage experience, offering a range of features that cater to performance and aesthetics alike.

One of the most notable features of the KBPU182VSS is its spacious interior, with a capacity of 18 cubic feet, which allows ample room for groceries, leftovers, and culinary ingredients. The stainless steel finish adds a sleek and contemporary look, making it a perfect fit for various kitchen designs. This model seamlessly integrates into cabinetry, ensuring a polished and cohesive kitchen appearance.

The refrigerator is equipped with the advanced FreshSeal technology that helps to keep food fresher for longer. This is achieved through enhanced cooling capabilities that maintain consistent temperatures. The cooling system utilizes a dual evaporator, which is essential for optimal humidity control. This feature prevents odor mixing between the fridge and freezer, ensuring that everything—from meats to fruits—remains flavorful and fresh.

Organization is another key aspect of the KBPU182VSS. It features adjustable shelves that allow users to customize the interior layout according to their storage needs. The produce drawers are specifically designed to maintain ideal humidity levels for fruits and vegetables, prolonging their freshness. Additionally, the model comes with specialized storage for beverages, dairy, and other commonly used items, promoting convenience in access.

One innovative feature is the vibrant LED lighting that illuminates the interior, making it easy to find items quickly, even in low-light conditions. The door bins are designed for easy access and can accommodate larger bottles and containers, proving to be a practical solution for busy households.

The KitchenAid KBPU182VSS also boasts energy-efficient technology, reducing its environmental impact while keeping energy bills low. This is in line with KitchenAid's commitment to sustainability, giving customers peace of mind regarding their energy consumption.

In summary, the KitchenAid KBPU182VSS perfectly melds style, functionality, and technology, making it an excellent choice for anyone looking to upgrade their kitchen. Its thoughtful design features, advanced cooling technologies, and organization options set it apart in the competitive market of built-in refrigerators, satisfying both aesthetic and practical needs.