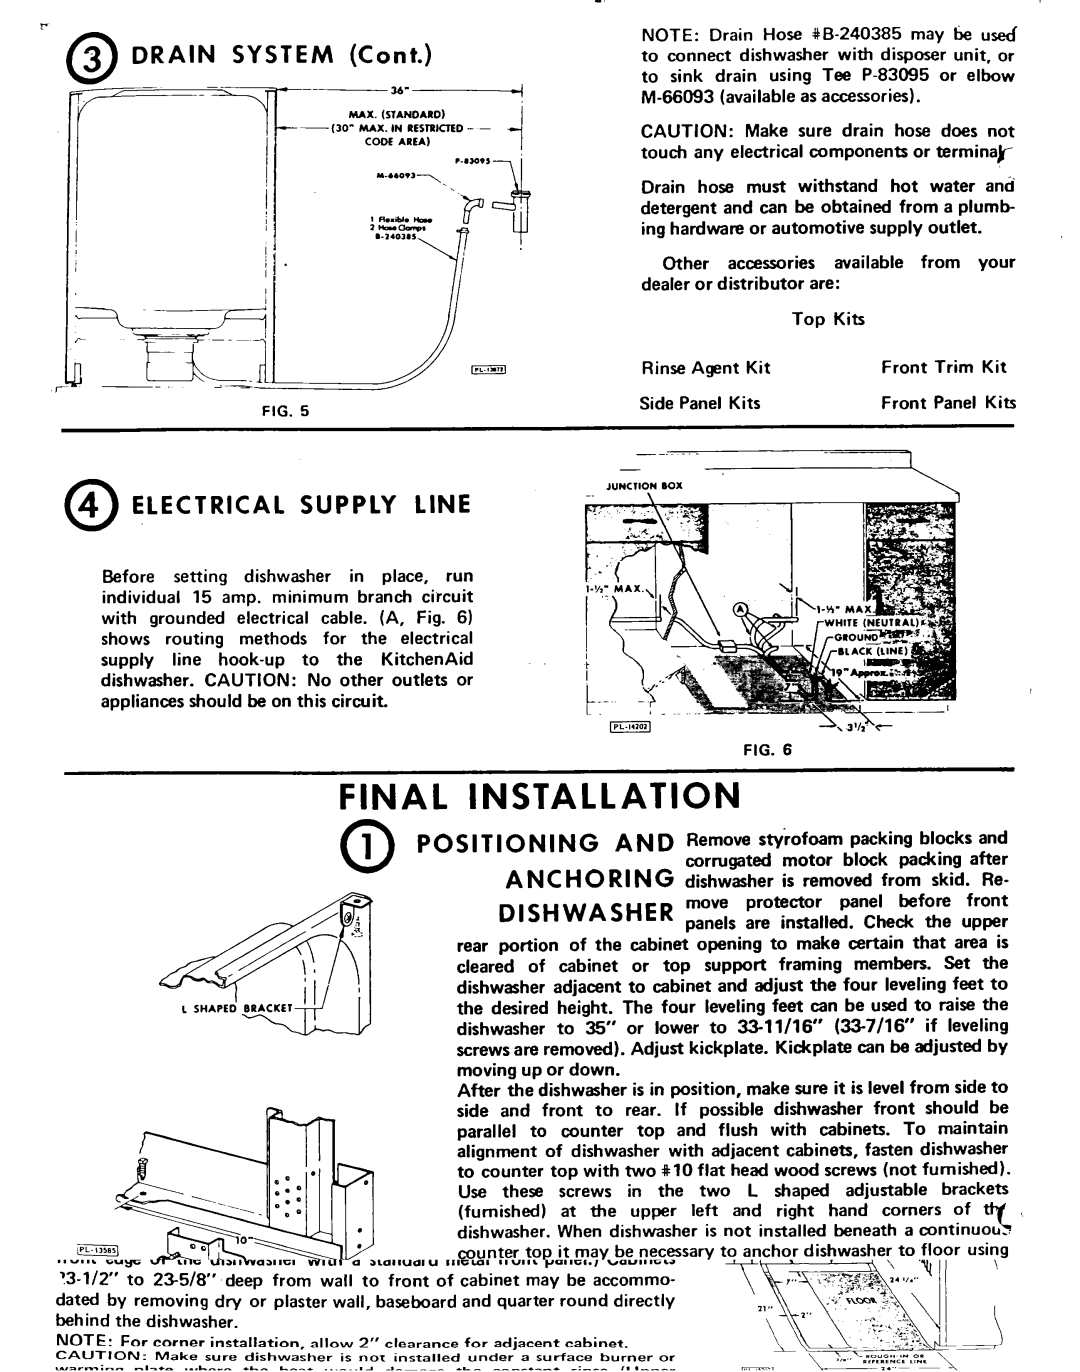
3 | DRAIN SYSTEM | (Cont.) |
|
0 | - | 34’ |
|
|
|
| |
| MIX. (57*~01R0). | ||
|
| ||
| MAX. IN RESRICIED - - |
| |
|
| CODfCODC AREA) | i |
|
|
|
I
m | ||
| ||
|
| FIG. 5 |
0.4 ELECTRICAL SUPPLY LINE
NOTE: Drain Hose
CAUTION: Make sure drain hose does not touch any electrical components or terminaF
Drain hose must withstand hot water and detergent and can be obtained from a plumb ing hardware or automotive supply outlet.
Other accessories available from your dealer or distributor are:
Top | Kits |
|
|
Rinse Agent Kit | Front | Trim | Kit |
Side Panel Kits | Front | Panel | Kits |
JUNCIION DOX
Before setting dishwasher in place, run individual 15 amp. minimum branch circuit with grounded electrical cable. (A, Fig. 6) shows routing methods for the electrical supply line
FIG. 6
DOORSPRING BRACKET
FIG. 7
FINAL | INSTALLATION |
|
|
|
|
|
|
|
|
|
|
|
| ||||||||
1 | POSITIONING |
|
| AND | Remove | Styrofoam |
|
| packing blocks | and | |||||||||||
0 |
|
|
|
|
|
|
|
| corrugated |
| motor |
| block | packing after | |||||||
|
|
| A NC H 0 RI N G dishwasher | is removed | from | skid. | Re- | ||||||||||||||
|
|
| DISHWASHER |
| move | protector |
|
| panel | before | front | ||||||||||
|
|
|
| panels | are installed. |
| Check the upper | ||||||||||||||
|
|
|
|
|
|
|
|
|
| ||||||||||||
| rear | portion | of | the cabinet opening to make certain that area is | |||||||||||||||||
| cleared | of | cabinet | or | top |
| support |
| framing |
|
| members. |
| Set | the | ||||||
| dishwasher adjacent to cabinet and adjust the four leveling feet to | ||||||||||||||||||||
| the desired height. The four leveling feet can be used to raise the | ||||||||||||||||||||
| dishwasher | to | 36” | or lower | to |
| if | leveling | |||||||||||||
| screws are removed). Adjust kickplate. Kickplate can be adjusted by | ||||||||||||||||||||
| moving | up or down. |
|
|
|
|
|
|
|
|
|
|
|
|
|
|
| ||||
| After the dishwasher is in position, make sure it is level from side to | ||||||||||||||||||||
| side | and front | to | rear. | If | possible | dishwasher | front should be | |||||||||||||
| parallel | to | counter | top | and | flush |
| with | cabinets. | To |
| maintain | |||||||||
| alignment of dishwasher with adjacent cabinets, fasten dishwasher | ||||||||||||||||||||
| to counter top with two #lO flat head wood screws (not furnished). | ||||||||||||||||||||
| Use | these | screws | in | the | two | L |
| shaped |
| adjustable |
| brackets | ||||||||
| (furnished) | at | the | upper | left | and |
| right |
| hand | corners | of | , | ||||||||
|
|
|
|
|
|
|
|
|
|
|
|
|
|
|
|
|
|
|
|
| T |
| dishwasher, When dishwasher is not installed beneath a continuou,. | ||||||||||||||||||||
| counter top it may be necessary to anchor dishwasher to floor using | ||||||||||||||||||||
| l/4” lag bolt or screw, in hole provided. If door tension adjustment | ||||||||||||||||||||
| is | required, | adjust | door | spring | so | the | door | is | counterbalanced | and | ||||||||||
| will remain in open position. Adjust tension by changing bracket to | ||||||||||||||||||||
| alternate holes and/or moving spring hooks to alternate position. |
| |||||||||||||||||||