Orificios de la bisagra de la puerta

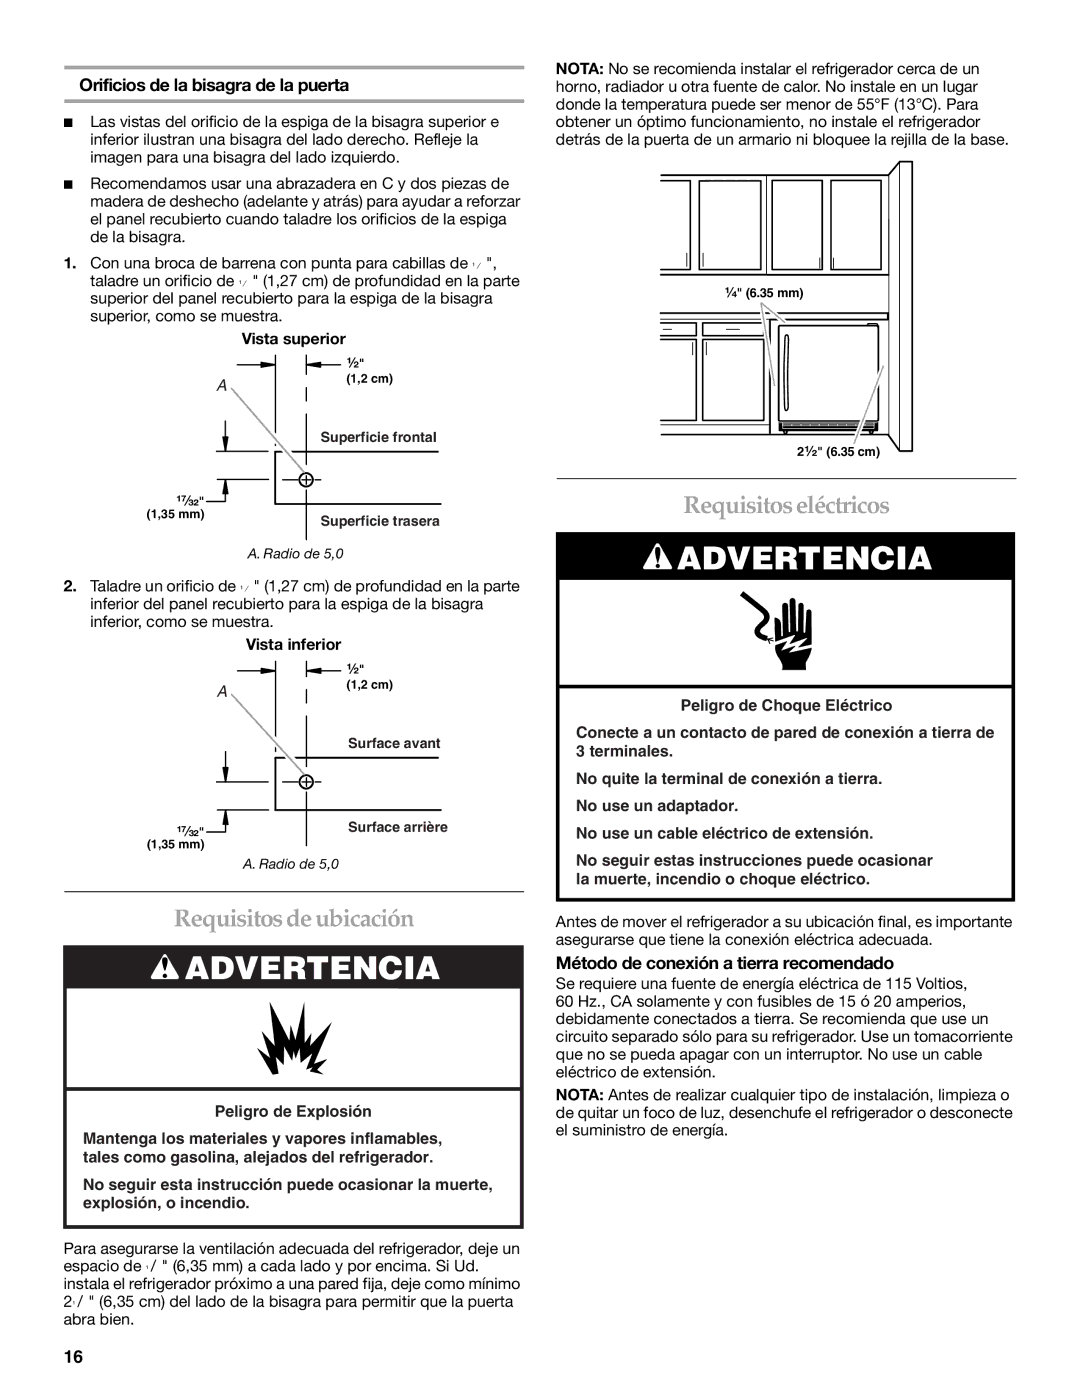
Las vistas del orificio de la espiga de la bisagra superior e inferior ilustran una bisagra del lado derecho. Refleje la imagen para una bisagra del lado izquierdo.

Recomendamos usar una abrazadera en C y dos piezas de madera de deshecho (adelante y atrás) para ayudar a reforzar el panel recubierto cuando taladre los orificios de la espiga de la bisagra.

1.Con una broca de barrena con punta para cabillas de ¹⁄₂", taladre un orificio de ¹⁄₂" (1,27 cm) de profundidad en la parte superior del panel recubierto para la espiga de la bisagra superior, como se muestra.

Vista superior


¹⁄₂"


A

(1,2 cm)


Superficie frontal

¹⁷⁄₃₂"


(1,35 mm)


Superficie trasera


A. Radio de 5,0

2.Taladre un orificio de ¹⁄₂" (1,27 cm) de profundidad en la parte inferior del panel recubierto para la espiga de la bisagra inferior, como se muestra.

Vista inferior

NOTA: No se recomienda instalar el refrigerador cerca de un horno, radiador u otra fuente de calor. No instale en un lugar donde la temperatura puede ser menor de 55°F (13°C). Para obtener un óptimo funcionamiento, no instale el refrigerador detrás de la puerta de un armario ni bloquee la rejilla de la base.

¹⁄₄" (6.35 mm)

2¹⁄₂" (6.35 cm)

Requisitos eléctricos

ADVERTENCIA

A

¹⁷⁄₃₂"

(1,35 mm)

¹⁄₂"

(1,2 cm)

Surface avant

Surface arrière

Peligro de Choque Eléctrico

Conecte a un contacto de pared de conexión a tierra de 3 terminales.

No quite la terminal de conexión a tierra.

No use un adaptador.

No use un cable eléctrico de extensión.

A. Radio de 5,0

Requisitos de ubicación

ADVERTENCIA

Peligro de Explosión

Mantenga los materiales y vapores inflamables, tales como gasolina, alejados del refrigerador.

No seguir esta instrucción puede ocasionar la muerte, explosión, o incendio.

Para asegurarse la ventilación adecuada del refrigerador, deje un espacio de ¹/" (6,35 mm) a cada lado y por encima. Si Ud. instala el refrigerador próximo a una pared fija, deje como mínimo 2¹/" (6,35 cm) del lado de la bisagra para permitir que la puerta abra bien.

No seguir estas instrucciones puede ocasionar la muerte, incendio o choque eléctrico.

Antes de mover el refrigerador a su ubicación final, es importante asegurarse que tiene la conexión eléctrica adecuada.

Método de conexión a tierra recomendado

Se requiere una fuente de energía eléctrica de 115 Voltios, 60 Hz., CA solamente y con fusibles de 15 ó 20 amperios, debidamente conectados a tierra. Se recomienda que use un circuito separado sólo para su refrigerador. Use un tomacorriente que no se pueda apagar con un interruptor. No use un cable eléctrico de extensión.

NOTA: Antes de realizar cualquier tipo de instalación, limpieza o de quitar un foco de luz, desenchufe el refrigerador o desconecte el suministro de energía.

16

Page 16
Image 16
KitchenAid KURO24LSBX manual Requisitos eléctricos, Requisitos de ubicación, Orificios de la bisagra de la puerta

KURO24LSBX specifications

The KitchenAid KURO24LSBX is a remarkable compact refrigerator designed to meet the needs of modern kitchens and dining setups. This unit combines style, efficiency, and advanced technology, making it an ideal choice for both home and professional use. One of the standout features of the KURO24LSBX is its sleek, stainless steel finish, which complements any kitchen decor while providing a durable, easy-to-clean surface.

With a capacity of 24 inches wide, this refrigerator offers ample storage space without overwhelming smaller areas. Equipped with adjustable shelves, the KURO24LSBX allows users to customize the interior layout to accommodate various foods and beverages. The frameless glass shelves make it easy to store taller items and offer a streamlined look, enhancing visibility and accessibility.

One of the notable technologies in this model is the advanced cooling system, which ensures optimal temperature and humidity levels for food preservation. The refrigerator utilizes a dual evaporator that helps maintain consistent temperatures, preventing freezer burn in the freezer compartment, while also keeping the fresh food section at ideal conditions.

The temperature management system features digital controls, allowing users to precisely set and monitor the internal environment. This technology is complemented by a bright LED lighting system, illuminating the interior and making it easy to find items even in low light.

The KitchenAid KURO24LSBX is also designed with energy efficiency in mind, utilizing an ENERGY STAR certification that signifies reduced energy consumption without sacrificing performance. This not only helps lower energy bills but also contributes to environmental sustainability.

Another impressive characteristic of this model is the integrated ice maker. This convenience ensures you always have ice available for drinks or entertaining guests, adhering to the demands of a busy kitchen.

In conclusion, the KitchenAid KURO24LSBX offers a blend of style, functionality, and advanced technologies. Its compact design, superior cooling features, and energy-efficient operation make it an ideal addition to any kitchen, ensuring that food and drinks are kept at their best while enhancing the overall aesthetic of the space. Whether for home use or in a commercial setting, the KURO24LSBX represents a thoughtful investment in quality and performance.