Install the Door

IMPORTANT: To ensure proper operation, be sure to grease the top hinge, top spacer and washer with petroleum jelly.

1.Using a Phillips screwdriver and three screws, attach the top spacer to the door.

2.Using petroleum jelly, grease the bottom spacer hole and the bottom hinge pin. Align the washer with the bottom spacer hole.

3.Install the door by inserting the bottom hinge pin into the bottom spacer hole. Be sure the washer remains in place. Slowly lower the door straight and evenly onto the bottom hinge pin. Close the door. Be sure the door properly aligns to the cabinet.

NOTE: Provide additional support for the door when moving the hinges. Do not depend on the door magnets to hold the door in place while you are working.

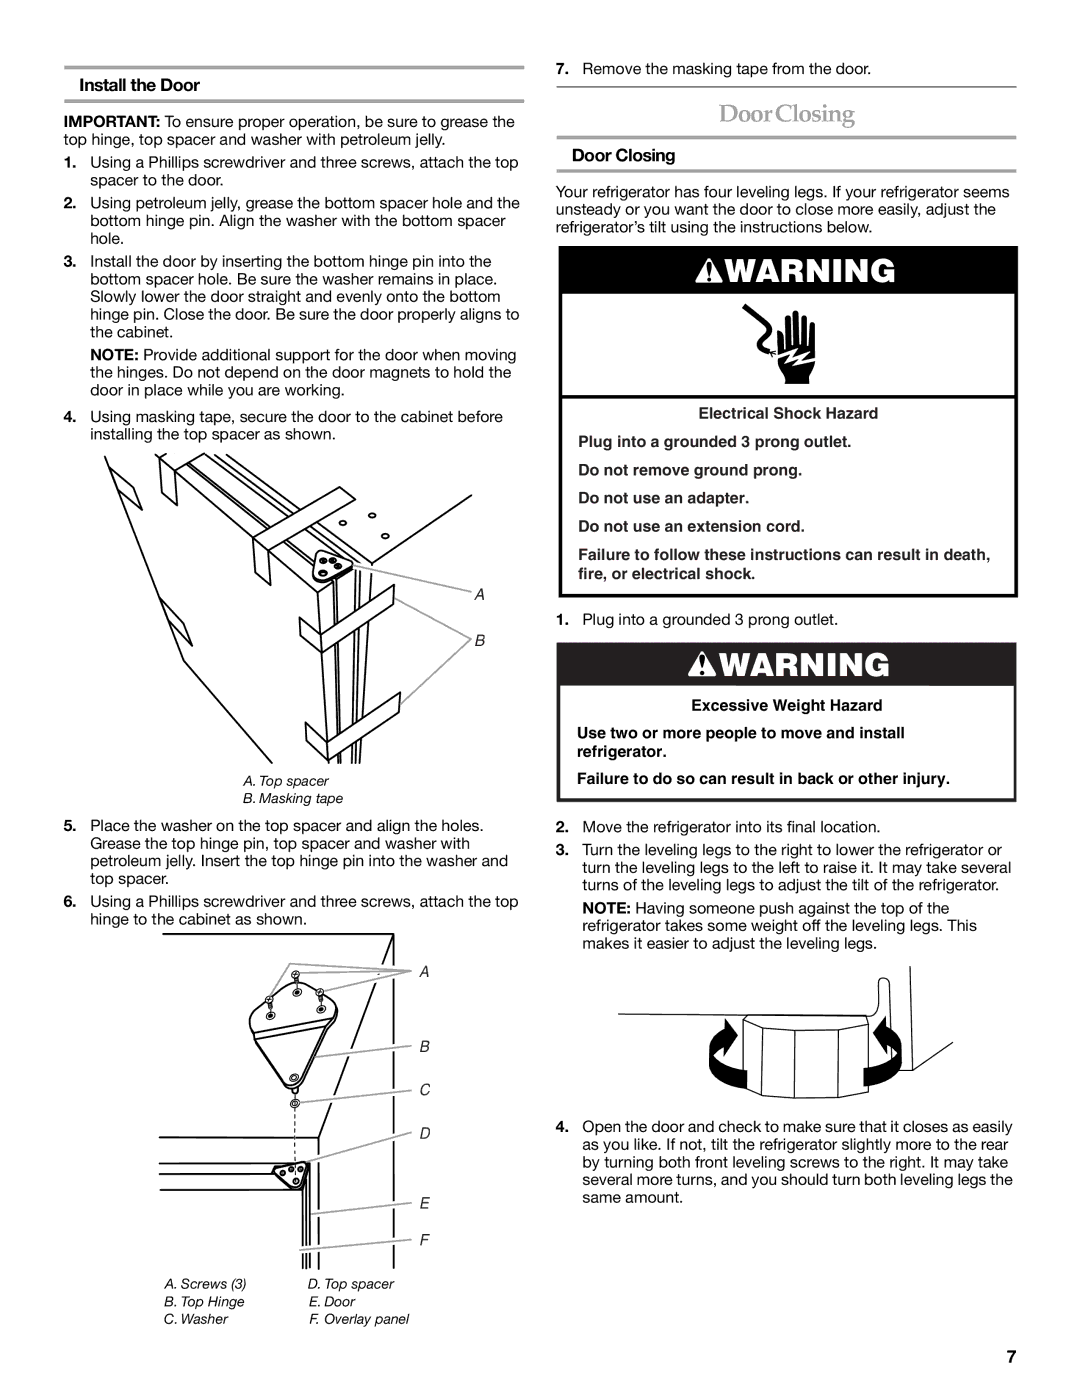
4.Using masking tape, secure the door to the cabinet before installing the top spacer as shown.

A

B

A. Top spacer

B. Masking tape

5.Place the washer on the top spacer and align the holes. Grease the top hinge pin, top spacer and washer with petroleum jelly. Insert the top hinge pin into the washer and top spacer.

6.Using a Phillips screwdriver and three screws, attach the top hinge to the cabinet as shown.

A

B

C

D

E

F

A. Screws (3)

D. Top spacer

B. Top Hinge

E. Door

C. Washer

F. Overlay panel

7.Remove the masking tape from the door.

Door Closing

Door Closing

Your refrigerator has four leveling legs. If your refrigerator seems unsteady or you want the door to close more easily, adjust the refrigerator’s tilt using the instructions below.

WARNING

Electrical Shock Hazard

Plug into a grounded 3 prong outlet.

Do not remove ground prong.

Do not use an adapter.

Do not use an extension cord.

Failure to follow these instructions can result in death, fire, or electrical shock.

1.Plug into a grounded 3 prong outlet.

WARNING

Excessive Weight Hazard

Use two or more people to move and install refrigerator.

Failure to do so can result in back or other injury.

2.Move the refrigerator into its final location.

3.Turn the leveling legs to the right to lower the refrigerator or turn the leveling legs to the left to raise it. It may take several turns of the leveling legs to adjust the tilt of the refrigerator.

NOTE: Having someone push against the top of the refrigerator takes some weight off the leveling legs. This makes it easier to adjust the leveling legs.

4.Open the door and check to make sure that it closes as easily as you like. If not, tilt the refrigerator slightly more to the rear by turning both front leveling screws to the right. It may take several more turns, and you should turn both leveling legs the same amount.

7

Page 7
Image 7
KitchenAid KURO24LSBX manual Door Closing, Install the Door

KURO24LSBX specifications

The KitchenAid KURO24LSBX is a remarkable compact refrigerator designed to meet the needs of modern kitchens and dining setups. This unit combines style, efficiency, and advanced technology, making it an ideal choice for both home and professional use. One of the standout features of the KURO24LSBX is its sleek, stainless steel finish, which complements any kitchen decor while providing a durable, easy-to-clean surface.

With a capacity of 24 inches wide, this refrigerator offers ample storage space without overwhelming smaller areas. Equipped with adjustable shelves, the KURO24LSBX allows users to customize the interior layout to accommodate various foods and beverages. The frameless glass shelves make it easy to store taller items and offer a streamlined look, enhancing visibility and accessibility.

One of the notable technologies in this model is the advanced cooling system, which ensures optimal temperature and humidity levels for food preservation. The refrigerator utilizes a dual evaporator that helps maintain consistent temperatures, preventing freezer burn in the freezer compartment, while also keeping the fresh food section at ideal conditions.

The temperature management system features digital controls, allowing users to precisely set and monitor the internal environment. This technology is complemented by a bright LED lighting system, illuminating the interior and making it easy to find items even in low light.

The KitchenAid KURO24LSBX is also designed with energy efficiency in mind, utilizing an ENERGY STAR certification that signifies reduced energy consumption without sacrificing performance. This not only helps lower energy bills but also contributes to environmental sustainability.

Another impressive characteristic of this model is the integrated ice maker. This convenience ensures you always have ice available for drinks or entertaining guests, adhering to the demands of a busy kitchen.

In conclusion, the KitchenAid KURO24LSBX offers a blend of style, functionality, and advanced technologies. Its compact design, superior cooling features, and energy-efficient operation make it an ideal addition to any kitchen, ensuring that food and drinks are kept at their best while enhancing the overall aesthetic of the space. Whether for home use or in a commercial setting, the KURO24LSBX represents a thoughtful investment in quality and performance.