Installation du système d’évacuation

1.Installer le conduit d’évacuation à travers les ouvertures découpées dans le placard mural ou le mur. Achever l’installation du système d’évacuation conformément à la méthode d’évacuation sélectionnée. Voir la section “Exigences concernant l'évacuation”.

2.À l’aide d’un produit de calfeutrage, assurer l’étanchéité autour de la bouche de décharge à l’extérieur (à travers le mur ou le toit).

Installation de la hotte

1.Ôter les filtres à graisse. Voir la section “Entretien de la cuisinière”.

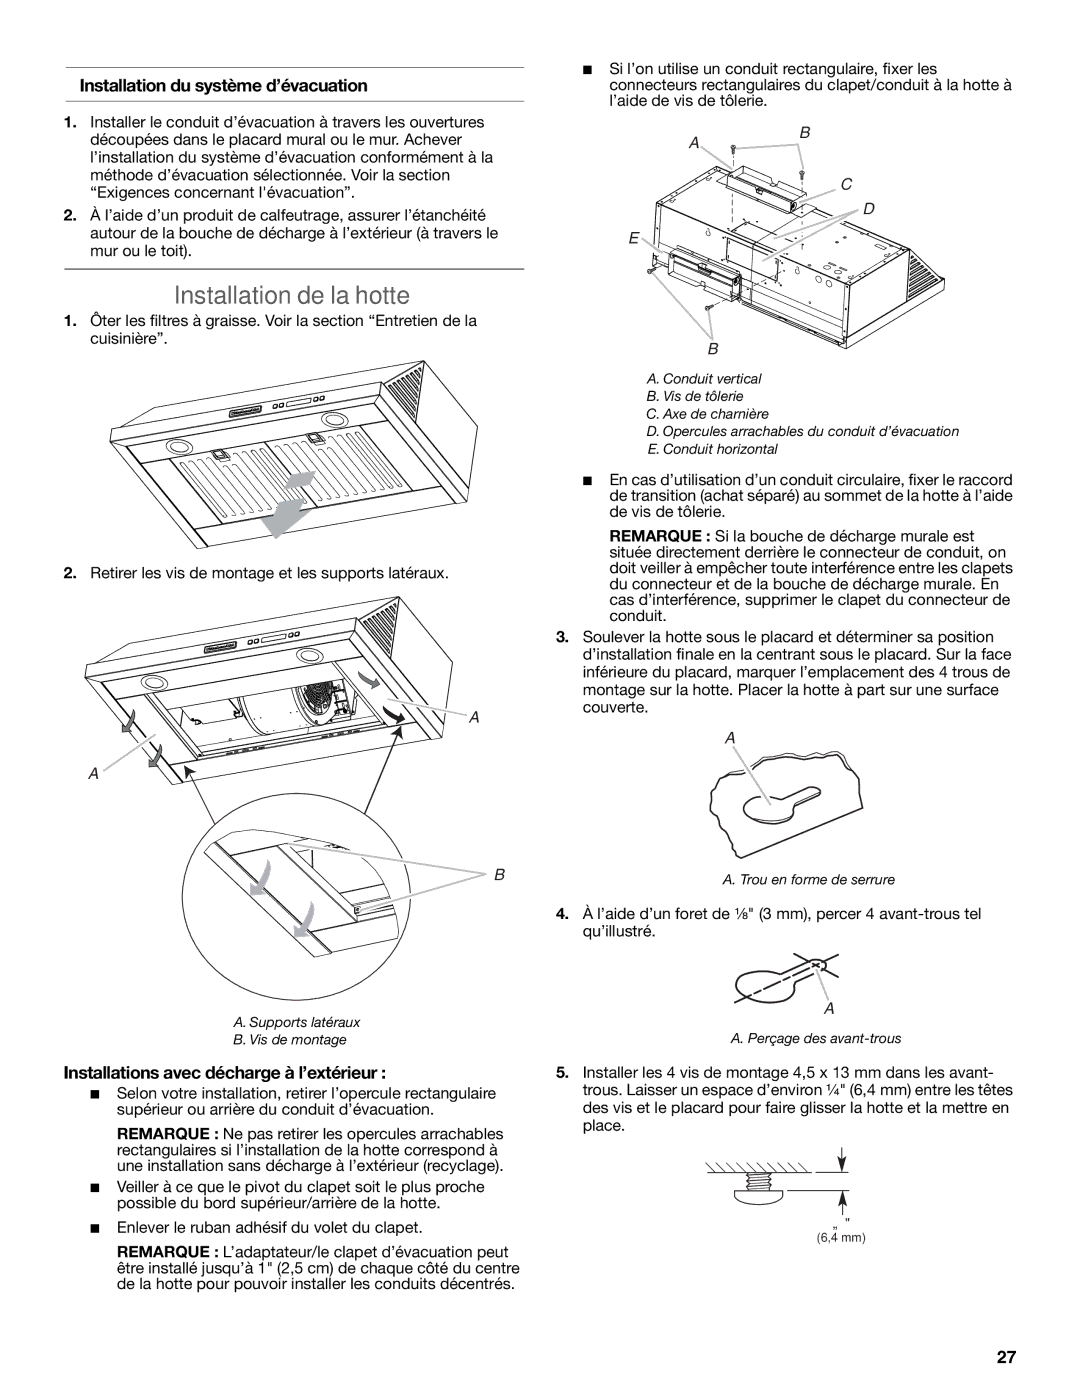
2.Retirer les vis de montage et les supports latéraux.

A

A

B

A. Supports latéraux

B. Vis de montage

Installations avec décharge à l’extérieur :

Selon votre installation, retirer l’opercule rectangulaire supérieur ou arrière du conduit d’évacuation.

REMARQUE : Ne pas retirer les opercules arrachables rectangulaires si l’installation de la hotte correspond à une installation sans décharge à l’extérieur (recyclage).

Veiller à ce que le pivot du clapet soit le plus proche possible du bord supérieur/arrière de la hotte.

Enlever le ruban adhésif du volet du clapet.

REMARQUE : L’adaptateur/le clapet d’évacuation peut être installé jusqu’à 1" (2,5 cm) de chaque côté du centre de la hotte pour pouvoir installer les conduits décentrés.

Si l’on utilise un conduit rectangulaire, fixer les connecteurs rectangulaires du clapet/conduit à la hotte à l’aide de vis de tôlerie.

A

B


C


D

E


B

A. Conduit vertical

B. Vis de tôlerie

C. Axe de charnière

D. Opercules arrachables du conduit d’évacuation

E. Conduit horizontal

En cas d’utilisation d’un conduit circulaire, fixer le raccord de transition (achat séparé) au sommet de la hotte à l’aide de vis de tôlerie.

REMARQUE : Si la bouche de décharge murale est située directement derrière le connecteur de conduit, on doit veiller à empêcher toute interférence entre les clapets du connecteur et de la bouche de décharge murale. En cas d’interférence, supprimer le clapet du connecteur de conduit.

3.Soulever la hotte sous le placard et déterminer sa position d’installation finale en la centrant sous le placard. Sur la face inférieure du placard, marquer l’emplacement des 4 trous de montage sur la hotte. Placer la hotte à part sur une surface couverte.

A

A. Trou en forme de serrure

4.À l’aide d’un foret de ¹⁄₈" (3 mm), percer 4 avant-trous tel qu’illustré.

A

A.Perçage des avant-trous

5.Installer les 4 vis de montage 4,5 x 13 mm dans les avant- trous. Laisser un espace d’environ ¹⁄₄" (6,4 mm) entre les têtes des vis et le placard pour faire glisser la hotte et la mettre en place.

¹⁄₄"

(6,4 mm)

27

Page 27
Image 27
KitchenAid LI3ZGC/W10320581E installation instructions Installation de la hotte, Installation du système d’évacuation

LI3ZGC/W10320581E specifications

The KitchenAid LI3ZGC/W10320581E is a versatile and efficient appliance that enhances the culinary experience for home chefs. With its sleek design and powerful capabilities, this kitchen tool stands out in any kitchen setting. One of the main features is its powerful motor, designed to handle a range of mixing tasks with ease. Whether you are kneading bread dough or whipping cream, the LI3ZGC combines efficiency with performance, ensuring consistent results every time.

One of the key technologies integrated into the KitchenAid LI3ZGC is its advanced planetary mixing action. This innovative system allows the mixing attachment to rotate around the bowl, while also spinning on its own axis. This unique motion ensures that all ingredients are thoroughly mixed, eliminating the need to scrape down the bowl frequently. This feature not only saves time but also enhances the quality of the final product.

Another standout characteristic of the LI3ZGC is its robust construction, designed for durability and longevity. Made from high-quality materials, this appliance can withstand heavy usage, making it ideal for both everyday cooking and special occasions. The sturdy design provides stability during operation, preventing any unwanted movement or slipping.

Additionally, the KitchenAid LI3ZGC/W10320581E comes with various attachments that expand its functionality. These attachments are tailored for specific tasks, such as mixing, whipping, and kneading, allowing users to tackle a wide array of recipes. The ease of switching attachments makes it simple to transition from one culinary task to another, making the cooking process streamlined and enjoyable.

The appliance is also designed with user-friendliness in mind. Intuitive controls and a clear design make it accessible for cooks of all skill levels. The LI3ZGC is not only powerful but also easy to clean, with many components being dishwasher-safe, which contributes to its overall convenience.

In summary, the KitchenAid LI3ZGC/W10320581E is a remarkable kitchen appliance that combines power, efficiency, and durability. With its advanced mixing technology, versatile attachments, and user-friendly design, it is an excellent addition to any kitchen, helping both novice and experienced cooks elevate their culinary creations.