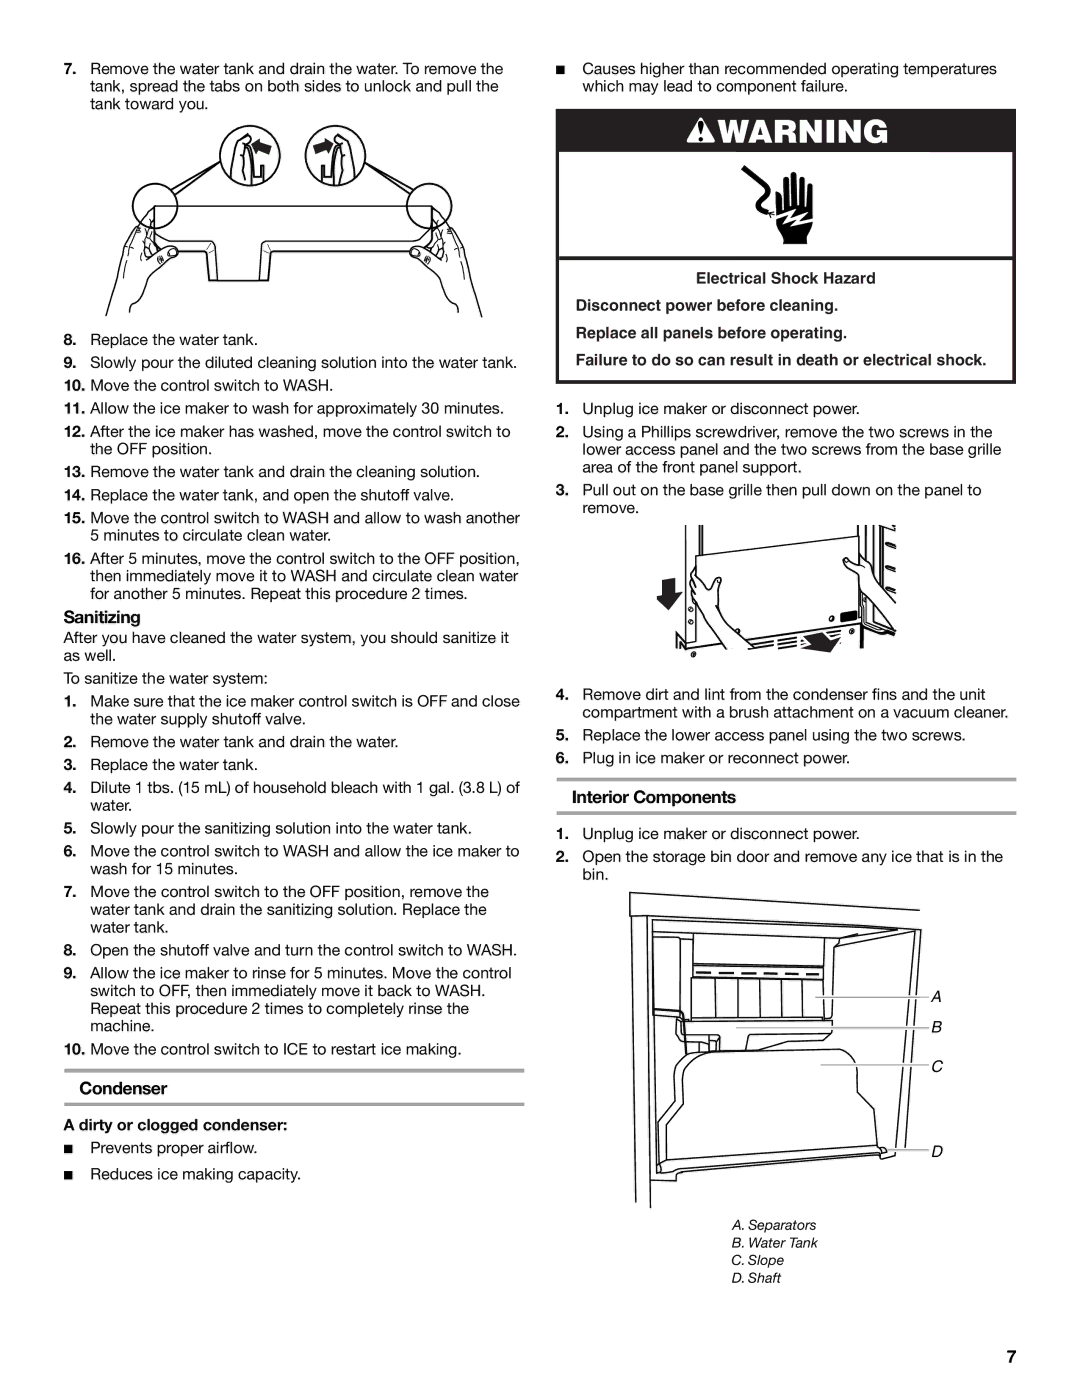
7.Remove the water tank and drain the water. To remove the tank, spread the tabs on both sides to unlock and pull the tank toward you.

8.Replace the water tank.

9.Slowly pour the diluted cleaning solution into the water tank.

10.Move the control switch to WASH.

11.Allow the ice maker to wash for approximately 30 minutes.

12.After the ice maker has washed, move the control switch to the OFF position.

13.Remove the water tank and drain the cleaning solution.

14.Replace the water tank, and open the shutoff valve.

15.Move the control switch to WASH and allow to wash another 5 minutes to circulate clean water.

16.After 5 minutes, move the control switch to the OFF position, then immediately move it to WASH and circulate clean water for another 5 minutes. Repeat this procedure 2 times.

Sanitizing

After you have cleaned the water system, you should sanitize it as well.

To sanitize the water system:

1.Make sure that the ice maker control switch is OFF and close the water supply shutoff valve.

2.Remove the water tank and drain the water.

3.Replace the water tank.

4.Dilute 1 tbs. (15 mL) of household bleach with 1 gal. (3.8 L) of water.

5.Slowly pour the sanitizing solution into the water tank.

6.Move the control switch to WASH and allow the ice maker to wash for 15 minutes.

7.Move the control switch to the OFF position, remove the water tank and drain the sanitizing solution. Replace the water tank.

8.Open the shutoff valve and turn the control switch to WASH.

9.Allow the ice maker to rinse for 5 minutes. Move the control switch to OFF, then immediately move it back to WASH. Repeat this procedure 2 times to completely rinse the machine.

10.Move the control switch to ICE to restart ice making.

Condenser

A dirty or clogged condenser:

Prevents proper airflow.

Reduces ice making capacity.

Causes higher than recommended operating temperatures which may lead to component failure.

WARNING

Electrical Shock Hazard

Disconnect power before cleaning.

Replace all panels before operating.

Failure to do so can result in death or electrical shock.

1.Unplug ice maker or disconnect power.

2.Using a Phillips screwdriver, remove the two screws in the lower access panel and the two screws from the base grille area of the front panel support.

3.Pull out on the base grille then pull down on the panel to remove.

4.Remove dirt and lint from the condenser fins and the unit compartment with a brush attachment on a vacuum cleaner.

5.Replace the lower access panel using the two screws.

6.Plug in ice maker or reconnect power.

Interior Components

1.Unplug ice maker or disconnect power.

2.Open the storage bin door and remove any ice that is in the bin.

A

B

C

D

A.Separators

B.Water Tank

C.Slope

D.Shaft

7

Page 7
Image 7
KitchenAid OUTDOOR ICE MAKER manual Sanitizing, Condenser, Interior Components, Dirty or clogged condenser

OUTDOOR ICE MAKER specifications

The KitchenAid Outdoor Ice Maker is a perfect blend of style, functionality, and durability, making it an essential addition for outdoor kitchens and patios. Designed for those who love entertaining outdoor, this appliance ensures you never run out of ice during your gatherings.

One of the standout features of this ice maker is its ability to produce up to 50 pounds of ice per day, meaning you can keep your drinks cool without constant refills. It features a large-capacity storage bin that holds about 25 pounds of clear, elegant ice, ensuring that you have a steady supply on hand. The unit's compact design allows it to fit seamlessly into any outdoor kitchen setup, making it both practical and aesthetically pleasing.

The KitchenAid Outdoor Ice Maker uses advanced technology to deliver clear ice that melts slowly and maintains the quality of your beverages. The unit employs a commercial-grade compressor that ensures efficient ice production, even in varying outdoor temperatures. With a built-in drain pump, it automatically manages wastewater, making installation easy in various outdoor settings.

In terms of design, this ice maker is crafted from stainless steel, which not only enhances its visual appeal but also provides resistance to rust and corrosion. The sleek finish complements outdoor grills, refrigerators, and other appliances, creating a cohesive look for your culinary space. The front-facing venting design allows for easy installation flush against cabinetry, maximizing your outdoor area while maintaining functionality.

Moreover, the user-friendly control panel allows you to select ice production settings effortlessly. LED lighting within the storage bin makes it easy to see the ice level, ensuring you never run low unexpectedly. The exterior also features a reversible door, providing flexibility in terms of installation orientation.

In summary, the KitchenAid Outdoor Ice Maker combines superior ice-making capacity with advanced features, durable design, and practical technology to enhance any outdoor entertaining experience. Whether hosting a summer barbecue or enjoying a cozy evening by the fire, this ice maker ensures that you are always prepared with fresh, high-quality ice at your fingertips.