3-prong grounding wail recepl

retainer

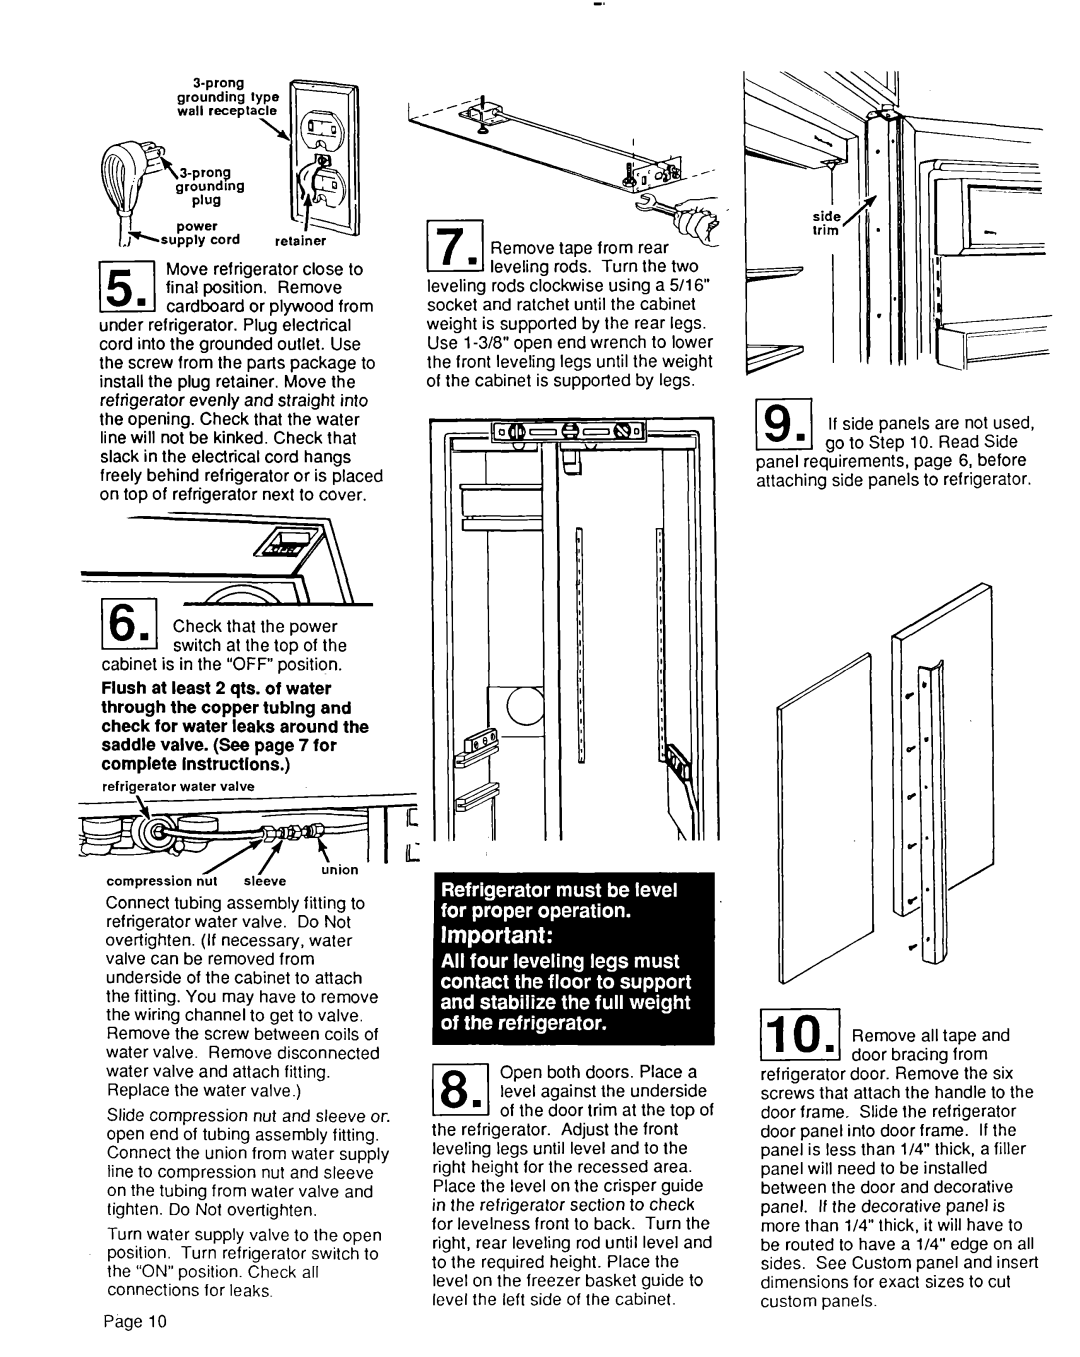
Move refrigerator close to final position. Remove cardboard or plywood from

under refrigerator. Plug electrical cord into the grounded outlet. Use the screw from the parts package to install the plug retainer. Move the refrigerator evenly and straight into the opening. Check that the water line will not be kinked. Check that slack in the electrical cord hangs freely behind refrigerator or is placed on top of refrigerator next to cover.

Check that the power switch at the top of the

cabinet is in the “OFF”position.

Flush at least 2 qts. of water through the copper tublng and check for water leaks around the saddle valve. (See page 7 for complete instructions.)

refrigerator waler valve

Remove tape from

leveling rods cl&wise using a 5/l 6” socket and ratchet until the cabinet weight is supported by the rear legs. Use l-3/8” open end wrench to lower the front leveling legs until the weight of the cabinet is supported by legs.

(9 If side panels are not used,

. go to Step 10. Read Side panel requirements, page 6, before attaching side panels to refrigerator.

/ / union

compression nut sleeve

Connect tubing assembly fitting to refrigerator water valve. Do Not overtighten. (If necessary, water valve can be removed from underside of the cabinet to attach the fitting. You may have to remove the wiring channel to get to valve. Remove the screw between coils of water valve. Remove disconnected water valve and attach fitting. Replace the water valve.)

Slide compression nut and sleeve or. open end of tubing assembly fitting. Connect the union from water supply line to compression nut and sleeve on the tubing from water valve and tighten. Do Not over-tighten.

Turn water supply valve to the open position. Turn refrigerator switch to the “ON”position. Check all connections for leaks.

Page 10

El Open both doors. Place a level against the underside

n of the door trim at the top of the refrigerator. Adjust the front leveling legs until level and to the right height for the recessed area. Place the level on the crisper guide in the refrigerator section to check for levelness front to back. Turn the right, rear leveling rod until level and to the required height. Place the level on the freezer basket guide to level the left side of the cabinet.

/

/

Remove all tape and door bracing from

refrigerator door. Remove the six screws that attach the handle to the door frame. Slide the refrigerator door panel into door frame. If the panel is less than l/4” thick, a filler panel will need to be installed between the door and decorative panel. If the decorative panel is more than l/4” thick, it will have to be routed to have a l/4” edge on all sides. See Custom panel and insert dimensions for exact sizes to cut custom panels.

Page 10
Image 10
KitchenAid S-302 installation instructions Remove tape from, If side panels are not used

S-302 specifications

The KitchenAid S-302 is a versatile and robust stand mixer designed for both amateur cooks and culinary enthusiasts. With a powerful motor and a user-friendly design, this appliance makes preparing a variety of dishes easier and more efficient. Its stylish and classic design ensures that it complements any kitchen décor, while its durable construction promises longevity.

One of the standout features of the KitchenAid S-302 is its impressive motor, which delivers 325 watts of power. This ensures that even heavy doughs and large batches of ingredients can be mixed with ease. The mixer boasts a 10-speed control slider, allowing users to select the perfect speed for their specific mixing needs, from slow stirring to fast whipping. This flexibility is particularly beneficial when working with various textures and consistencies.

The six-quart stainless steel bowl is another highlight of the KitchenAid S-302. This generous capacity allows users to prepare large quantities of ingredients in one go, making it perfect for baking projects or meal prep. The bowl is designed with a sturdy handle for ease of use, and it is dishwasher-safe for hassle-free cleanup.

Another innovative characteristic of the KitchenAid S-302 is its planetary mixing action. This technology ensures that the mixing attachment rotates in one direction while the bowl rotates in the opposite direction, providing thorough ingredient incorporation and eliminating the need to scrape down the sides of the bowl frequently.

The S-302 also comes with various attachments, including a flat beater, a dough hook, and a whisk, making it suitable for a wide range of tasks, from making bread dough to whipping cream or mixing cake batter. The mixer is compatible with numerous optional attachments as well, such as pasta makers and food grinders, further enhancing its versatility.

Ease of use is a priority in the design of the KitchenAid S-302. It features a tilt-head design, which allows users to easily access the bowl and change attachments without hassle. The sturdy base provides stability during operation, ensuring the mixer remains steady while tackling tough mixing jobs.

In addition to its performance features, the KitchenAid S-302 comes in a variety of colors, enabling users to choose one that fits their personal style. With its powerful motor, extensive features, and sleek design, the KitchenAid S-302 is an essential tool for anyone looking to elevate their cooking and baking game.