Location Requirements

WARNING

Explosion Hazard

Keep flammable materials and vapors, such as gasoline, away from refrigerator.

Failure to do so can result in death, explosion, or fire.

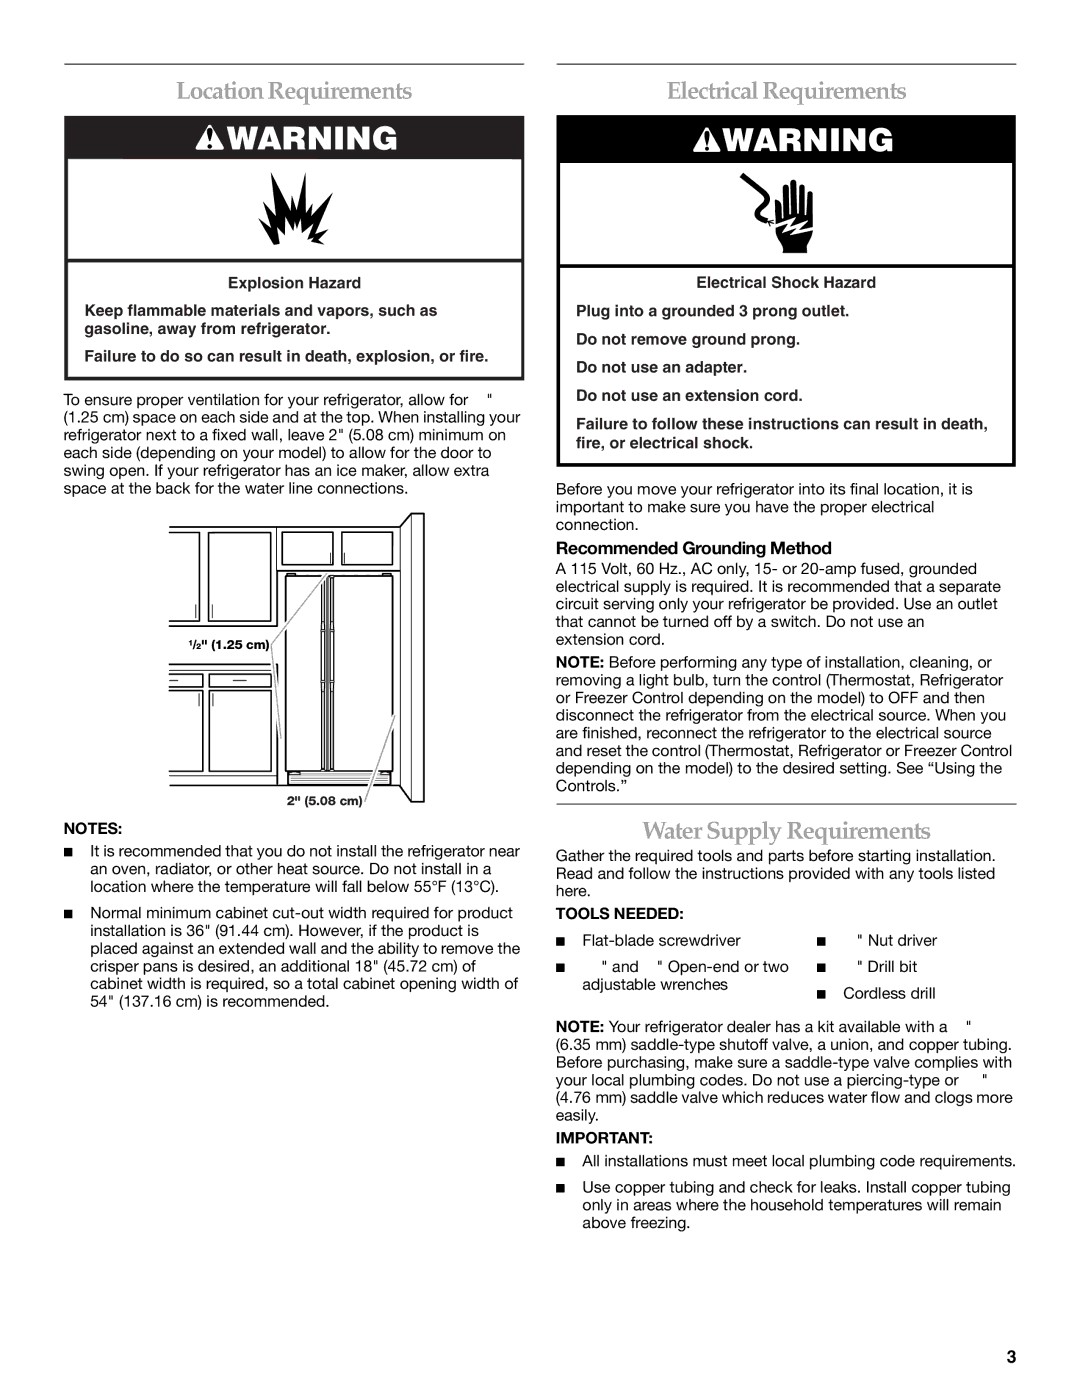
To ensure proper ventilation for your refrigerator, allow for ¹⁄₂" (1.25 cm) space on each side and at the top. When installing your refrigerator next to a fixed wall, leave 2" (5.08 cm) minimum on each side (depending on your model) to allow for the door to swing open. If your refrigerator has an ice maker, allow extra space at the back for the water line connections.

1/2" (1.25 cm)

2" (5.08 cm)

NOTES:

It is recommended that you do not install the refrigerator near an oven, radiator, or other heat source. Do not install in a location where the temperature will fall below 55°F (13°C).

Normal minimum cabinet cut-out width required for product installation is 36" (91.44 cm). However, if the product is placed against an extended wall and the ability to remove the crisper pans is desired, an additional 18" (45.72 cm) of cabinet width is required, so a total cabinet opening width of 54" (137.16 cm) is recommended.

Electrical Requirements

WARNING

Electrical Shock Hazard

Plug into a grounded 3 prong outlet.

Do not remove ground prong.

Do not use an adapter.

Do not use an extension cord.

Failure to follow these instructions can result in death, fire, or electrical shock.

Before you move your refrigerator into its final location, it is important to make sure you have the proper electrical connection.

Recommended Grounding Method

A 115 Volt, 60 Hz., AC only, 15- or 20-amp fused, grounded electrical supply is required. It is recommended that a separate circuit serving only your refrigerator be provided. Use an outlet that cannot be turned off by a switch. Do not use an extension cord.

NOTE: Before performing any type of installation, cleaning, or removing a light bulb, turn the control (Thermostat, Refrigerator or Freezer Control depending on the model) to OFF and then disconnect the refrigerator from the electrical source. When you are finished, reconnect the refrigerator to the electrical source and reset the control (Thermostat, Refrigerator or Freezer Control depending on the model) to the desired setting. See “Using the Controls.”

Water Supply Requirements

Gather the required tools and parts before starting installation. Read and follow the instructions provided with any tools listed here.

TOOLS NEEDED:

Flat-blade screwdriver

¹⁄₄" Nut driver

⁷⁄₁₆" and ¹⁄₂" Open-end or two

¹⁄₄" Drill bit


adjustable wrenches

Cordless drill


NOTE: Your refrigerator dealer has a kit available with a ¹⁄₄"

(6.35 mm) saddle-type shutoff valve, a union, and copper tubing. Before purchasing, make sure a saddle-type valve complies with your local plumbing codes. Do not use a piercing-type or ³⁄₁₆"

(4.76 mm) saddle valve which reduces water flow and clogs more easily.

IMPORTANT:

All installations must meet local plumbing code requirements.

Use copper tubing and check for leaks. Install copper tubing only in areas where the household temperatures will remain above freezing.

3

Page 3
Image 3
KitchenAid T2WG2 Location Requirements, Electrical Requirements, Water Supply Requirements, Recommended Grounding Method

T2WG2L, T2WG2 specifications

The KitchenAid T2WG2 and T2WG2L stand out in the realm of kitchen appliances, offering a combination of style, efficiency, and innovative technology. Both models are designed to elevate culinary experiences, making them essential for home cooks and culinary enthusiasts alike.

One of the standout features of the KitchenAid T2WG2 and T2WG2L is their robust construction. Made from high-quality materials, these kitchen tools are built to withstand the rigors of daily use. The T2WG2 features a durable robust design that emphasizes functionality without sacrificing aesthetics. The T2WG2L variant offers a more modern look, appealing to those who appreciate sleek and contemporary kitchen designs.

The ergonomic handle on both models ensures a comfortable grip, making them easy to maneuver during food preparation. The smooth operation of the tools reduces hand fatigue, allowing users to prepare meals effortlessly. These appliances boast a range of attachments that enhance their versatility. From beaters to dough hooks, the T2WG2 and T2WG2L cater to an array of culinary tasks, allowing users to mix, knead, and whip with ease.

Moreover, both models feature advanced design technology that promotes efficiency. The powerful motor ensures consistent performance, whether you're mixing a light batter or kneading dense dough. The planetary mixing action guarantees that all ingredients are evenly combined, leaving no stubborn pockets of unmixed ingredients.

Cleaning and maintenance are simple with the T2WG2 and T2WG2L. The removable parts are dishwasher-safe, ensuring that cleanup is a breeze after a long cooking session. This feature is particularly appealing to busy individuals who want to enjoy their cooking experience without the hassle of extensive cleanup afterward.

The T2WG2L offers additional color options, allowing users to select an appliance that complements their kitchen décor perfectly. This versatility in design and functionality makes both models an attractive choice for anyone looking to upgrade their kitchen appliances.

In summary, the KitchenAid T2WG2 and T2WG2L embody the perfect blend of power, durability, and style. With their ergonomic design, versatile attachments, and advanced mixing technology, these models are poised to redefine kitchen efficiency and enhance the overall cooking experience. Whether you’re an amateur cook or a seasoned chef, these appliances are sure to become indispensable tools in your culinary toolkit.