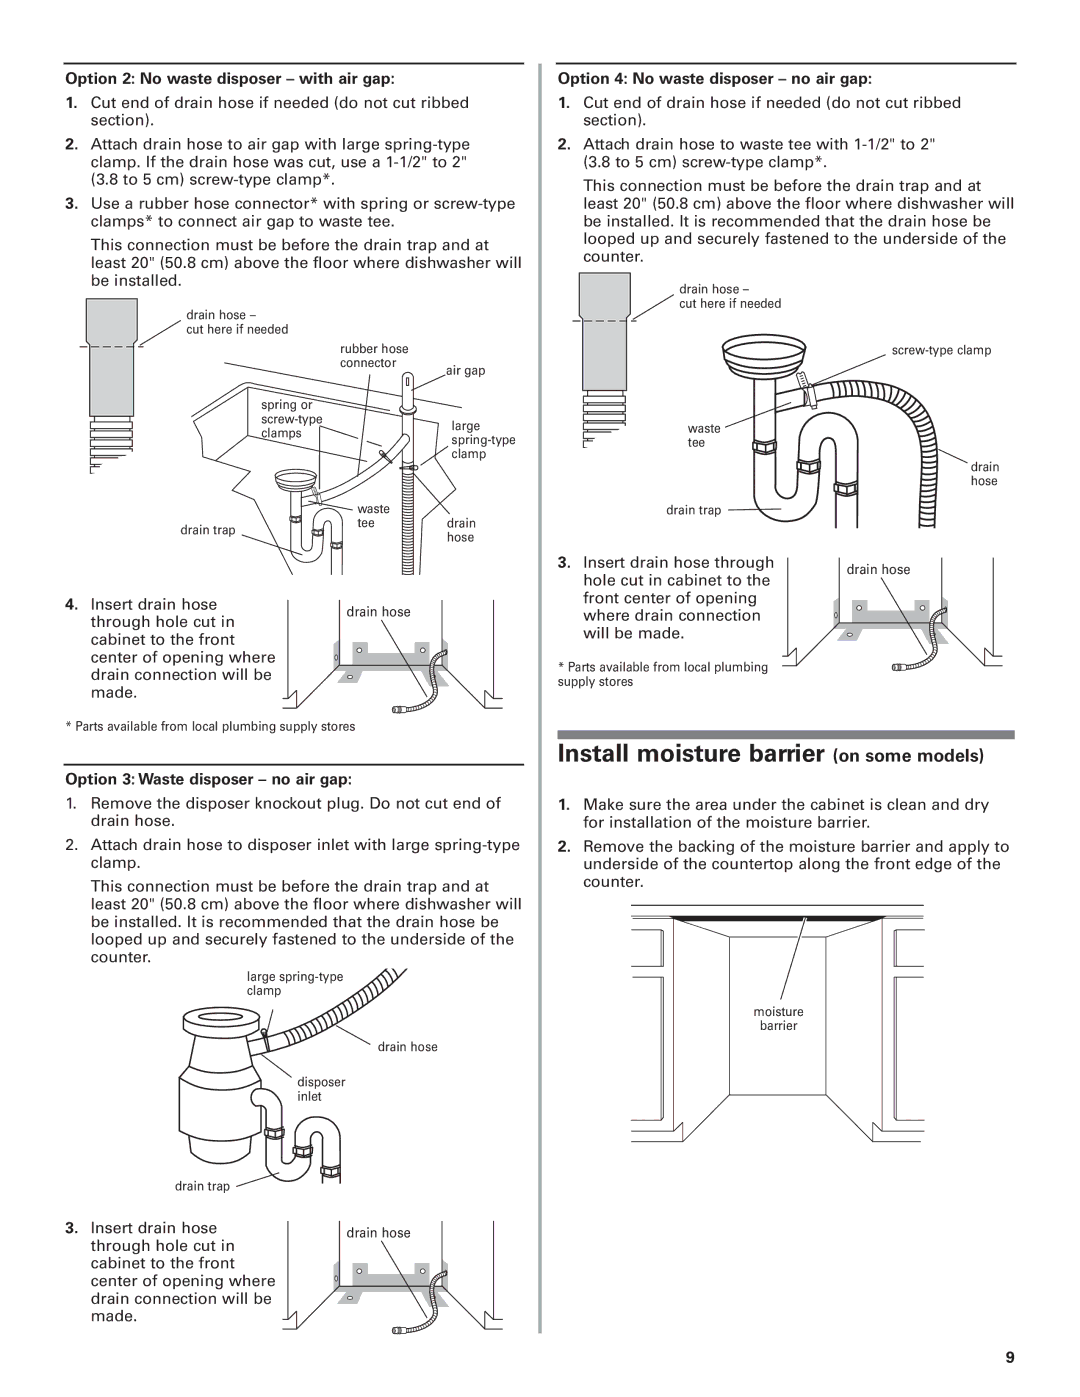
Option 2: No waste disposer – with air gap:

1.Cut end of drain hose if needed (do not cut ribbed section).

2.Attach drain hose to air gap with large spring-type clamp. If the drain hose was cut, use a 1-1/2" to 2"

(3.8 to 5 cm) screw-type clamp*.

3.Use a rubber hose connector* with spring or screw-type clamps* to connect air gap to waste tee.

This connection must be before the drain trap and at least 20" (50.8 cm) above the floor where dishwasher will be installed.

drain hose –

cut here if needed

rubber hose

connector

air gap

Option 4: No waste disposer – no air gap:

1.Cut end of drain hose if needed (do not cut ribbed section).

2.Attach drain hose to waste tee with 1-1/2" to 2"

(3.8 to 5 cm) screw-type clamp*.

This connection must be before the drain trap and at least 20" (50.8 cm) above the floor where dishwasher will be installed. It is recommended that the drain hose be looped up and securely fastened to the underside of the counter.

drain hose – cut here if needed

screw-type clamp

spring or screw-type clamps


waste

drain trap

tee


large spring-type clamp

drain hose

waste tee

drain hose

drain trap

4. Insert drain hose


drain hose

through hole cut in


cabinet to the front


center of opening where


drain connection will be


made.


* Parts available from local plumbing supply stores

Option 3: Waste disposer – no air gap:

1.Remove the disposer knockout plug. Do not cut end of drain hose.

2.Attach drain hose to disposer inlet with large spring-type clamp.

This connection must be before the drain trap and at least 20" (50.8 cm) above the floor where dishwasher will be installed. It is recommended that the drain hose be looped up and securely fastened to the underside of the counter.

large spring-type clamp

drain hose

disposer inlet

drain trap


3. Insert drain hose

drain hose

through hole cut in


cabinet to the front


center of opening where


drain connection will be


made.


3. Insert drain hose through


drain hose

hole cut in cabinet to the


front center of opening


where drain connection


will be made.


* Parts available from local plumbing supply stores

Install moisture barrier (on some models)

1.Make sure the area under the cabinet is clean and dry for installation of the moisture barrier.

2.Remove the backing of the moisture barrier and apply to underside of the countertop along the front edge of the counter.

moisture

barrier

9

Page 9
Image 9
KitchenAid W10078153A installation instructions Install moisture barrier on some models

W10078153A specifications

The KitchenAid W10078153A is a versatile and essential appliance designed to elevate the cooking and baking experience in any kitchen. Known for its high build quality and reliability, this kitchen tool exemplifies the craftsmanship that KitchenAid is renowned for. With an array of features and modern technologies, it stands out as a must-have for both home cooks and professional chefs.

One of the main features of the W10078153A is its powerful performance. Equipped with a robust motor, it ensures efficient mixing and processing, capable of handling heavy doughs and large batches with ease. This makes it an ideal assistant for baking enthusiasts who frequently work with bread, pastries, and other dense mixtures. The appliance also comes with multiple speed settings, allowing users to select the perfect speed for various tasks, ranging from slow stirring to high-speed whipping.

Additionally, the W10078153A incorporates unique mixing technologies, including a planetary mixing action. This feature ensures that ingredients are thoroughly combined, as the mixing attachment rotates around the bowl, covering every corner for consistent blending. This innovative design helps reduce the mixing time and guarantees that even the most challenging recipes achieve the desired texture and results.

Another highlight of this kitchen appliance is its versatility. It includes various attachments that can be interchanged to perform different functions, such as kneading dough, whipping cream, or grinding meat. These attachments can be easily added or removed, making the W10078153A not just a mixer, but a multifunctional kitchen partner that streamlines food preparation tasks.

The design of the W10078153A is both stylish and functional. Its sleek appearance can complement any kitchen decor, while its sturdy construction ensures long-lasting durability. The user-friendly interface features easy-to-read controls and a tilting head that provides easy access to the mixing bowl. This thoughtful design makes it convenient for users to add ingredients while the mixer is in operation.

In summary, the KitchenAid W10078153A is more than just a kitchen appliance; it is a versatile tool designed for efficiency and performance. With its powerful motor, planetary mixing action, and interchangeable attachments, it offers a wide range of culinary possibilities. Whether you are an avid baker or simply looking to simplify your meal prep, this appliance is built to deliver outstanding results, making it an invaluable addition to any kitchen.