KitchenAid W10526089A Adjust Leveling Legs, Install Anti-Tip Bracket, Floor Mounting

Models: W10526089A

1 44
Download 44 pages 19.96 Kb
Page 11
Image 11

Adjust Leveling Legs

1.If range height adjustment is necessary, use a wrench or pliers to loosen the 4 leveling legs.

This may be done with the range on its back or with the range supported on 2 legs after the range has been placed back to a standing position.

NOTE: To place range back up into a standing position, put a sheet of cardboard or hardboard in front of range. Using 2 or more people, stand range back up onto the cardboard or hardboard.

2.Adjust the leveling legs to the correct height. Leveling legs can be loosened to add up to a maximum of 1" (2.5 cm). A minimum of ³⁄₁₆" (5.0 mm) is needed to engage the anti-tip bracket.

NOTE: If height adjustment is made when range is standing, tilt the range back to adjust the front legs, then tilt forward to adjust the rear legs.

3.When the range is at the correct height, check that there is adequate clearance under the range for the anti-tip bracket. Before sliding range into its final location, check that the anti- tip bracket will slide under the range and onto the rear leveling leg prior to anti-tip bracket installation.

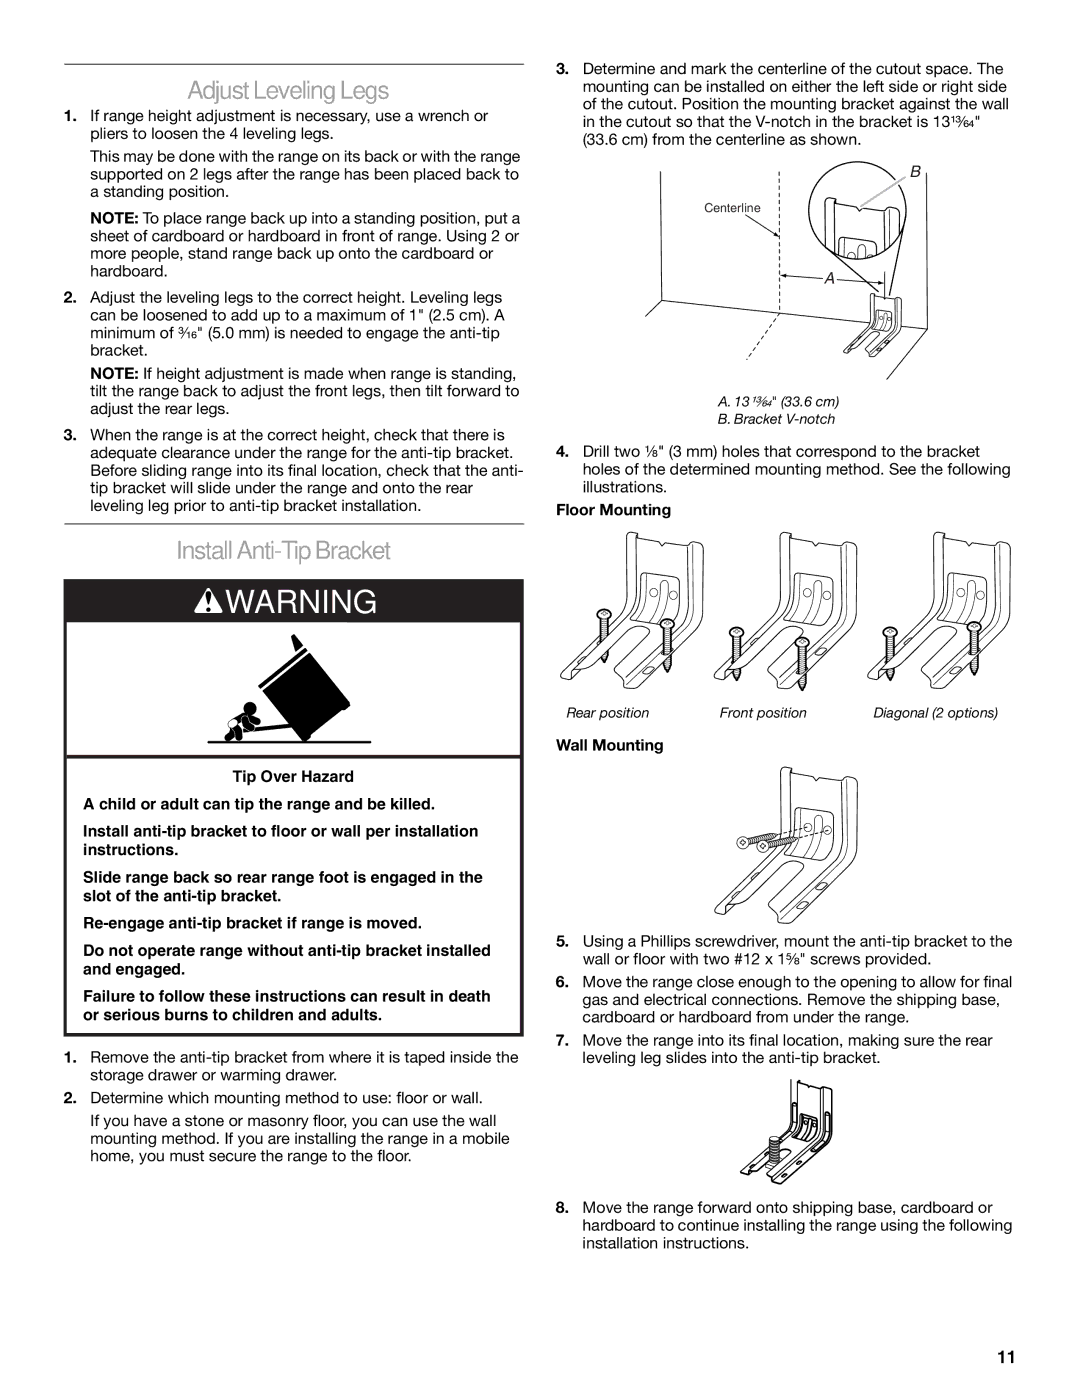
3.Determine and mark the centerline of the cutout space. The mounting can be installed on either the left side or right side of the cutout. Position the mounting bracket against the wall in the cutout so that the V-notch in the bracket is 13¹³⁄₆₄"

(33.6 cm) from the centerline as shown.

B

Centerline

A

A. 13¹³⁄₆₄" (33.6 cm)

B.Bracket V-notch

4.Drill two ¹⁄₈" (3 mm) holes that correspond to the bracket holes of the determined mounting method. See the following illustrations.

Floor Mounting

Install Anti-Tip Bracket

WARNING

Tip Over Hazard

A child or adult can tip the range and be killed.

Install anti-tip bracket to floor or wall per installation instructions.

Slide range back so rear range foot is engaged in the slot of the anti-tip bracket.

Re-engage anti-tip bracket if range is moved.

Do not operate range without anti-tip bracket installed and engaged.

Failure to follow these instructions can result in death or serious burns to children and adults.

1.Remove the anti-tip bracket from where it is taped inside the storage drawer or warming drawer.

2.Determine which mounting method to use: floor or wall.

If you have a stone or masonry floor, you can use the wall mounting method. If you are installing the range in a mobile home, you must secure the range to the floor.

Rear position

Front position

Diagonal (2 options)

Wall Mounting

5.Using a Phillips screwdriver, mount the anti-tip bracket to the wall or floor with two #12 x 1⁵⁄₈" screws provided.

6.Move the range close enough to the opening to allow for final gas and electrical connections. Remove the shipping base, cardboard or hardboard from under the range.

7.Move the range into its final location, making sure the rear leveling leg slides into the anti-tip bracket.

8.Move the range forward onto shipping base, cardboard or hardboard to continue installing the range using the following installation instructions.

11

Page 11
Image 11
KitchenAid W10526089A Adjust Leveling Legs, Install Anti-Tip Bracket, Floor Mounting, Wall Mounting

W10526089A specifications

The KitchenAid W10526089A is a highly efficient and versatile appliance that serves as a replacement water filter, designed specifically for select KitchenAid refrigerators. This model ensures that you and your family can enjoy clean, fresh-tasting water and ice. One of its main features is the ability to reduce contaminants commonly found in tap water, including chlorine, lead, and sediment, ensuring a healthier drinking experience.

One of the standout technologies in the W10526089A is its advanced filtration system, which includes activated carbon. This technology works effectively to absorb impurities that can affect the taste and purity of water. Not only does it enhance flavor, but it also helps in removing odors, delivering crisp and refreshing hydration. The filter is designed to provide up to six months of use, depending on water quality and consumption, which ensures that you get great performance without frequent replacements.

Installation of the W10526089A is straightforward, making it easy for homeowners to replace their existing filter without needing professional assistance. It features a simple twist-and-lock design that allows for quick and hassle-free changes. This ease of use is a significant benefit, particularly for busy families who rely on continual access to filtered water.

In terms of characteristics, the W10526089A is designed to fit within specific KitchenAid refrigerator models, ensuring seamless compatibility. Its compact size allows it to fit discreetly behind the refrigerator’s interior, maintaining aesthetic appeal while ensuring functionality. Additionally, the filter carries the NSF International certification, which verifies that it meets strict public health standards for water filtration safety and performance.

The W10526089A also comes with a clear indicator that alerts users when it’s time to replace the filter, promoting better maintenance and ensuring your water remains pure at all times. This intelligent feature minimizes the guesswork involved with water filter replacement, leading to improved health and convenience.

Overall, the KitchenAid W10526089A water filter is a reliable investment for anyone looking to improve their home’s drinking water quality, offering advanced filtration technologies, user-friendly design, and a commitment to safety and performance.