Exhaust
requirements 1
Four Inch Metal Exhaust Duct IS
.equlred. (Do nol use 3 in exhaust duct.) Metal flex~ nay be used.
Use Duct Tape to peal all joints.
Exhausting the dryer outside is recommende
IIdryer cannot be exhaus sutside, use Exhaust Defl
Kit LCK4500 available from your KitchenAId dealer.
Exhausting the dryer through the side of the washer/dryer requires use of Side Exhaust Kit LCK4600. Follow installation mstructions with the kit for proper exhaust mslallation.
Mobile Home Exhaust Reouirements: see Panel F Al&ate Exhaust Method.
Metal Flexible Duct must be fully extended and supported when the dryer IS III its final posItIon. DO NOT KINK OR CRUSH THE DUCT
Exhaust Duct should end with an exhaust hood to prevent exhausted air returning Into dryer. The outlet 01 the hood musl be at least 12 Inches from Ihe ground or any object lhat may be in path of exhausl.
2%” inch outlet Exhaust Hood should be used with short systems only. This outlet creates greater backward pressure than other hood types.
Exhaust Hoods with magnetic latches should not be used
Maximum Length of the exhaust system depends upon the type of duct used, number of elbows and type of exhaust hood. The maximum lenglh for both ngid and flexible duct is shown in charf
Caution: Exhaust Systems longer than speclfled WIII -
lShorten the life of the dryer.
l Reduce
l Accumulate Ilnt.
Now start...
1.
Use a ‘/IS Inch socket wrench to remove two bolts holdina Ihe wood pallet to the bottom of th> washer/dryer.
PANEL B
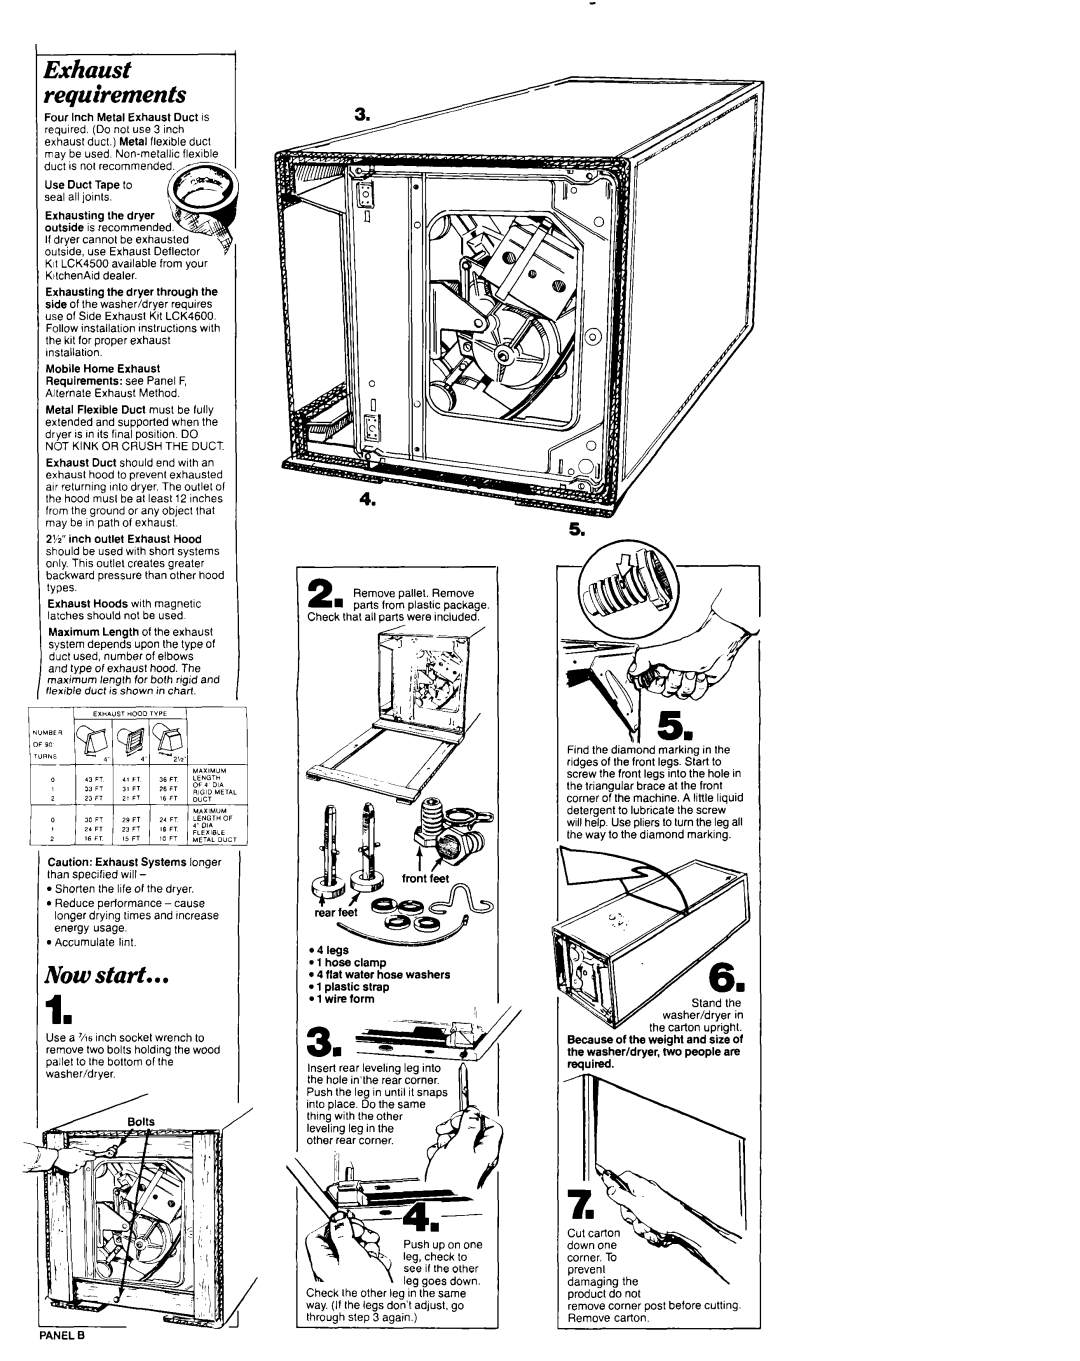
2 Remove pallet. Remove
n parts from plastic package. Check thal all parts were included.
l 1 h&e clamp
l 4 flat water hose washers l 1 elastic straw
l 1 ire term ’
Insert rear levelmg leg into the hole in’the rear corner. Push the leg in until it snap inlo place. Do the same thmg with the other leveling leg in the
other rear corner.
rw | Pushuponone | 1 |
| ~ lea.checkto | I |
Check Ihe other leg in the same |
| |
way. (If the legs don’t adjust, go |
| |
through step | 3 again.) | I |
:ind the diamond marking in the idges of the front legs. Start to icrew the front legs into the hole in he triangular brace at the front :orner of the machine. A little liquid detergent to lubricale the screw VIIIhelp. Use pliers to turn lhe leg all he way to the diamond marking.
he washer/dryer, people are ~uired.
damaging the producl do not
remove corner post before cutting. Remove carton.