2.Determine vent length.

The maximum length of the exhaust system depends upon:

The type of vent (rigid metal or flexible metal).

The number of elbows used.

Type of hood.

Recommended hood styles are shown here.

B

A

4"

(10.2 cm)

4" (10.2 cm)

A. Louvered hood style

B. Box hood style

The angled hood style (shown following) is acceptable.

4" (10.2 cm)

2½"

(6.4 cm)

See the exhaust vent length chart that matches your hood type for the maximum vent lengths you can use.

Exhaust systems longer than specified will:

Shorten the life of the dryer.

Reduce performance, resulting in longer drying times and increased energy usage.

3.Determine the number of elbows you will need.

IMPORTANT: Do not use vent runs longer than those specified in the Vent Length Chart.

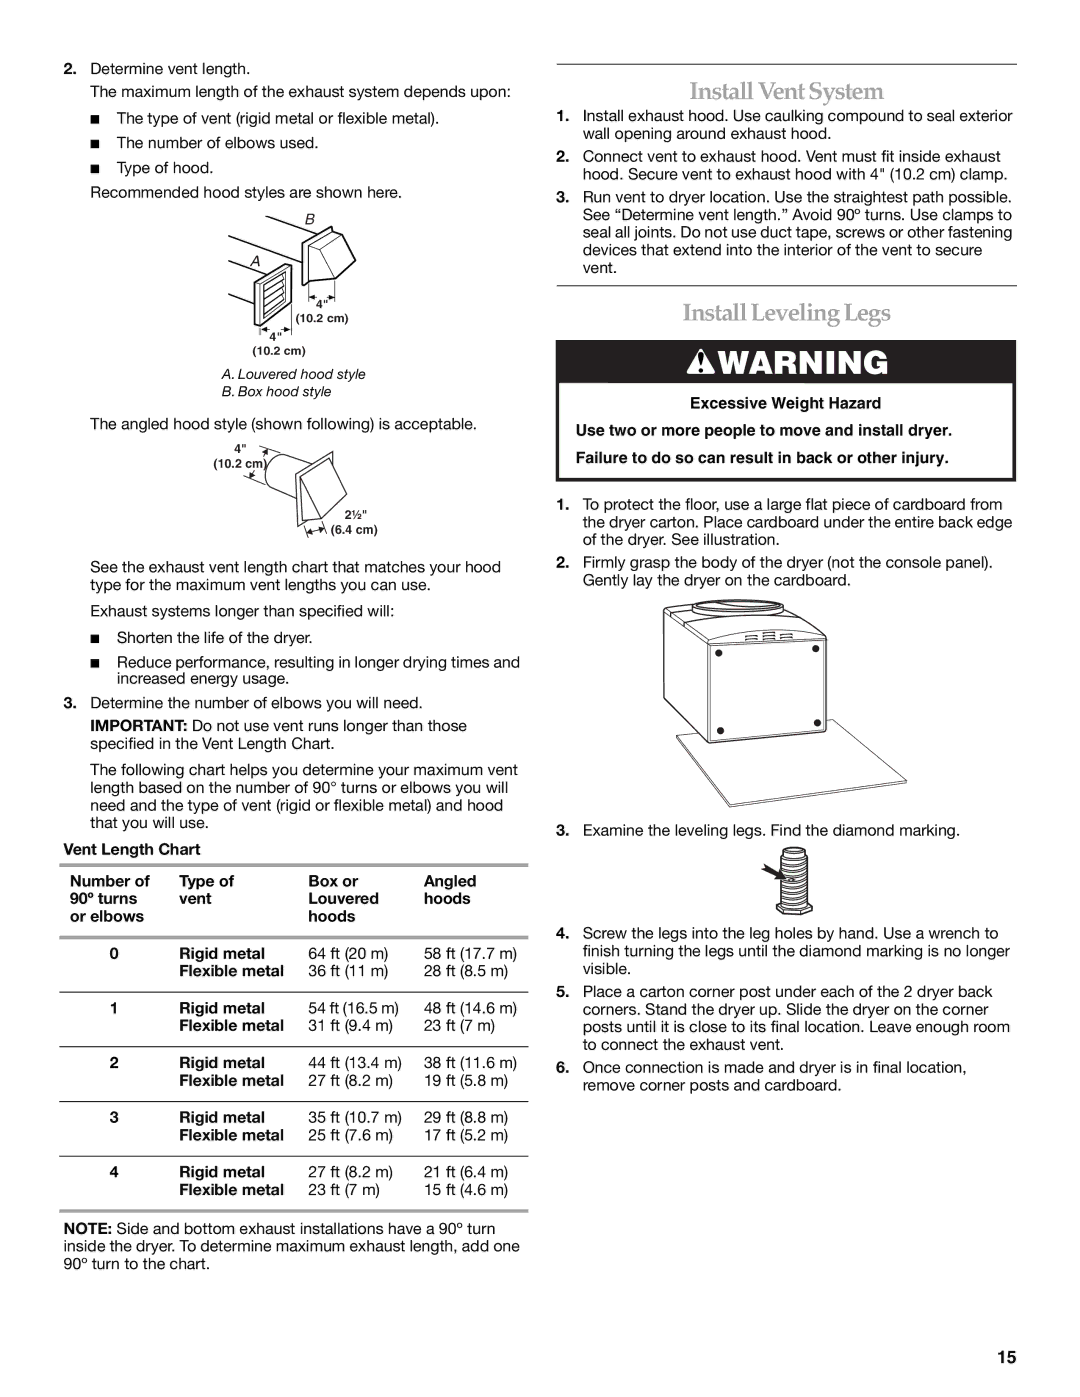
The following chart helps you determine your maximum vent length based on the number of 90° turns or elbows you will need and the type of vent (rigid or flexible metal) and hood that you will use.

Vent Length Chart

Number of

Type of

Box or

Angled

90º turns

vent

Louvered

hoods

or elbows


hoods


0

Rigid metal

64 ft (20 m)

58 ft (17.7 m)


Flexible metal

36 ft (11 m)

28 ft (8.5 m)


1

Rigid metal

54 ft (16.5 m)

48 ft (14.6 m)


Flexible metal

31 ft (9.4 m)

23 ft (7 m)


2

Rigid metal

44 ft (13.4 m)

38 ft (11.6 m)


Flexible metal

27 ft (8.2 m)

19 ft (5.8 m)


3

Rigid metal

35 ft (10.7 m)

29 ft (8.8 m)


Flexible metal

25 ft (7.6 m)

17 ft (5.2 m)


4

Rigid metal

27 ft (8.2 m)

21 ft (6.4 m)


Flexible metal

23 ft (7 m)

15 ft (4.6 m)

NOTE: Side and bottom exhaust installations have a 90º turn inside the dryer. To determine maximum exhaust length, add one 90º turn to the chart.

InstallVent System

1.Install exhaust hood. Use caulking compound to seal exterior wall opening around exhaust hood.

2.Connect vent to exhaust hood. Vent must fit inside exhaust hood. Secure vent to exhaust hood with 4" (10.2 cm) clamp.

3.Run vent to dryer location. Use the straightest path possible. See “Determine vent length.” Avoid 90º turns. Use clamps to seal all joints. Do not use duct tape, screws or other fastening devices that extend into the interior of the vent to secure vent.

InstallLeveling Legs

WARNING

Excessive Weight Hazard

Use two or more people to move and install dryer. Failure to do so can result in back or other injury.

1.To protect the floor, use a large flat piece of cardboard from the dryer carton. Place cardboard under the entire back edge of the dryer. See illustration.

2.Firmly grasp the body of the dryer (not the console panel). Gently lay the dryer on the cardboard.

3.Examine the leveling legs. Find the diamond marking.

4.Screw the legs into the leg holes by hand. Use a wrench to finish turning the legs until the diamond marking is no longer visible.

5.Place a carton corner post under each of the 2 dryer back corners. Stand the dryer up. Slide the dryer on the corner posts until it is close to its final location. Leave enough room to connect the exhaust vent.

6.Once connection is made and dryer is in final location, remove corner posts and cardboard.

15

Page 15
Image 15
KitchenAid YKEHS01P manual InstallVent System, InstallLeveling Legs, Angled hood style shown following is acceptable

YKEHS01P, KEHS01P specifications

The KitchenAid KEHS01P and YKEHS01P stand mixers are emblematic of KitchenAid's commitment to quality, durability, and innovative design in kitchen appliances. These stand mixers have become essential tools for both amateur home bakers and professional chefs, bringing versatility and performance to every kitchen.

One of the most notable features of the KEHS01P and YKEHS01P is their powerful motor. With a robust engine that delivers reliable torque, these mixers can handle a wide range of tasks, from whipping egg whites to kneading thick bread dough. This level of power ensures that users can mix even the heaviest of ingredients effortlessly.

Both models come equipped with the signature 10-speed slide control, which allows for precise adjustments to suit different mixing techniques and recipes. Whether it’s a slow stir, a moderate mix, or a fast whip, the seamless transition between speeds provides optimal control over the mixing process. This feature is especially beneficial when dealing with delicate ingredients that require a gentle touch.

The tilt-head design of the KEHS01P and YKEHS01P makes it easy to access the mixing bowl and change attachments, allowing for quick ingredient additions and simple cleaning. The mixers are compatible with a wide range of accessories and attachments that expand their functionality, from pasta makers to food grinders, enhancing their versatility in the kitchen.

Another key characteristic of these stand mixers is their sturdy construction. Made with a durable metal housing, the stand mixers provide stability during use and ensure long-lasting performance. Their compact yet powerful design means they can easily fit into any kitchen countertop without sacrificing functionality.

The mixing bowl included with these models is typically a generous 4.5-quart capacity, perfect for preparing large batches of dough or batter. The stainless-steel bowl is not only easy to clean but is also designed to resist rust and wear over time, adding to the longevity of the product.

In addition to functionality, style is not overlooked. KitchenAid offers a variety of colors and finishes, allowing users to find a model that fits their kitchen aesthetic.

Overall, the KitchenAid KEHS01P and YKEHS01P models embody a blend of power, precision, and style. They are designed to inspire culinary creativity while making the baking and cooking experience enjoyable and efficient. With their impressive features and reliable performance, these stand mixers are truly a worthy investment for anyone who loves to cook or bake.