3.Remove the 2 screws that hold the handle bracket to the door.

4.Move hinge to the other side and reattach with the 4 screws removed in Step 2.

5.Move handle bracket to the other side and reattach with the 2 screws removed in Step 3.

6.Set the inner door assembly aside.

Reinstalling the door

1.Check for fingerprints on the glass. Clean if necessary.

2.Place the inner door assembly into the outer door assembly. Align the hinge in the opening on the side. To fit correctly, the inside door assembly edge is completely inside the outside door assembly edge.

3.Reassemble the inner and outer door assemblies with the 6 screws.

4.Replace the 2 handle screws for the door handle of the door assembly.

5.Use a small flat-blade screwdriver to remove hole plugs in the door opening. Slide the head of the screwdriver under the cap of each hole plug, being careful not to scratch the dryer surface. Lift up. Remove the hole plugs in the door opening and insert in the opposite side.

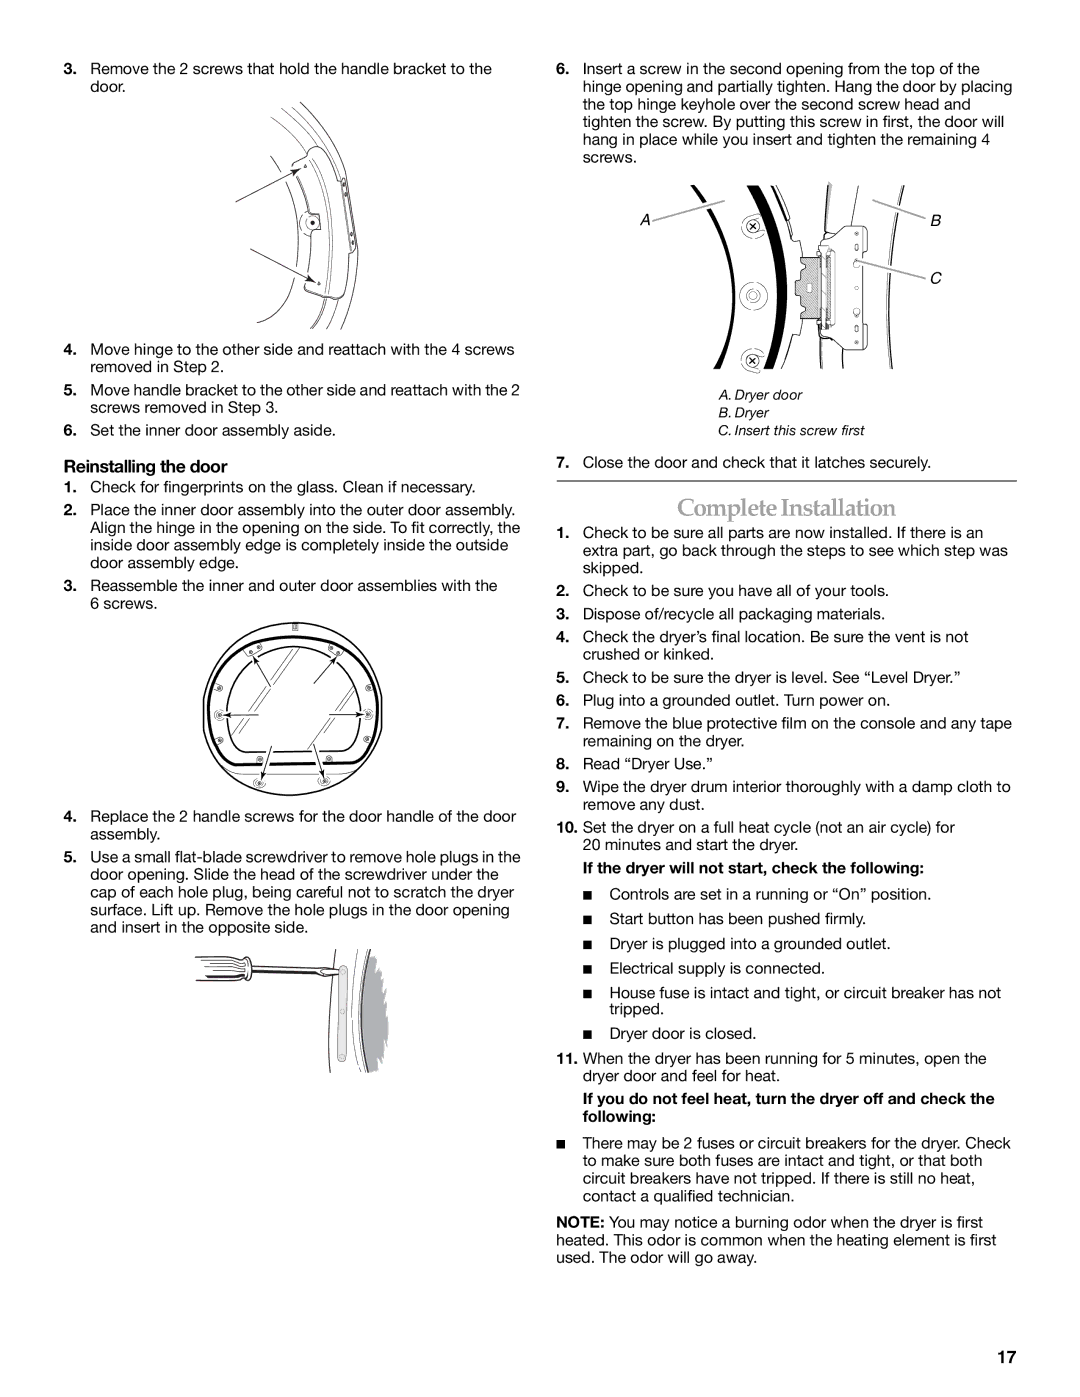
6.Insert a screw in the second opening from the top of the hinge opening and partially tighten. Hang the door by placing the top hinge keyhole over the second screw head and tighten the screw. By putting this screw in first, the door will hang in place while you insert and tighten the remaining 4 screws.

A B

C

A. Dryer door

B.Dryer

C.Insert this screw first

7.Close the door and check that it latches securely.

Complete Installation

1.Check to be sure all parts are now installed. If there is an extra part, go back through the steps to see which step was skipped.

2.Check to be sure you have all of your tools.

3.Dispose of/recycle all packaging materials.

4.Check the dryer’s final location. Be sure the vent is not crushed or kinked.

5.Check to be sure the dryer is level. See “Level Dryer.”

6.Plug into a grounded outlet. Turn power on.

7.Remove the blue protective film on the console and any tape remaining on the dryer.

8.Read “Dryer Use.”

9.Wipe the dryer drum interior thoroughly with a damp cloth to remove any dust.

10.Set the dryer on a full heat cycle (not an air cycle) for 20 minutes and start the dryer.

If the dryer will not start, check the following:

Controls are set in a running or “On” position.

Start button has been pushed firmly.

Dryer is plugged into a grounded outlet.

Electrical supply is connected.

House fuse is intact and tight, or circuit breaker has not tripped.

Dryer door is closed.

11.When the dryer has been running for 5 minutes, open the dryer door and feel for heat.

If you do not feel heat, turn the dryer off and check the following:

There may be 2 fuses or circuit breakers for the dryer. Check to make sure both fuses are intact and tight, or that both circuit breakers have not tripped. If there is still no heat, contact a qualified technician.

NOTE: You may notice a burning odor when the dryer is first heated. This odor is common when the heating element is first used. The odor will go away.

17

Page 17
Image 17
KitchenAid KEHS01P manual Complete Installation, Reinstalling the door, Close the door and check that it latches securely

YKEHS01P, KEHS01P specifications

The KitchenAid KEHS01P and YKEHS01P stand mixers are emblematic of KitchenAid's commitment to quality, durability, and innovative design in kitchen appliances. These stand mixers have become essential tools for both amateur home bakers and professional chefs, bringing versatility and performance to every kitchen.

One of the most notable features of the KEHS01P and YKEHS01P is their powerful motor. With a robust engine that delivers reliable torque, these mixers can handle a wide range of tasks, from whipping egg whites to kneading thick bread dough. This level of power ensures that users can mix even the heaviest of ingredients effortlessly.

Both models come equipped with the signature 10-speed slide control, which allows for precise adjustments to suit different mixing techniques and recipes. Whether it’s a slow stir, a moderate mix, or a fast whip, the seamless transition between speeds provides optimal control over the mixing process. This feature is especially beneficial when dealing with delicate ingredients that require a gentle touch.

The tilt-head design of the KEHS01P and YKEHS01P makes it easy to access the mixing bowl and change attachments, allowing for quick ingredient additions and simple cleaning. The mixers are compatible with a wide range of accessories and attachments that expand their functionality, from pasta makers to food grinders, enhancing their versatility in the kitchen.

Another key characteristic of these stand mixers is their sturdy construction. Made with a durable metal housing, the stand mixers provide stability during use and ensure long-lasting performance. Their compact yet powerful design means they can easily fit into any kitchen countertop without sacrificing functionality.

The mixing bowl included with these models is typically a generous 4.5-quart capacity, perfect for preparing large batches of dough or batter. The stainless-steel bowl is not only easy to clean but is also designed to resist rust and wear over time, adding to the longevity of the product.

In addition to functionality, style is not overlooked. KitchenAid offers a variety of colors and finishes, allowing users to find a model that fits their kitchen aesthetic.

Overall, the KitchenAid KEHS01P and YKEHS01P models embody a blend of power, precision, and style. They are designed to inspire culinary creativity while making the baking and cooking experience enjoyable and efficient. With their impressive features and reliable performance, these stand mixers are truly a worthy investment for anyone who loves to cook or bake.