User’s Guide
Kodak EasyShare LS755 zoom digital camera
Eastman Kodak Company Rochester, New York
Bottom view with the slot cover open
Front View
Back view
Using the 5-way controller
Table of contents
Table of contents
Page
Package contents
Installing the software first
Getting started
Important battery information
Loading the battery
Battery safety and handling
Battery life
Charging the battery
Extending battery life
Plug the other end of the AC adapter into the outlet
Setting the date & time, first time
Setting the date and time
Setting the date & time, anytime
Turning the camera on and off
Picture taking screen
Icons that appear on the camera screen
Active camera settings are displayed
Icon display
Review screen
Picture information screen
Remaining battery life
Using the xD-Picture Card
Storing pictures and videos on an xD-Picture Card
Push the card into the slot and close the slot cover
Taking a video
Taking a picture
Camera modes
Use this mode For
Scene modes
Focus setting
Focus setting Details
Using the AF frame
Press the Shutter button halfway down and hold
Mode
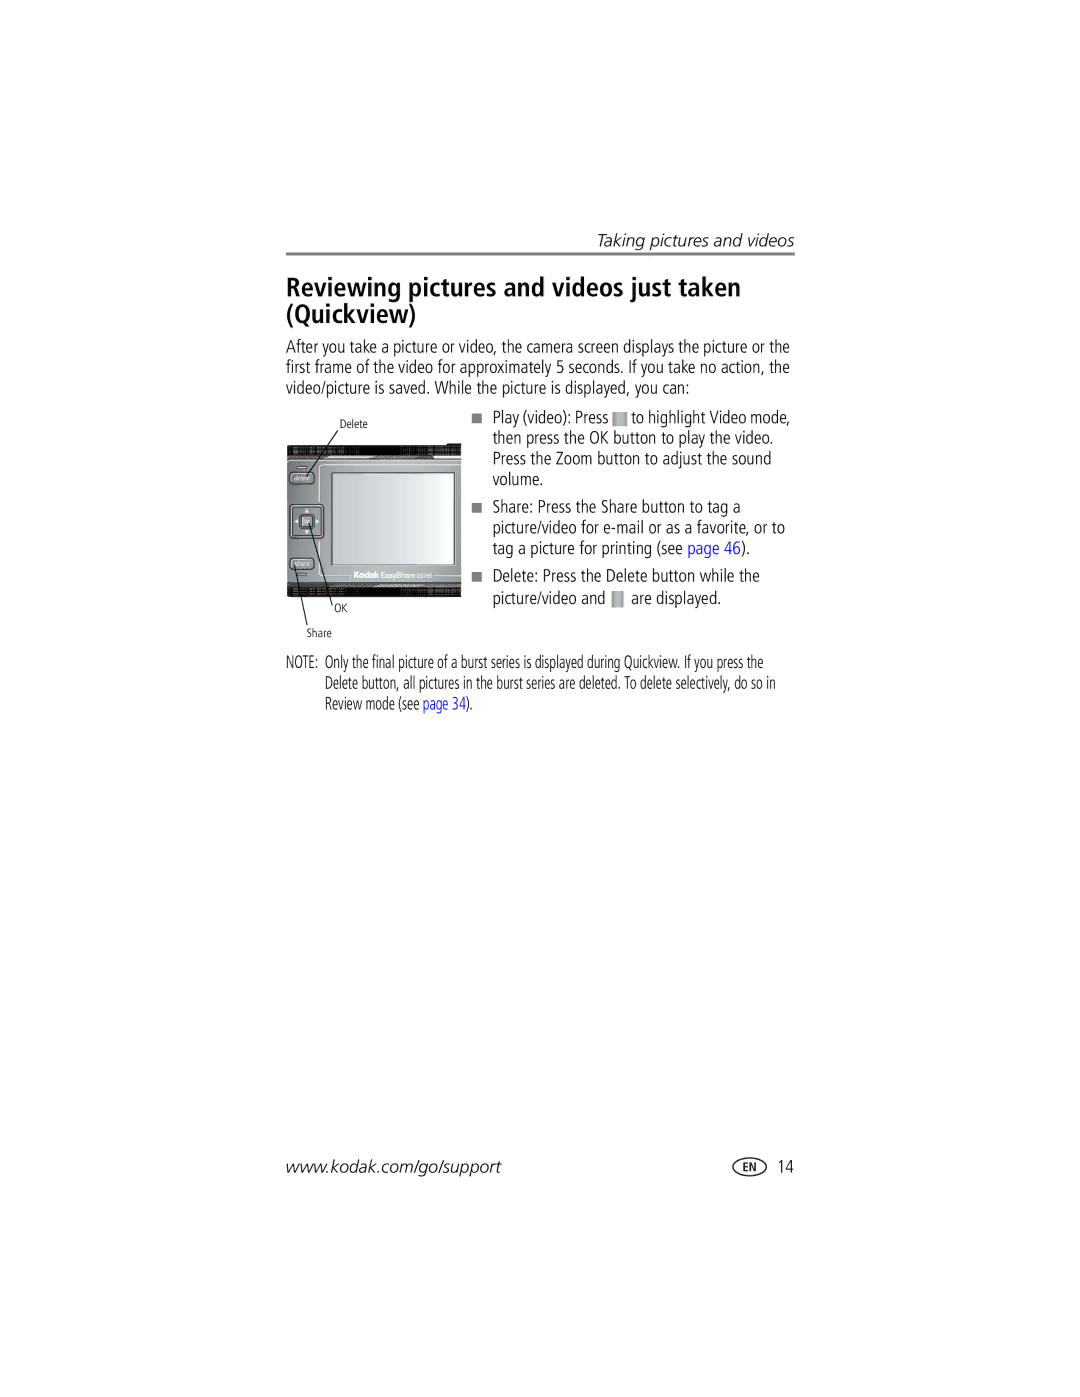
Reviewing pictures and videos just taken Quickview
Using digital zoom
Using optical zoom
Take a picture or video
Take a picture normally
Flash Mode Flash Fires
Using the flash
Turning the flash on
Flash range
Flash setting for each mode
Manually setting the white balance
Custom mode, press the Menu button
Press the OK button
Changing picture-taking settings
Setting Icon Options Self Timer
Digital Zoom
1920 x 2550 pixels
Setting Icon Options Burst
Picture Size
Scene Customizing
Setting Icon Options White Balance
ISO Speed
Setting Icon Options Focus Zone
Exposure Metering
Latitude
SPEED, Latitude
Sound Recording On or OFF default
Setting Icon Options Image Storage
Image Stabilizer On default or OFF
Set Album
Shutter Sound Sound 1 default
Setting Icon Options Quickview
Customizing your camera
Sound
Choose the sound volume Medium default
Setting Icon Options Sound Volume
Setting Memory
Mode it was turned off
Setting Icon Options Date Stamp OFF default
Putting yourself in the video
Putting yourself in the picture
Press to highlight ON, then press the OK button
Recording in Time Lapse Capture Mode
First-on your computer
Pre-tagging for album names
Second-on your camera
Highlight EXIT, then press the OK button
Reviewing pictures and videos
Review mode and Favorites mode
Viewing single pictures and videos
Press the Review button
Playing a video
Viewing multiple pictures and videos
Deleting pictures and videos
Editing videos
Review mode, press the Menu button for review settings
Changing review settings
Magnifying pictures
Protect Slide Show Copy Resize Image Storage
Protecting pictures and videos from deletion
Running a slide show
Starting the slide show
Running a continuous slide show loop
Changing the slide show display interval
Displaying pictures and videos on a television
Hold Press the OK button
Before you copy, make sure that
Copying pictures and videos
Resizing Pictures
You can reduce the size of a picture
Press to highlight OK, then press the OK button
Resizing to 240 x
Viewing picture and video information
Press the Review button, then press the OK button
Press the OK button to exit
Photo Frame display settings
Using the Kodak Photo Frame Dock
Press to highlight the option value, then press OK
Minimum system requirements
Installing the software
Windows OS-based computers
MHz processor or greater MB RAM 128 MB for Windows 2000, XP
Mac OS X-follow the on-screen instructions
Install the software
Sharing pictures and videos
Pictures Videos
Sharing on your camera
Printing tagged pictures
Tagging pictures for printing
Tagging pictures and videos for emailing
Press the OK button. Then press the Share button to exit
Second-tag pictures/videos on your camera
Tagging pictures as favorites
Third-transfer and e-mail
Press the Share button to exit the menu
Optional settings
Removing all favorites from your camera
Picture and video album settings
Printing and emailing favorites
Preventing favorites from transferring to the camera
Third-transfer to your computer
Transferring pictures and videos with the USB cable
Transferring and printing pictures
Printing pictures from your computer
Also available for transferring
Direct printing with a PictBridge printer
Connecting the camera to the printer
Printing pictures
Turn off the camera and printer
Ordering prints online
Disconnecting the camera from the printer
Printing from an optional xD-Picture Card
Printing without a computer
Adapter Dock
Dock compatibility
Troubleshooting
Camera problems
Try one or more of the following
Computer/connectivity problems
Picture quality problems
Status Cause
Camera ready light status
Camera power light status
Still having problems?
Power light glows steady
Helpful links
Getting help
Camera
Software
Amount of memory MB Exact error message you received
Telephone customer support
Before you call
Appendix
Camera specifications
Exposure Exposure metering
Exposure mode
Exposure range
Light, Sunset, Auction, Custom, Video
On once after every 10 pictures
Tips, safety, maintenance
Maximum number of pictures
Maximum number of pictures by picture quality
Upgrading your software and firmware
Power-saving features
Maximum time for recording videos unit seconds
No Action For Camera To Turn It Back On
Regulatory compliance
FCC compliance and advisory
Canadian DOC statement
Vcci Class B ITE
Motion Jpeg
English translation
Way controller
Settings
Button Location on camera, ii review, ii, 32 share Zoom
Audio/video, 1, 37 USB, 1
ISO speed, setting
Format memory Guidelines, battery
Emailing pictures, videos, 46 exposure
Flower mode, 11 focus
Safety
Nagashidori Panning Shot mode
Running slide show
Review button, ii, 32 reviewing pictures
System requirements, computer
Telephone numbers, 61 setting
Viewing picture after taking, 32 magnified
Button, ii using