Kodak EasyShare Z650 zoom digital camera
4J4303en
Eastman Kodak Company Rochester, New York
Kodak and EasyShare are trademarks of Eastman Kodak Company
Front view
LCD
Back view
Table of contents
Table of contents
Attaching the lens cap and strap
Installing the software
Loading the batteries
Turning on the camera Setting the language and date/time
Storing pictures on an SD or MMC card
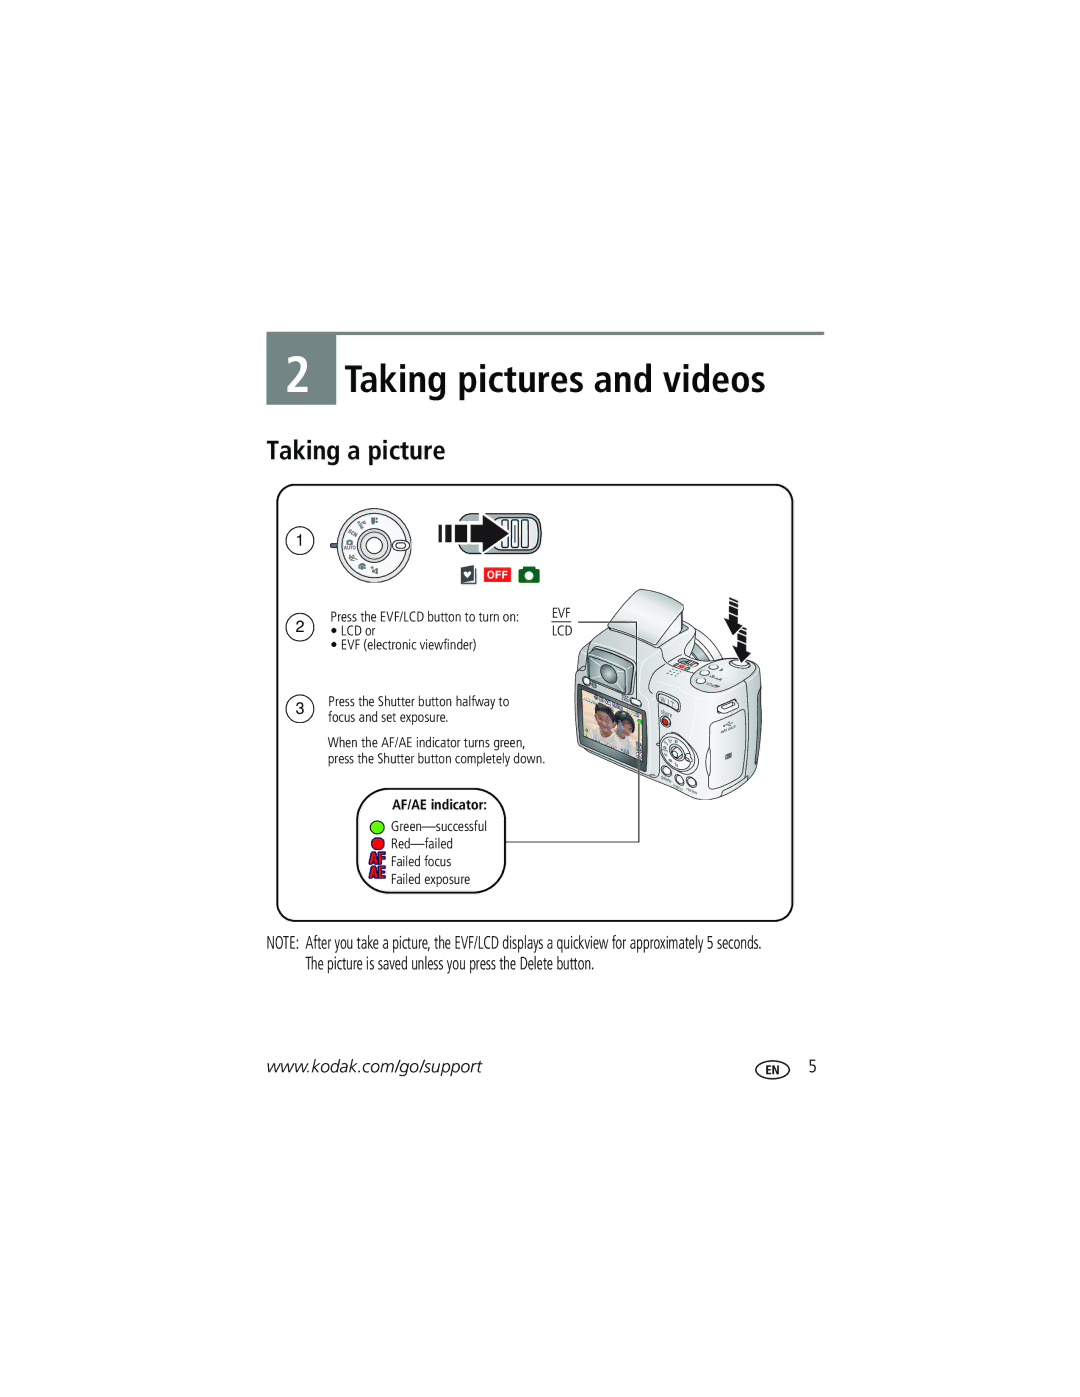
Taking a picture
Taking pictures and videos
Taking a video
While the shutter button is pressed halfway
Using the auto-focus framing marks pictures
Press the Shutter button halfway
Take the picture or video
Using optical zoom
Using digital zoom
To zoom out
Flash-to-subject distance Zoom position Flash distance
Using the flip-up flash
Using the info button
Capture modes-no buttons pressed
What the capture icons mean
Pictures
Reviewing pictures and videos
What the review icons mean
Videos
Magnifying a picture during review
Viewing multi-up thumbnails during review
Press the Menu button to exit the menu
Deleting pictures and videos
Protecting pictures and videos from deletion
Transferring and printing pictures
Follow the on-screen instructions to install the software
Turn on the camera
Transferring pictures
Also available for transferring
Turn off the camera
Printing pictures
Connecting the camera to a PictBridge enabled printer
Press to choose a printing option, then press the OK button
Printing from a PictBridge enabled printer
Disconnecting the camera from a PictBridge enabled printer
Turn on the printer. Turn on the camera
Printing from an optional SD or MMC card
Ordering prints online
Printing pictures from your computer
Dock compatibility for your camera
Dock Docking configuration
For flash settings in each mode, see
Changing the flash settings
Use the same procedure to take a video, but
Using the self-timer
For
Capture modes
Scene modes
Turn the Mode dial to Scene
Press the OK button to choose a Scene mode
Use this For Camera pre-settings
For information on Pasm modes, see
Zoom position Close-up focus distance
Taking close-up and landscape pictures
Close-up pictures
Landscape pictures
Press the Shutter button halfway to focus and set exposure
Using burst
Running a slide show
Description Purpose
To interrupt the Slide Show, press the OK button
Starting the slide show
Changing the slide show display interval
Running a continuous slide show loop
Picture Size
Changing picture-taking settings
Setting Options
Displaying pictures and videos on a television
Exposure Metering
Landscape mode
Video Size
White Balance
Black-and-white or sepia
Customizing your camera
Advanced Digital Zoom
None-digital zoom is disabled
Mode Auto Power Off Minutes
Camera turns off Minutes default Date & Time
Favorites
Set to Off
Press the Review button to exit Review
Cropping pictures
Viewing picture/video information
Copy pictures or videos
Copying pictures and videos
Before you copy, make sure that
Using the histogram to view picture brightness
Adjusting exposure compensation
Manual
Priority
Shutter
Press to choose P, A, S, or M
Changing P, A, S, or M mode settings
Third-transfer to your computer
Pre-tagging for album names
First-on your computer
Second-on your camera
Tagging pictures/videos for albums
Printing tagged pictures
Sharing your pictures
Tagging pictures for printing
Press the Share button to exit the menu
Tagging pictures and videos for emailing
First-on your computer
Second-tag pictures/videos on your camera
Computer
Tagging pictures as favorites
Favorites
Transfer
Preventing favorites from transferring to the camera
Optional settings
Removing all favorites from your camera
Printing and emailing favorites
Try one or more of the following
Camera problems
Interactive Troubleshooting & Repairs
Try one or more of the following
Picture quality problems
Computer/connectivity problems
Turn flash off
Status Solution
Direct printing PictBridge problems
Other
Helpful links
Camera
Software
Telephone customer support
Picture size
Camera specifications
Accessory lens thread-Yes Lens protection-Lens cap
CCD-1/2.5 in. CCD, 43 aspect ratio
VGA 640 x 480 @ 11 FPS Qvga 320 x 240 @ 20 FPS
Shutter speed
ISO speed
Video capture
Quickview-Yes Video output-NTSC or PAL
Flash settings in each mode
Operating temperature-32-104 F 0-40 C
Flash settings are preset for each picture-taking mode
Manner/Museum
Capture modes Default setting Available settings S, or M
Night Portrait
Night Landscape
Number of pictures Internal memory
Storage capacities
Picture storage capacity
Video storage capacity
Important safety instructions
Using this product
When removing the battery, allow it to cool it may be hot
Battery safety and handling
Extending battery life
Battery life
Kodak 3-volt AC adapter-powers your camera
Battery charging options
Limitations
Warranty
Limited warranty
Limited warranty coverage
Outside the United States and Canada
Your rights
Canadian DOC statement
Regulatory compliance
FCC compliance and advisory
English translation
Korean Class B ITE
Button
Index
Format
Settings, 9 flower, 23 focus
Guidelines, battery
Downloading pictures
Text
Information About pictures, videos, 34 installing
Cleaning lens, 61 liveview, 31 loading
Running slide show
Night portrait
Printer dock, 16, 61 printing
Review
Inserting, 4 printing from, 18 slot
Numbers, 52 setting
Setup mode, using
Priority, 37 problems, 47 self-timer delay, 21 speed
Warranty White balance