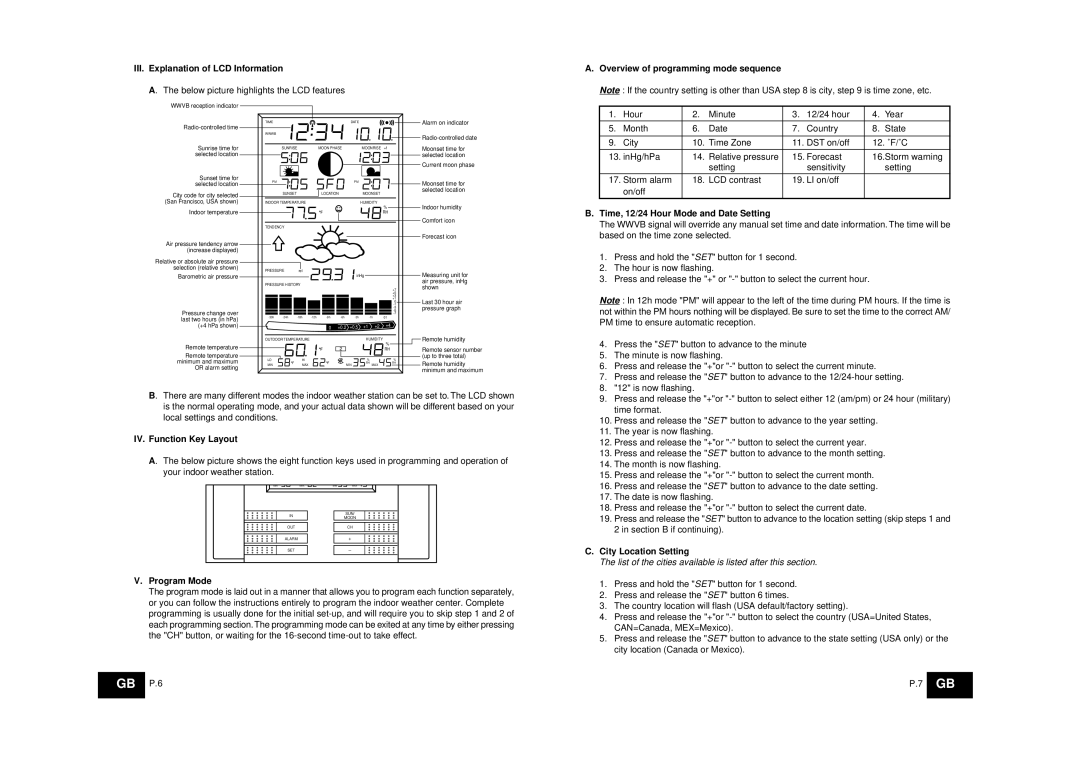
III. Explanation of LCD Information
A. The below picture highlights the LCD features
WWVB reception indicator
TIME | DATE |
|
| Alarm on indicator | |
|
|
| |||
|
|
|
|
| |
WWWB |
|
|
| ||
|
|
|
| ||
|
|
|
|
| |
|
|
|
|
|
A.Overview of programming mode sequence
Note : If the country setting is other than USA step 8 is city, step 9 is time zone, etc.
1. | Hour | 2. | Minute | 3. | 12/24 hour | 4. | Year |
5. | Month | 6. | Date | 7. | Country | 8. | State |
|
|
|
|
|
| ||
9. | City | 10. Time Zone | 11. | DST on/off | 12. ˚F/˚C | ||
Sunrise time for selected location
Sunset time for selected location
City code for city selected (San Francisco, USA shown)
Indoor temperature
| SUNRISE | MOON PHASE |
| MOONRISE +1 | Moonset time for | ||||||||
|
|
|
|
|
|
|
|
|
|
|
|
| selected location |
|
|
|
|
|
|
|
|
|
|
|
|
| |
|
|
|
|
|
|
|
|
|
|
|
|
| Current moon phase |
|
|
|
|
|
|
|
|
|
|
|
|
| |
|
|
|
|
|
|
|
|
|
|
|
|
|
|
PM |
|
|
|
| PM |
| Moonset time for | ||||||
| SUNSET | LOCATION |
| MOONSET | selected location | ||||||||
INDOOR TEMPERATURE |
|
|
| HUMIDITY | Indoor humidity | ||||||||
|
|
|
|
|
|
|
| % |
|
| |||
|
|
|
|
|
|
|
|
|
| ||||
|
|
|
|
|
|
|
|
|
| RH | Comfort icon | ||
TENDENCY |
|
|
|
|
|
|
|
| |||||
|
|
|
|
|
|
|
| ||||||
|
|
|
|
|
|
|
|
| |||||
|
|
|
|
|
|
|
|
| |||||
|
|
|
|
|
|
|
|
|
|
|
|
|
|
13. inHg/hPa | 14. | Relative pressure | 15. Forecast | 16.Storm warning |
|
| setting | sensitivity | setting |
17. Storm alarm | 18. | LCD contrast | 19. LI on/off |
|
on/off |
|
|
|
|
B. Time, 12/24 Hour Mode and Date Setting |
The WWVB signal will override any manual set time and date information. The time will be |
Air pressure tendency arrow (increase displayed)
Relative or absolute air pressure selection (relative shown)
Barometric air pressure
Pressure change over last two hours (in hPa)
(+4 hPa shown)
PRESSURE rel
![]()
![]()
![]()
![]()
![]()
![]()
![]()
![]() inHg
inHg
PRESSURE HISTORY
+7
+5
+3
+1
0
01 |
![]() 0 +0.2 +0.5 +1 +2 +4
0 +0.2 +0.5 +1 +2 +4
Forecast icon
Measuring unit for air pressure, inHg shown
Last 30 hour air pressure graph
based on the time zone selected. | |
1. | Press and hold the "SET" button for 1 second. |
2. | The hour is now flashing. |
3. | Press and release the "+" or |
Note : In 12h mode "PM" will appear to the left of the time during PM hours. If the time is not within the PM hours nothing will be displayed. Be sure to set the time to the correct AM/ PM time to ensure automatic reception.
Remote temperature | OUTDOOR TEMPERATURE |
|
| HUMIDITY | % |
|
|
|
|
| Remote humidity | ||
|
|
|
|
|
|
|
|
|
|
| Remote sensor number | ||
|
|
| 2 |
|
| RH |
| ||||||
Remote temperature |
|
|
|
|
|
|
|
|
|
|
|
| (up to three total) |
|
|
|
|
| % | % |
|
| |||||
minimum and maximum | LO | HI |
|
|
|
|
| Remote humidity | |||||
MIN | MAX |
| MIN | RH MAX |
|
| RH |
| |||||
OR alarm setting |
|
|
|
|
|
|
|
|
|
|
|
| minimum and maximum |
B. There are many different modes the indoor weather station can be set to. The LCD shown is the normal operating mode, and your actual data shown will be different based on your local settings and conditions.
IV. Function Key Layout
A. The below picture shows the eight function keys used in programming and operation of your indoor weather station.
MIN ![]()
![]()
![]() MAX
MAX ![]()
![]() MIN
MIN ![]()
![]() MAX
MAX![]()
![]()
| IN |
| SUN/ |
|
|
| MOON |
| |
|
|
|
| |
|
|
|
|
|
| OUT |
| CH |
|
|
|
|
|
|
|
|
|
|
|
| ALARM |
| + |
|
|
|
|
|
|
| SET |
| – |
|
V.Program Mode
The program mode is laid out in a manner that allows you to program each function separately, or you can follow the instructions entirely to program the indoor weather center. Complete programming is usually done for the initial
4.Press the "SET" button to advance to the minute
5.The minute is now flashing.
6.Press and release the "+"or
7.Press and release the "SET" button to advance to the
8."12" is now flashing.
9.Press and release the "+"or
10.Press and release the "SET" button to advance to the year setting.
11.The year is now flashing.
12.Press and release the "+"or
13.Press and release the "SET" button to advance to the month setting.
14.The month is now flashing.
15.Press and release the "+"or
16.Press and release the "SET" button to advance to the date setting.
17.The date is now flashing.
18.Press and release the "+"or
19.Press and release the "SET" button to advance to the location setting (skip steps 1 and 2 in section B if continuing).
C.City Location Setting
The list of the cities available is listed after this section.
1.Press and hold the "SET" button for 1 second.
2.Press and release the "SET" button 6 times.
3.The country location will flash (USA default/factory setting).
4.Press and release the "+"or
5.Press and release the "SET" button to advance to the state setting (USA only) or the city location (Canada or Mexico).
GB | P.6 | P.7 | GB |
|
|
|
|