8.30a.m. y las 4.00 p.m. EST. Si la etiqueta de advertencia del enchufe falta o esta dañada, llame al número de consulta gratuito para pedir una etiqueta de reemplazo.
6.Este Ventilador NO debe ser usado en lugares potencialmente peligrosos tales como atmósferas inflamables, explosivas, cargadas de sustancias químicas o húmedas donde se usen o almacenen gasolina, pintura o líquidos inflamables.
7.Donde sea posible, evite el uso de cables de alargue porque el cable de alargue podría sobrecalentarse y provocar un incendio. Si debe usar un cable de alargue, minimice el riesgo de sobrecalentamiento usando el cable más corto posible y garantizando que esté autorizado por UL (Underwriters Laboratories). NUNCA use un solo cable de alargue para hacer funcionar a más de un Ventilador.
8.El cordón eléctrico está equipado con una clavija a tierra de tres espigas que tiene que ser enchufada a un receptáculo del mismo diseño. Bajo ninguna circunstancia deberá cortarse la espiga a tierra de la clavija. De existir un receptáculo de pared de dos espigas, deberá reemplazarse por uno de tres espigas debidamente puesto a tierra e instalado de conformidad con el Código Nacional de Electricidad y todos los códigos y ordenanzas locales aplicables. El trabajo deberá hacerlo un electricista calificado, utilizando exclusivamente alambre de cobre.
9.NUNCA ponga en funcionamiento ningún Ventilador con un cable o enchufe dañado o después que el Ventilador haya tenido fallas de funcionamiento, haya sido arrojado o dañado de cualquier manera. Devuelva el Ventilador a una instalación autorizada de servicio para su revisión, ajuste eléctrico o mecánico o reparación.
10.NUNCA inserte o permita que los dedos u objetos extraños ingresen en ninguna abertura de ventilación o escape, ya que esto podría causar un choque eléctrico o incendio, o dañar el Ventilador. Para reducir el riesgo de incendio, NO bloquee ni altere el Ventilador de ninguna manera mientras esté en funcionamiento.
11.Siempre coloque el Ventilador en una superficie estable, plana y nivelada mientras esté en funcionamiento, para evitar la posibilidad de que el Ventilador se caiga. Coloque el Cable Eléctrico de modo tal que el Ventilador u otros objetos no estén apoyados sobre el mismo. NO coloque el Cable Eléctrico debajo de las alfombras. NO cubra el Cable Eléctrico con tapetes, alfombras de hule o similares. Coloque el Cable Eléctrico lejos del paso de la habitación y donde nadie pueda tropezarse con él.
12.Este Ventilador no está destinado para ser usado en lugares húmedos o mojados. Nunca coloque un Ventilador donde pueda caer dentro de una tina de baño u otro recipiente de agua. NUNCA use un Ventilador donde se usen o almacenen líquidos inflamables.
13.NUNCA use el Ventilador al aire libre.
14.Este Ventilador no es adecuado para usar en instalaciones de agricultura incluyendo áreas donde se almacene ganado, aves de corral u otros animales. Por favor consulte el Articulo 547-7 (2008) del Código Eléctrico Nacional (NEC), o los códigos o normas estatales o locales aplicables con relación a los requisitos eléctricos para edificios destinados a las agricultura. ESTE VENTILADOR
NO CUMPLE CON LOS REQUISITOS DEL ARTICULO 547-7 DEL NEC (2008).
15.Este Ventilador no es adecuado para usar en lugares peligrosos. Por favor consulte el Artículo 500 del Código Eléctrico Nacional (NEC), o los códigos o normas estatales o locales aplicables con relación a los requisitos eléctricos para lugares peligrosos. ESTE
VENTILADOR NO CUMPLE CON LOS REQUISITOS DEL ARTICULO 500 (2008).
DISMINUYA EL RIESGO DE INCENDIO O GOLPES DE ELECTRICIDAD – NO USE ESTE VENTILADOR CON ARTEFACTOS DE CONTROL DE VELOCIDAD EN ESTADO SÓLID.
CONSERVE ESTAS INSTRUCCIONES
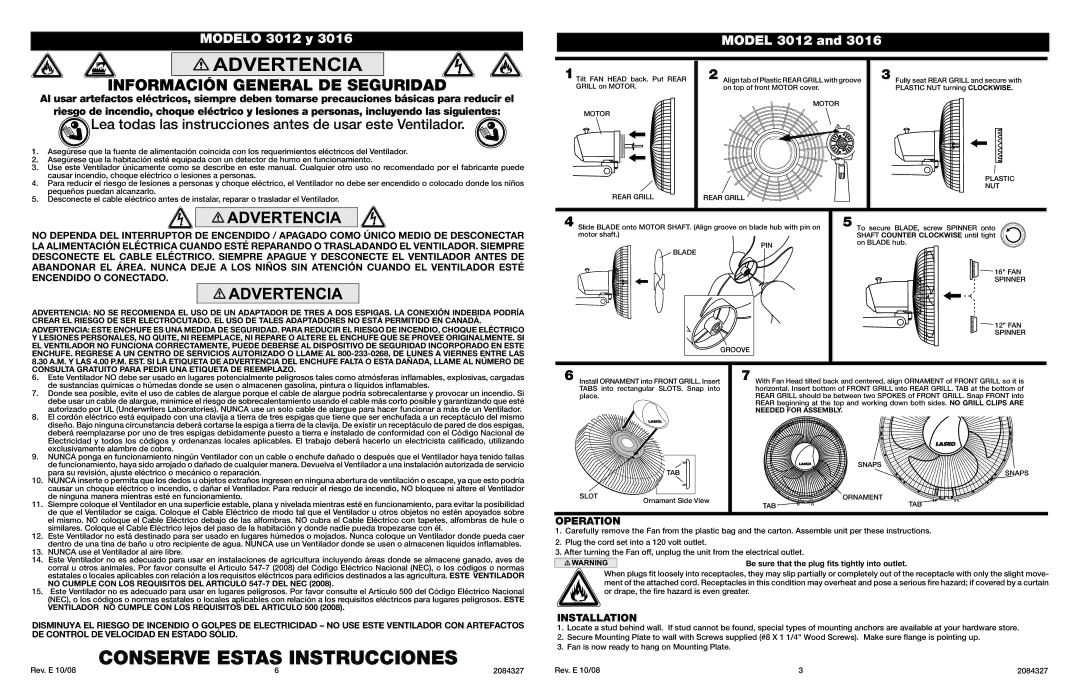
6 Install ORNAMENT into FRONT GRILL. Insert | 7 With Fan Head tilted back and centered, align ORNAMENT of FRONT GRILL so it is |
TABS into rectangular SLOTS. Snap into | horizontal. Insert bottom of FRONT GRILL into REAR GRILL. TAB at the bottom of |
place. | REAR GRILL should be between two SPOKES of FRONT GRILL. Snap FRONT into |
| REAR beginning at the top and working down both sides. NO GRILL CLIPS ARE |
| NEEDED FOR ASSEMBLY. |
| TAB | | SNAPS |
| | SNAPS |
SLOT | Ornament Side View | | ORNAMENT |
| TAB | TAB |
| |
OPERATION
1.Carefully remove the Fan from the plastic bag and the carton. Assemble unit per these instructions.
2.Plug the cord set into a 120 volt outlet.
3.After turning the Fan off, unplug the unit from the electrical outlet.
Be sure that the plug fits tightly into outlet.
When plugs fit loosely into receptacles, they may slip partially or completely out of the receptacle with only the slight move- ment of the attached cord. Receptacles in this condition may overheat and pose a serious fire hazard; if covered by a curtain or drape, the fire hazard is even greater.
INSTALLATION
1.Locate a stud behind wall. If stud cannot be found, special types of mounting anchors are available at your hardware store.
2.Secure Mounting Plate to wall with Screws supplied (#8 X 1 1/4" Wood Screws). Make sure flange is pointing up.
3.Fan is now ready to hang on Mounting Plate.

