MODEL 758000
INFORMACIÓN GENERAL DE SEGURIDAD
Al usar artefactos eléctricos, siempre deben tomarse precauciones básicas para reducir el
riesgo de incendio, choque eléctrico y lesiones a personas, incluyendo las siguientes:
 Lea todas las instrucciones antes de usar este Calefactor.
1.SIEMPRE CONECTE LOS CALENTADORES DIRECTAMENTE A UN TOMACORRIENTE/INTERRUPTOR DE PARED. NUNCA UTILICE CON UN CABLE DE EXTENSIÓN. NO conecte el Calefactor a cualquier otro dispositivo conectado a un cable, como un cable de contactos múltiples, protector de sobrecargas, adaptadores de tomacorrientes múltiples o refrescantes de aire tipo tomacorriente. El uso de tales dispositivos podría crear un riesgo de incendio. Conecte la unidad directamente a un tomacorriente de pared de 120V únicamente.
ADVERTENCIA: CONEXIONES DEFECTUOSAS AL TOMACORRIENTE DE PARED PUEDEN CAUSAR QUE EL TOMACORRIENTE DE PARED SE SOBRECALIENTE. ASEQÚRESE QUE EL ENCHUFE DEL CALEFACTOR ENCAJE FIRMEMENTE EN EL TOMACORRIENTE ANTES DE CADA USO. DURANTE EL USO, VERIFIQUE PARA ASEGURARSE QUE EL ENCHUFE DEL CALENFACTOR NO ESTÉ SOBRECALENTANDO. DE SER NECESARIO, HAGA QUE UN ELECTRICISTA CALIFICADO REVISE Y/O REEMPLACE EL TOMACORRIENTE DE PARED.
2.Use este Calefactor solamente como se describe en este manual. Cualquier otro uso no recomendado por el fabricante podría causar incendio, choque eléctrico o lesiones a personas.
3.Asegúrese que la habitación esté equipada con un detector de humo en funcionamiento.
4 Garantice que la fuente de alimentación eléctrica sea la adecuada a los requerimientos eléctricos del Calefactor.
5.Es necesario practicar extrema precaución al utilizar cualquier Calefactor cerca de o por niños o personas discapacitadas y cuando el Calefactor esté funcionando sin atención.
6.Este electrodoméstico cuenta con un enchufe polarizado (una clavija es más ancha que la otra). Para reducir el riesgo de choque eléctrico, este enchufe está diseñado para encajar en un tomacorriente polarizado solamente en un sentido. Si el enchufe no encaja perfectamente en el tomacorriente, coloque el enchufe a la inversa. Si sigue sin funcionar, póngase en contacto con un electricista calificado. No intente alterar esta característica de seguridad.
7.No ponga en funcionamiento ningún calefactor con un cable eléctrico o enchufe dañados, después que un calefactor haya funcionado mal o haya sido arrojado o dañado en cualquier modo. Por favor contacte a Servicio al Cliente al
NO DEPENDA DEL INTERRUPTOR DE ENCENDIDO / APAGADO COMO EL ÚNICO MEDIO DE DESCONECTAR LA ELECTRICIDAD CUANDO ESTÉ REPARANDO O TRASLADANDO EL CALEFACTOR. SIEMPRE DESCONECTE EL CABLE ELÉCTRICO. SIEMPRE APAGUE Y DESCONECTE EL CALEFACTOR ANTES DE DEJAR EL ÁREA. NUNCA DEJE NIÑOS SIN ATENCIÓN CUANDO EL CALEFACTOR ESTÉ ENCENDIDO O CONECTADO.
8.Para desconectar el Calefactor, posicione los controles en APAGADO, luego retire el enchufe del tomacorriente.
9.Siempre desconecte el Calefactor cuando no esté en uso. Desconecte el cable eléctrico antes de reparar o trasladar el Calefactor.
10.No inserte ni permita que los dedos u objetos extraños se introduzcan en ninguna abertura o escape de ventilación ya que esto podría causar un choque eléctrico, incendio o dañar el Calefactor. No bloquee ni altere el Calefactor de ninguna manera mientras esté en funcionamiento.
11.Para evitar un posible incendio, no bloquee las tomas o escapes de aire de ninguna manera. No coloque sobre superficies suaves como una cama, donde las aberturas podrían resultar bloqueadas.
12.Siempre coloque el Calefactor sobre una superficie estable, plana y nivelada mientras esté en funcionamiento para evitar la posibilidad de que el Calefactor se caiga. Ubique el cable de corriente de manera que el ventilador Calefactor o los demás objetos no queden sobre éste. No coloque el cable de corriente debajo de alfombras. NO cubra el cable de corriente con tapetes, alfombras estrechas o artículos coberturas similares. Coloque el cable de corriente lejos del tráfico de la habitación, donde las personas no se tropiecen con éste.
13.Este Calefactor está CALIENTE cuando está en funcionamiento. Para evitar quemaduras, no permita que la piel desnuda toque las superficies calientes. Siempre use la agarradera cuando traslade este Calefactor. Mantenga los materiales combustibles, tales como muebles, almohadas, ropa de cama, papeles, vestimenta y cortinas por lo menos a 3 pies (0.9 m) del frente del Calefactor y manténgalos por lo menos a 1 pie (0.3 m) de los costados y de la parte trasera.
14.Un Calefactor tiene partes calientes y arcos eléctricos o partes que producen chispas en su interior. no use el Calefactor en áreas donde se almacene o use gasolina, pintura o líquidos inflamables. NO use el Calefactor en lugares donde sustancias químicas inflamables o explosivas, sean almacenadas, o en atmósferas húmedas. Este Calefactor está diseñado ÚNICAMENTE para uso general.
15.Este Calefactor no está diseñado para ser usado en lugares húmedos o mojados. Este Calefactor no está diseñado para usar en baños, áreas de lavandería o lugares interiores similares. NUNCA ubique un Calefactor en un lugar donde podría caer dentro de una tina de baño o cualquier otro recipiente de agua.
16.no use Calefactores al aire libre.
17.Este Calefactor no es adecuado para usar en instalaciones de agricultura incluyendo áreas donde se almacene ganado, aves de corral u otros animales. Por favor consulte el Articulo
NO CUMPLE CON LOS REQUISITOS DEL ARTICULO
18.Este Calefactor no es adecuado para usar en lugares peligrosos. Por favor consulte el Artículo 500 del Código Eléctrico Nacional (NEC), o los códigos o normas estatales o locales aplicables con relación a los requisitos eléctricos para lugares peligrosos. ESTE
CALEFACTOR NO CUMPLE CON LOS REQUISITOS DEL ARTICULO 500 (2008).
ADVERTENCIA: REDUZCA EL RIESGO DE INCENDIO O CHOQUE ELÉCTRICO – NO USE ESTE CALEFACTOR CON DISPOSITIVOS DE CONTROL DE VELOCIDAD DE ESTADO SÓLIDO.
CONSERVE ESTAS INSTRUCCIONES
OPERATION
1.Carefully remove the Heater from the bag and the carton.
2.Place the Heater on a firm, level surface.
WARNING: Plastic or rubber tabs, like the feet on this unit, may stick to furniture surfaces and/or hardwood floors. The unit may leave a residue that could darken, stain or leave permanent blem- ishes on the finish of certain furniture surfaces, including wood surfaces, and/or hardwood floors.
3. Plug the cord set into a 120 volt outlet.
Be sure that the plug fits tightly into outlet.
When plugs fit loosely into receptacles, they may slip partially or completely out of the receptacle with only the slight movement of the attached cord. Receptacles in this condition may overheat and pose a serious fire hazard; if covered by a curtain or drape, the fire hazard is even greater.
4.When the Heater is initially plugged in, there will be a ‘beep’ and the Power Light will come on indicating that there is power to the unit. The Power Light will remain lit until the Heater is unplugged from the electrical outlet.
5.Turn the Heater ON by pressing the Power Button.
6.When initially turned on, the Heater will display the current room temperature in ° Fahrenheit. Press the (![]() ) and ( ) but- tons at the same time to change the display to ° Celsius. Press the same two buttons together again to change the display back to ° Fahrenheit.
) and ( ) but- tons at the same time to change the display to ° Celsius. Press the same two buttons together again to change the display back to ° Fahrenheit.
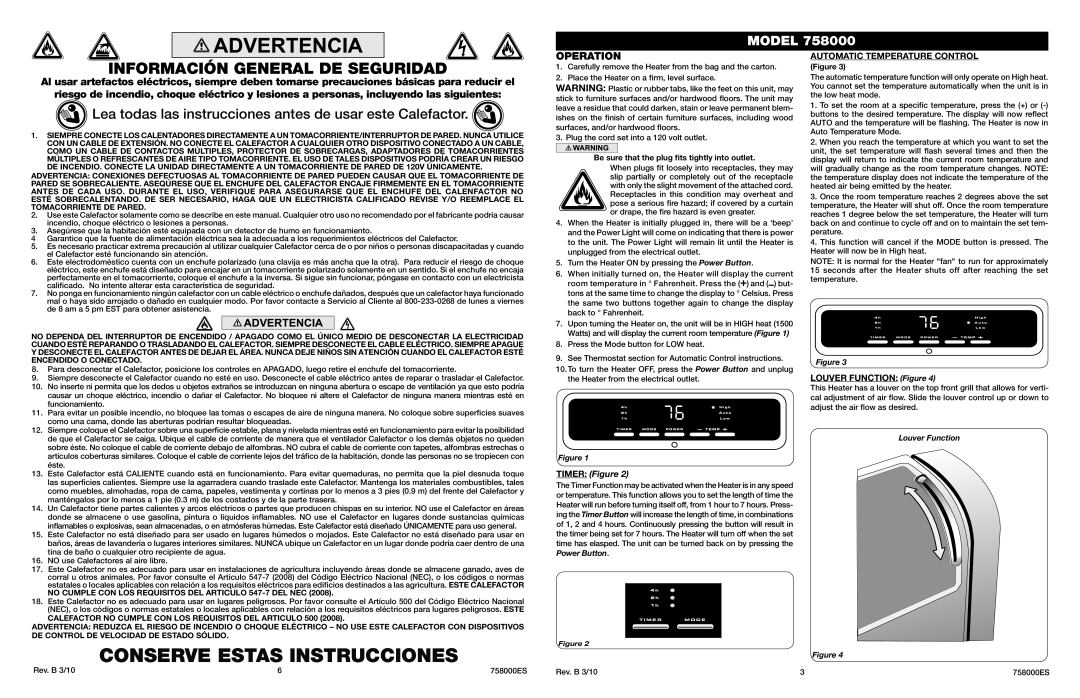
7.Upon turning the Heater on, the unit will be in HIGH heat (1500 Watts) and will display the current room temperature (Figure 1)
8.Press the Mode button for LOW heat.
9.See Thermostat section for Automatic Control instructions.
10.To turn the Heater OFF, press the Power Button and unplug the Heater from the electrical outlet.
Figure 1
TIMER: (Figure 2)
The Timer Function may be activated when the Heater is in any speed or temperature. This function allows you to set the length of time the Heater will run before turning itself off, from 1 hour to 7 hours. Press- ing the Timer Button will increase the length of time, in combinations of 1, 2 and 4 hours. Continuously pressing the button will result in the timer being set for 7 hours. The Heater will turn off when the set time has elasped. The unit can be turned back on by pressing the
Power Button.
� � � � � � � � �
Figure 2
AUTOMATIC TEMPERATURE CONTROL
(Figure 3)
The automatic temperature function will only operate on High heat. You cannot set the temperature automatically when the unit is in the low heat mode.
1.To set the room at a specific temperature, press the (+) or
2.When you reach the temperature at which you want to set the unit, the set temperature will flash several times and then the display will return to indicate the current room temperature and will gradually change as the room temperature changes. NOTE: the temperature display does not indicate the temperature of the heated air being emitted by the heater.
3.Once the room temperature reaches 2 degrees above the set temperature, the Heater will shut off. Once the room temperature reaches 1 degree below the set temperature, the Heater will turn back on and continue to cycle off and on to maintain the set tem- perature.
4.This function will cancel if the MODE button is pressed. The Heater will now be in High heat.
NOTE: It is normal for the Heater "fan" to run for approximately 15 seconds after the Heater shuts off after reaching the set temperature.
Figure 3
LOUVER FUNCTION: (Figure 4)
This Heater has a louver on the top front grill that allows for verti- cal adjustment of air flow. Slide the louver control up or down to adjust the air flow as desired.
Louver Function
Figure 4
Rev. B 3/10 | 6 | 758000ES |
Rev. B 3/10 | 3 | 758000ES |