ENSURE THAT THE FRONT GLASS PANEL IS IN PLACE AND SEALED DURING ADJUSTMENT.
Adjustment
CAUTION: THE ADJUSTMENT ROD AND NEARBY APPLIANCE SURFACES ARE HOT. EXERCISE CAUTION TO AVOID INJURY WHILE ADJUSTING FLAME APPEARANCE.
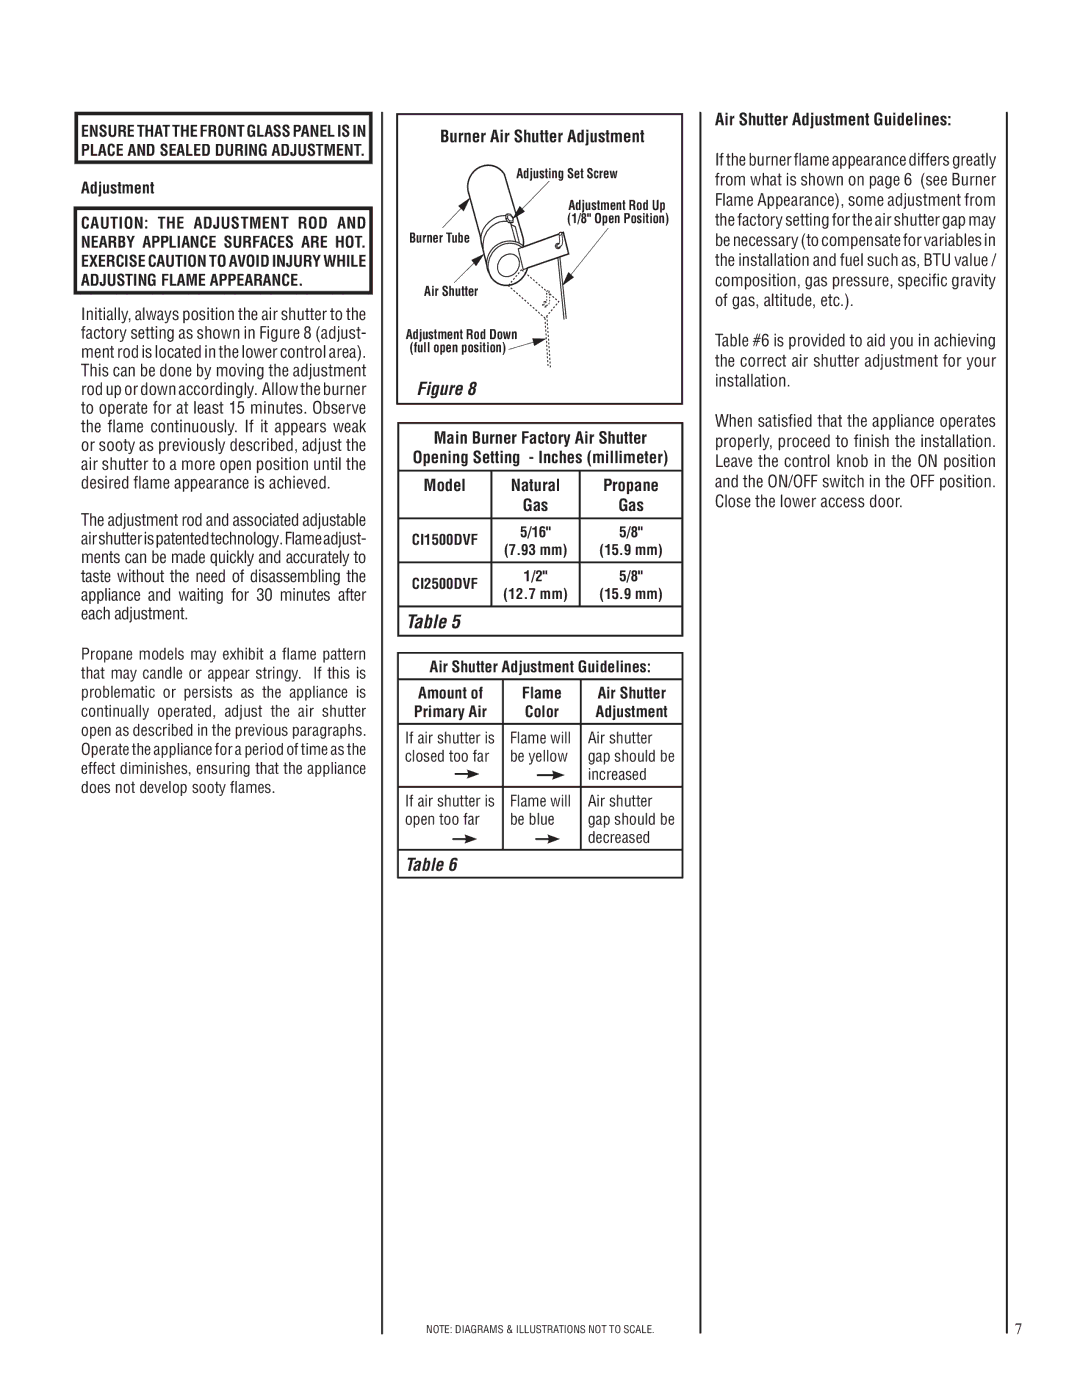
Initially, always position the air shutter to the factory setting as shown in Figure 8 (adjust- ment rod is located in the lower control area). This can be done by moving the adjustment rod up or down accordingly. Allow the burner to operate for at least 15 minutes. Observe the flame continuously. If it appears weak or sooty as previously described, adjust the air shutter to a more open position until the desired flame appearance is achieved.
The adjustment rod and associated adjustable airshutterispatentedtechnology.Flameadjust- ments can be made quickly and accurately to taste without the need of disassembling the appliance and waiting for 30 minutes after each adjustment.
Propane models may exhibit a flame pattern that may candle or appear stringy. If this is problematic or persists as the appliance is continually operated, adjust the air shutter open as described in the previous paragraphs. Operate the appliance for a period of time as the effect diminishes, ensuring that the appliance does not develop sooty flames.
Burner Air Shutter Adjustment
Adjusting Set Screw
Adjustment Rod Up
(1/8" Open Position)
Burner Tube
Air Shutter
Adjustment Rod Down (full open position) ![]()
Figure 8
Main Burner Factory Air Shutter
Opening Setting - Inches (millimeter)
Model |
| Natural | Propane | |||||||
|
|
|
|
|
| Gas | Gas | |||
|
|
|
|
|
|
|
|
|
|
|
CI1500DVF |
| 5/16" |
| 5/8" | ||||||
| (7.93 mm) | (15.9 mm) | ||||||||
|
|
|
|
|
| |||||
|
|
|
|
|
|
|
|
|
|
|
CI2500DVF |
| 1/2" |
|
| 5/8" | |||||
| (12.7 mm) | (15.9 mm) | ||||||||
|
|
|
|
|
| |||||
|
|
|
|
|
|
|
|
|
|
|
Table 5 |
|
|
|
|
| |||||
|
|
|
|
|
|
|
|
|
| |
|
|
|
|
|
|
|
|
|
| |
Air Shutter Adjustment Guidelines: | ||||||||||
|
|
|
|
|
|
|
|
|
| |
Amount of | Flame | Air Shutter | ||||||||
Primary Air | Color | Adjustment | ||||||||
If air shutter is | Flame will | Air shutter | ||||||||
closed too far | be yellow | gap should be | ||||||||
|
|
|
|
|
|
|
|
|
| increased |
|
|
|
|
|
|
|
|
|
| |
If air shutter is | Flame will | Air shutter | ||||||||
open too far | be blue | gap should be | ||||||||
|
|
|
|
|
|
|
|
|
| decreased |
|
|
|
|
|
|
|
|
|
| |
Table 6
NOTE: DIAGRAMS & ILLUSTRATIONS NOT TO SCALE.
Air Shutter Adjustment Guidelines:
If the burner flame appearance differs greatly from what is shown on page 6 (see Burner Flame Appearance), some adjustment from the factory setting for the air shutter gap may be necessary (to compensate for variables in the installation and fuel such as, BTU value / composition, gas pressure, specific gravity of gas, altitude, etc.).
Table #6 is provided to aid you in achieving the correct air shutter adjustment for your installation.
When satisfied that the appliance operates properly, proceed to finish the installation. Leave the control knob in the ON position and the ON/OFF switch in the OFF position. Close the lower access door.
7
