LENNOX HEARTH PRODUCTS • MONTEBELLO®
12
Removal and Installation
of Glass Doors, Mesh Pull
Screens, and Modesty Panel
![]() WARNING
WARNING
Hot GLASS WILL CAUSE BURNS.
DO NOT TOUCH GLASS UNTIL COOLED.
•Install only when fireplace is OFF and COLD.
•Fireplace surfaces get EXTREMELY HOT!
•The glass on the front of the fireplace reaches EXTREMELY HIGH temperatures and can cause severe burns if touched. Even after the gas is turned off, fireplace surfaces remain extremely hot.
![]() CAUTION
CAUTION
Risk of personal injury
or property damage.
•Do NOT abuse glass doors by striking or slamming shut
•Never operate fireplace with glass door assemblies removed.
These
•Securely tighten door latch screws when reinstalling glass door assemblies to prevent doors from falling out.
•Handle glass door assemblies with extreme care. Replace damaged glass door assemblies with approved replace- ment assemblies only.
The door assemblies on this fireplace contain ceramic glass. Handle with care to prevent damage. If the door frame or glass on either assembly becomes
damaged, replace the entire glass door assembly with a
![]() WARNING
WARNING
Any safety screen or guard removed for servicing the appli- ance must be replaced prior to operating the appliance.
 AVERTISSEMENT
Tout écran ou protecteur retiré pour permettre l’entretien de l’appareil doit être remis en place avant de mettre l’appareil en marche.
Removing Glass Doors, Mesh Pull Screens, and Modesty Panel
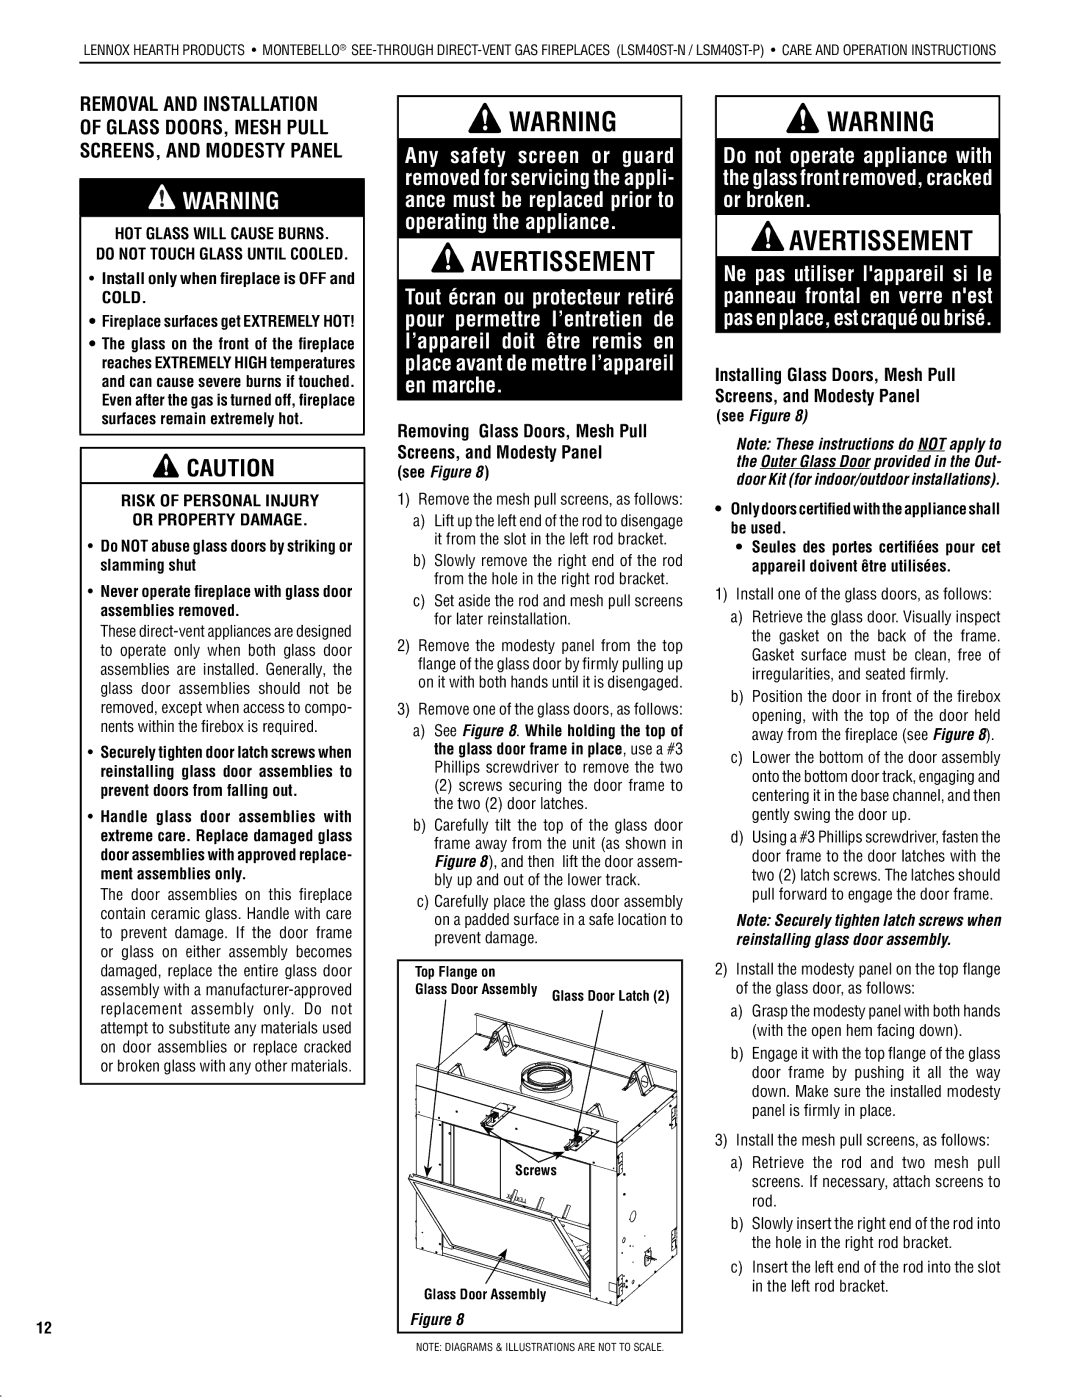
(see Figure 8 )
1)Remove the mesh pull screens, as follows:
a)Lift up the left end of the rod to disengage it from the slot in the left rod bracket.
b)Slowly remove the right end of the rod from the hole in the right rod bracket.
c)Set aside the rod and mesh pull screens for later reinstallation.
2)Remove the modesty panel from the top flange of the glass door by firmly pulling up on it with both hands until it is disengaged.
3)Remove one of the glass doors, as follows:
a)See Figure 8. While holding the top of the glass door frame in place, use a #3 Phillips screwdriver to remove the two
(2)screws securing the door frame to the two (2) door latches.
b)Carefully tilt the top of the glass door frame away from the unit (as shown in Figure 8), and then lift the door assem- bly up and out of the lower track.
c)Carefully place the glass door assembly on a padded surface in a safe location to prevent damage.
Top Flange on |
|
Glass Door Assembly | Glass Door Latch (2) |
| |
Screws | |
Glass Door Assembly |
|
Figure 8 |
|
![]() WARNING
WARNING
Do not operate appliance with the glass front removed, cracked or broken.
 AVERTISSEMENT
Ne pas utiliser l'appareil si le panneau frontal en verre n'est pas en place, est craqué ou brisé.
Installing Glass Doors, Mesh Pull Screens, and Modesty Panel
(see Figure 8)
Note: These instructions do NOT apply to the Outer Glass Door provided in the Out- door Kit (for indoor/outdoor installations).
•Only doors certified with the appliance shall be used.
•Seules des portes certifiées pour cet appareil doivent être utilisées.
1)Install one of the glass doors, as follows:
a)Retrieve the glass door. Visually inspect the gasket on the back of the frame. Gasket surface must be clean, free of irregularities, and seated firmly.
b)Position the door in front of the firebox opening, with the top of the door held away from the fireplace (see Figure 8).
c)Lower the bottom of the door assembly onto the bottom door track, engaging and centering it in the base channel, and then gently swing the door up.
d)Using a #3 Phillips screwdriver, fasten the door frame to the door latches with the two (2) latch screws. The latches should pull forward to engage the door frame.
Note: Securely tighten latch screws when reinstalling glass door assembly.
2)Install the modesty panel on the top flange of the glass door, as follows:
a)Grasp the modesty panel with both hands (with the open hem facing down).
b)Engage it with the top flange of the glass door frame by pushing it all the way down. Make sure the installed modesty panel is firmly in place.
3)Install the mesh pull screens, as follows:
a)Retrieve the rod and two mesh pull screens. If necessary, attach screens to rod.
b)Slowly insert the right end of the rod into the hole in the right rod bracket.
c)Insert the left end of the rod into the slot in the left rod bracket.
NOTE: DIAGRAMS & ILLUSTRATIONS ARE NOT TO SCALE.
