STEP 2 -- REFRIGERANT PIPING -- Installing Indoor Expansion Valve
This outdoor unit is designed for use in systems that use either an fixed orifice (RFC) (included with outdoor unit), or expansion valve metering device (purchased separately) at the indoor coil. See the 13ACX Product Specifications bulletin (EHB) for approved expansion valve kit match ups. The expansion valve unit can be installed internal or external to the indoor coil. In applications where an uncased coil is being installed in a
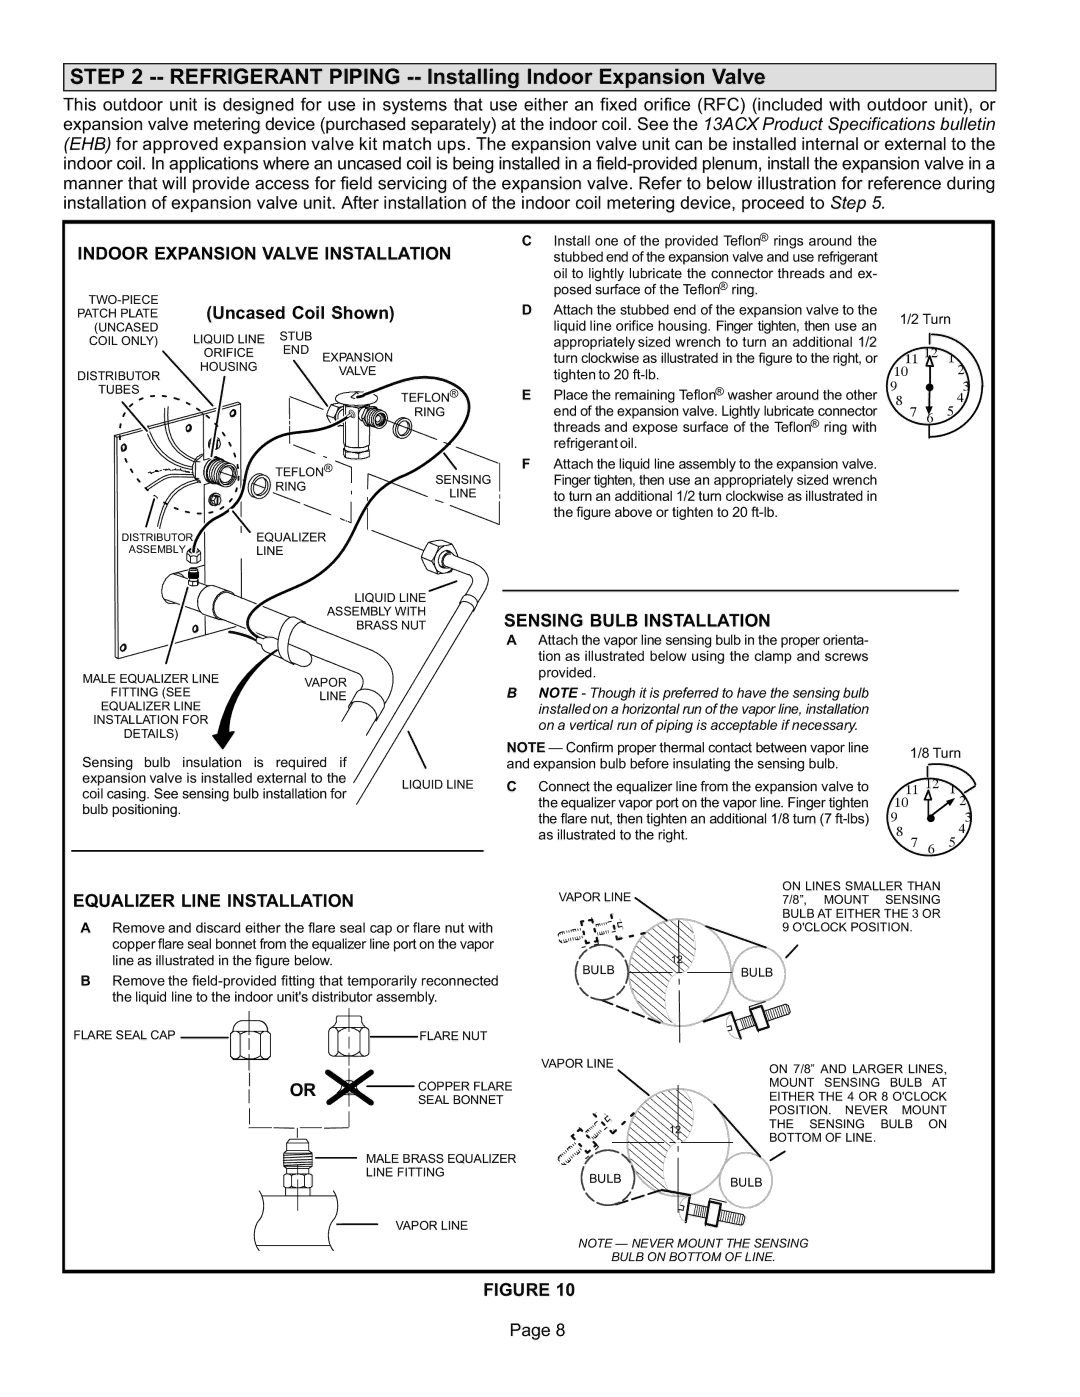
INDOOR EXPANSION VALVE INSTALLATION
| (Uncased Coil Shown) |
| ||||
PATCH PLATE |
|
| ||||
(UNCASED |
|
|
| STUB |
|
|
COIL ONLY) | LIQUID LINE |
|
| |||
END |
|
| ||||
|
| ORIFICE |
| EXPANSION |
| |
|
|
|
|
| ||
|
| HOUSING |
|
| ||
DISTRIBUTOR |
|
| VALVE |
| ||
|
|
|
|
| ||
|
|
|
|
|
| |
TUBES |
|
|
|
|
| TEFLON® |
|
|
|
|
|
| |
|
|
|
|
|
| RING |
|
|
|
| TEFLON® | SENSING | |
|
|
|
| RING |
| |
|
|
|
|
| LINE | |
|
|
|
|
|
| |
DISTRIBUTOR |
| EQUALIZER |
| |||
ASSEMBLY |
|
| LINE |
|
| |
|
|
|
|
| LIQUID LINE | |
|
|
|
|
| ASSEMBLY WITH | |
CInstall one of the provided Teflon® rings around the stubbed end of the expansion valve and use refrigerant
oil to lightly lubricate the connector threads and ex posed surface of the Teflon® ring.
DAttach the stubbed end of the expansion valve to the liquid line orifice housing. Finger tighten, then use an appropriately sized wrench to turn an additional 1/2 turn clockwise as illustrated in the figure to the right, or tighten to 20
EPlace the remaining Teflon® washer around the other
end of the expansion valve. Lightly lubricate connector threads and expose surface of the Teflon® ring with refrigerant oil.
FAttach the liquid line assembly to the expansion valve. Finger tighten, then use an appropriately sized wrench to turn an additional 1/2 turn clockwise as illustrated in the figure above or tighten to 20
1/2 Turn
11 12 | 1 | |
10 |
| 2 |
9 |
| 43 |
8 7 | 6 | 5 |
|
| BRASS NUT | |
MALE EQUALIZER LINE | VAPOR |
| |
FITTING (SEE |
| ||
LINE |
| ||
EQUALIZER LINE |
| ||
|
| ||
INSTALLATION FOR |
|
| |
DETAILS) |
|
| |
Sensing bulb insulation is required if |
| ||
expansion valve is installed external to the | LIQUID LINE | ||
coil casing. See sensing bulb installation for | |||
| |||
bulb positioning. |
|
| |
SENSING BULB INSTALLATION
AAttach the vapor line sensing bulb in the proper orienta tion as illustrated below using the clamp and screws provided.
BNOTE - Though it is preferred to have the sensing bulb installed on a horizontal run of the vapor line, installation on a vertical run of piping is acceptable if necessary.
NOTE — Confirm proper thermal contact between vapor line and expansion bulb before insulating the sensing bulb.
CConnect the equalizer line from the expansion valve to the equalizer vapor port on the vapor line. Finger tighten the flare nut, then tighten an additional 1/8 turn (7
| 1/8 Turn | ||
| 11 12 | 1 | |
10 |
| 2 | |
9 |
|
| 43 |
8 | 7 | 6 | 5 |
EQUALIZER LINE INSTALLATION
ARemove and discard either the flare seal cap or flare nut with copper flare seal bonnet from the equalizer line port on the vapor line as illustrated in the figure below.
BRemove the
FLARE SEAL CAP |
| FLARE NUT |
| OR | COPPER FLARE |
| SEAL BONNET | |
|
| |
|
| MALE BRASS EQUALIZER |
|
| LINE FITTING |
|
| VAPOR LINE |
VAPOR LINE
12
BULB
VAPOR LINE
12
BULB
ON LINES SMALLER THAN 7/8”, MOUNT SENSING BULB AT EITHER THE 3 OR 9 O'CLOCK POSITION.
BULB
ON 7/8” AND LARGER LINES,
MOUNT SENSING BULB AT
EITHER THE 4 OR 8 O'CLOCK
POSITION. NEVER MOUNT
THE SENSING BULB ON
BOTTOM OF LINE.
BULB
NOTE — NEVER MOUNT THE SENSING
BULB ON BOTTOM OF LINE.
FIGURE 10
Page 8