If you place the jumper in the cable-select position, the IDE cable automatically assigns the master and slave settings based on the position of the drive on the cable. You must use the cable-select setting for this cabling system whether the drive is the only device or the second device connected to the cable.

The drive closest to the IDE controller is automatically the master drive. Any other devices on the IDE cable must also be set to cable-select.

Step 4. Mounting the drive in the bay

Attention

Be sure to use the M3 x 5-mm mounting screws in the option package when securing screws directly into the drive. Using screws that are too long might damage the drive.

You can mount the drive horizontally or vertically in the computer. If you mount the drive vertically, you must secure any discs that you place into the drive before the drive tray is closed, or the drive will not be able to read the disc properly.

1.Slide the drive into the bay. Your computer might have required procedures for installing storage devices. For more information on storage devices, refer to the documentation that comes with your computer.

2.Align the drive-bay screw holes with the threaded holes in the drive housing or mounting bracket.

3.Thread the screws in loosely to check their position. Two screws are usually used on each side. Verify that the alignment is correct; then tighten the screws to secure the drive. Do not overtighten.

Step 5. Attaching the cables to the drive

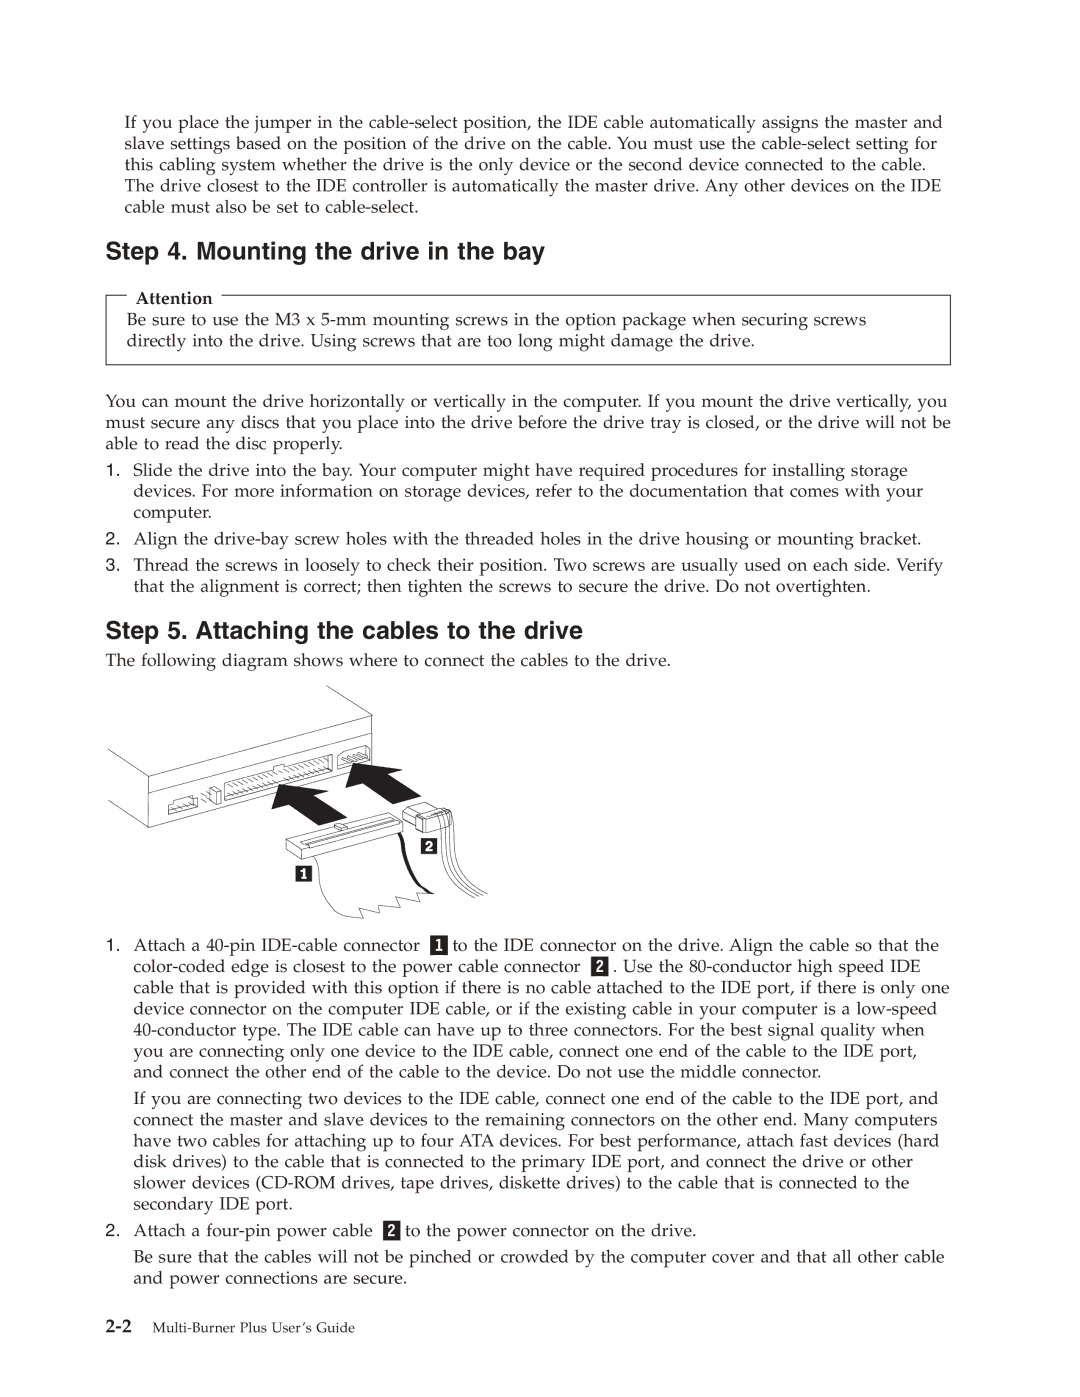
The following diagram shows where to connect the cables to the drive.

1. Attach a 40-pin IDE-cable connector

to the IDE connector on the drive. Align the cable so that the

color-coded edge is closest to the power cable connector

. Use the 80-conductor high speed IDE

cable that is provided with this option if there is no cable attached to the IDE port, if there is only one device connector on the computer IDE cable, or if the existing cable in your computer is a low-speed 40-conductor type. The IDE cable can have up to three connectors. For the best signal quality when you are connecting only one device to the IDE cable, connect one end of the cable to the IDE port, and connect the other end of the cable to the device. Do not use the middle connector.

If you are connecting two devices to the IDE cable, connect one end of the cable to the IDE port, and connect the master and slave devices to the remaining connectors on the other end. Many computers have two cables for attaching up to four ATA devices. For best performance, attach fast devices (hard disk drives) to the cable that is connected to the primary IDE port, and connect the drive or other slower devices (CD-ROM drives, tape drives, diskette drives) to the cable that is connected to the secondary IDE port.

2. Attach a four-pin power cable

to the power connector on the drive.

Be sure that the cables will not be pinched or crowded by the computer cover and that all other cable and power connections are secure.

2-2Multi-Burner Plus User’s Guide

Page 20
Image 20
Lenovo 41N5583 manual Mounting the drive in the bay, Attaching the cables to the drive

41N5583 specifications

The Lenovo 41N5583 is a high-quality replacement battery specifically designed for Lenovo laptops, particularly catering to those models that require reliable and efficient performance. As advancements in technology push the boundaries of mobile computing, having a dependable battery solution has become paramount for users who rely heavily on their devices for work, entertainment, and communication.

One of the standout features of the Lenovo 41N5583 is its impressive capacity, typically rated at around 4400mAh. This capacity allows for extended usage times, enabling users to work for hours without the need for constant recharging. Additionally, the battery is designed with Lithium-Ion technology, which ensures a longer lifespan compared to traditional batteries. Lithium-Ion batteries are known for maintaining their performance over numerous charge cycles, making them an excellent investment for laptop users.

In terms of compatibility, the Lenovo 41N5583 is designed to suit various Lenovo laptop models, making it a versatile option for those who need a battery replacement. The installation process is straightforward, allowing users to easily swap out their old battery without requiring specialized tools or expertise. This user-friendly design is essential for individuals who prefer to handle their device maintenance independently.

Another significant characteristic of the Lenovo 41N5583 is its safety features. The battery is built with built-in protection mechanisms to prevent overcharging, overheating, and short-circuiting. These safety measures are critical for ensuring the long-term health of both the battery and the laptop itself. Users can feel confident that they are using a product that prioritizes safety and reliability.

Furthermore, the Lenovo 41N5583 is environmentally friendly, complying with various recycling standards and regulations. By choosing this battery, users contribute to a more sustainable electronic ecosystem by reducing waste and promoting proper disposal practices.

In conclusion, the Lenovo 41N5583 is an essential component for Lenovo laptop users seeking a reliable, high-capacity replacement battery. With its advanced Lithium-Ion technology, user-friendly installation, extensive compatibility, safety features, and environmental compliance, it stands out as a smart choice for those needing dependable power solutions on the go. Whether for professional, educational, or personal use, this battery ensures that your Lenovo laptop remains functional and efficient.