SECTION 4 - MAINTENANCE
2. | Remove the master links from each conveyor belt. |
| Then, roll the belts up along the length of the conveyor |
| to remove them from the frame. |
3. | Remove the two conveyor adjustment screws from the |
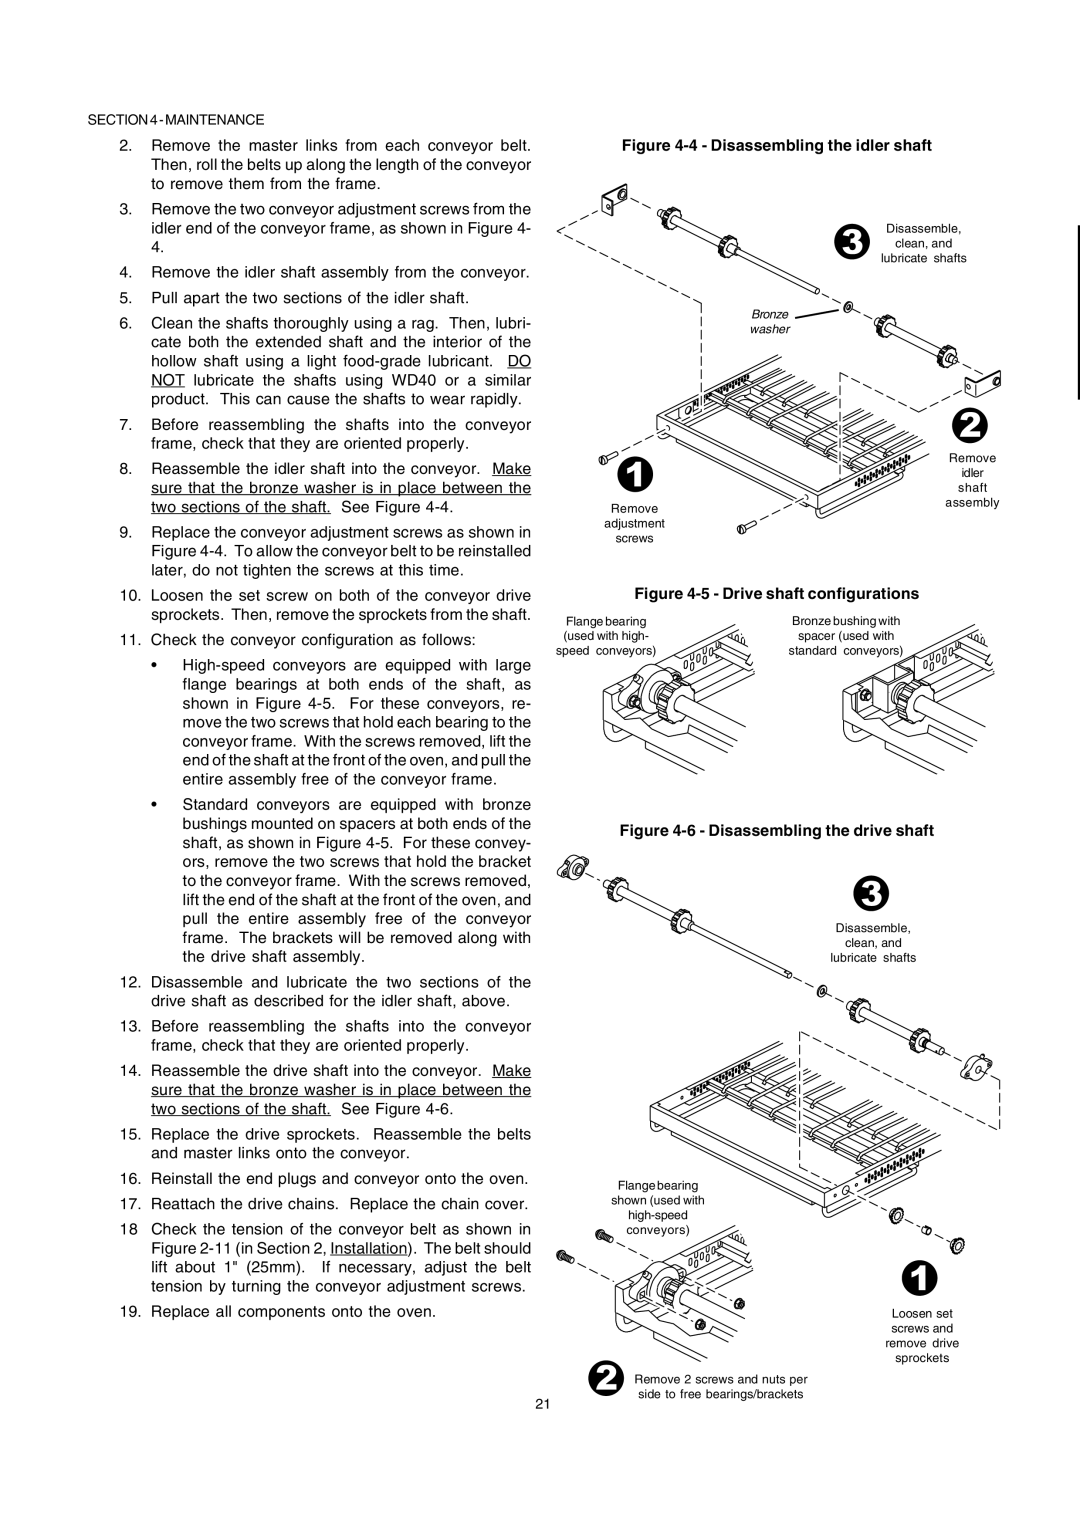
| idler end of the conveyor frame, as shown in Figure 4- |
| 4. |
4. | Remove the idler shaft assembly from the conveyor. |
5. | Pull apart the two sections of the idler shaft. |
6. | Clean the shafts thoroughly using a rag. Then, lubri- |
| cate both the extended shaft and the interior of the |
| hollow shaft using a light |
| NOT lubricate the shafts using WD40 or a similar |
| product. This can cause the shafts to wear rapidly. |
7. | Before reassembling the shafts into the conveyor |
| frame, check that they are oriented properly. |
Figure 4-4 - Disassembling the idler shaft
| Disassemble, |
|
| clean, and | ENGLISH |
| lubricate shafts | |
Bronze |
|
washer
8. Reassemble the idler shaft into the conveyor. Make |
sure that the bronze washer is in place between the |
two sections of the shaft. See Figure |
Remove
Remove
idler shaft assembly
9. Replace the conveyor adjustment screws as shown in | ||
| Figure | |
| later, do not tighten the screws at this time. | |
10. | Loosen the set screw on both of the conveyor drive | |
| sprockets. Then, remove the sprockets from the shaft. | |
11. | Check the conveyor configuration as follows: | |
| • | |
|
| flange bearings at both ends of the shaft, as |
|
| shown in Figure |
|
| move the two screws that hold each bearing to the |
|
| conveyor frame. With the screws removed, lift the |
|
| end of the shaft at the front of the oven, and pull the |
|
| entire assembly free of the conveyor frame. |
| • | Standard conveyors are equipped with bronze |
|
| bushings mounted on spacers at both ends of the |
|
| shaft, as shown in Figure |
|
| ors, remove the two screws that hold the bracket |
|
| to the conveyor frame. With the screws removed, |
|
| lift the end of the shaft at the front of the oven, and |
|
| pull the entire assembly free of the conveyor |
|
| frame. The brackets will be removed along with |
|
| the drive shaft assembly. |
12. | Disassemble and lubricate the two sections of the | |
| drive shaft as described for the idler shaft, above. | |
13. | Before reassembling the shafts into the conveyor | |
| frame, check that they are oriented properly. | |
14. | Reassemble the drive shaft into the conveyor. Make | |
| sure that the bronze washer is in place between the | |
| two sections of the shaft. See Figure | |
15. | Replace the drive sprockets. Reassemble the belts | |
| and master links onto the conveyor. | |
16. | Reinstall the end plugs and conveyor onto the oven. | |
17. | Reattach the drive chains. Replace the chain cover. | |
18Check the tension of the conveyor belt as shown in Figure
19. Replace all components onto the oven.
adjustment
screws
Figure 4-5 - Drive shaft configurations
Flange bearing | Bronze bushing with |
(used with high- | spacer (used with |
speed conveyors) | standard conveyors) |
Figure 4-6 - Disassembling the drive shaft
Disassemble,
clean, and
lubricate shafts
Flange bearing
shown (used with
Loosen set screws and remove drive sprockets
Remove 2 screws and nuts per side to free bearings/brackets
21
