37LC7D 50PC5D 42LC7D
32LC7D 42PC5D
Page
FCC Notice
Safety Instructions
Important Safety Instructions
Do not use this apparatus near water
Use only with the cart, stand, tripod, bracket
Exposed to dripping or splashing and no
Grounding
Contents
External Control Through RS-232C
Time Setting
Introduction
Feature of this TV
Preparation
Accessories
Front Panel Information
Front Panel Controls
Plasma TV Model
LCD TV Model
Remote Control Sensor
Back Panel Information
Back Connection Panel
Here shown may be somewhat different from your TV
Component
Service
AV OUT
Video
Back Cover for Wire Arrangement
Connect the cables as necessary
How to remove the Cable Management
Ensure the eye-bolts or brackets are tightened securely
Attaching the TV to a Wall
Stand Installation Only 32/37 inches LCD TV models
Desktop Pedestal Installation
Vesa Wall Mounting
Plasma TV Model LCD TV Model
Antenna Analog or Digital
Antenna or Cable Connection
HD Receiver Setup
External Equipment Setup
How to connect
How to use
Turn on the digital set-top box
External Equipment Setup
External Equipment Setup
Component Input ports
DVD Setup
Connect the video outputs Y, PB, PR of the DVD to
Refer to the DVD players manual for operating instructions
Remote control
Select AV1 input source by using the Input button on
Connect the S-VIDEO output of the DVD to
Video input on the set
When connecting with an antenna
VCR Setup
= white, and Audio Right = red
Insert a video tape into the VCR and press Play on
Mono jack of the set
Other A/V Source Setup
Camcorder
Ex LCD TV Model
Audio
RGB-PC mode only 640x350 HDMI1/DVI-DTV, HDMI2-DTV mode
RGB-PC, HDMI1/DVI-PC mode
59.94
800x600
Screen Setup for PC mode Overview
Phase
Initializing Reset to original factory values
Digital Audio Output
AV OUT Setup
Remote Control Functions
Watching TV / Channel Control
Watching TV / Channel Control
Inside the Sliding Cover
Installing Batteries
Volume Adjustment
Turning on TV
Control
ON-SCREEN Menus Selection
Setup
Watching TV / Channel Control Lock
Option
Auto Scan EZ Scan
Channel Search
Add/Delete Channel Manual Scan
Channel Editing
After EZ Scan on the Setup menu
There are two different ways in order to add or delete
Small window at the top-left corner of the screen
DTV Signal Strength
Watching
Input Source Selection
Select the source T V, AV1, AV2, Component1
Press the G button and then use D or Button to
Input Label
SimpLink Preparations
SimpLink Menu
SimpLink Functions
Picture Control
You can also adjust Aspect Ratio in the Option menu
Set by program
Become imprinted on the screen and remain visible
Horizon
169
Zoom
Picture
EZ Picture Preset
Preset Picture Settings
Picture Control
Color Tone Preset
Manual Picture Adjustment
EZ Picture User Mode
Select EZ Picture
Or G button to
Color Tone User Mode
Select X D
XD Picture Improvement Technology
Advanced Cinema 32 Pull Down Mode
Advanced Black Darkness Level
Select Video Reset
Picture Reset
Inversion
Orbiter
LOW Power Picture Mode Plasma TV only
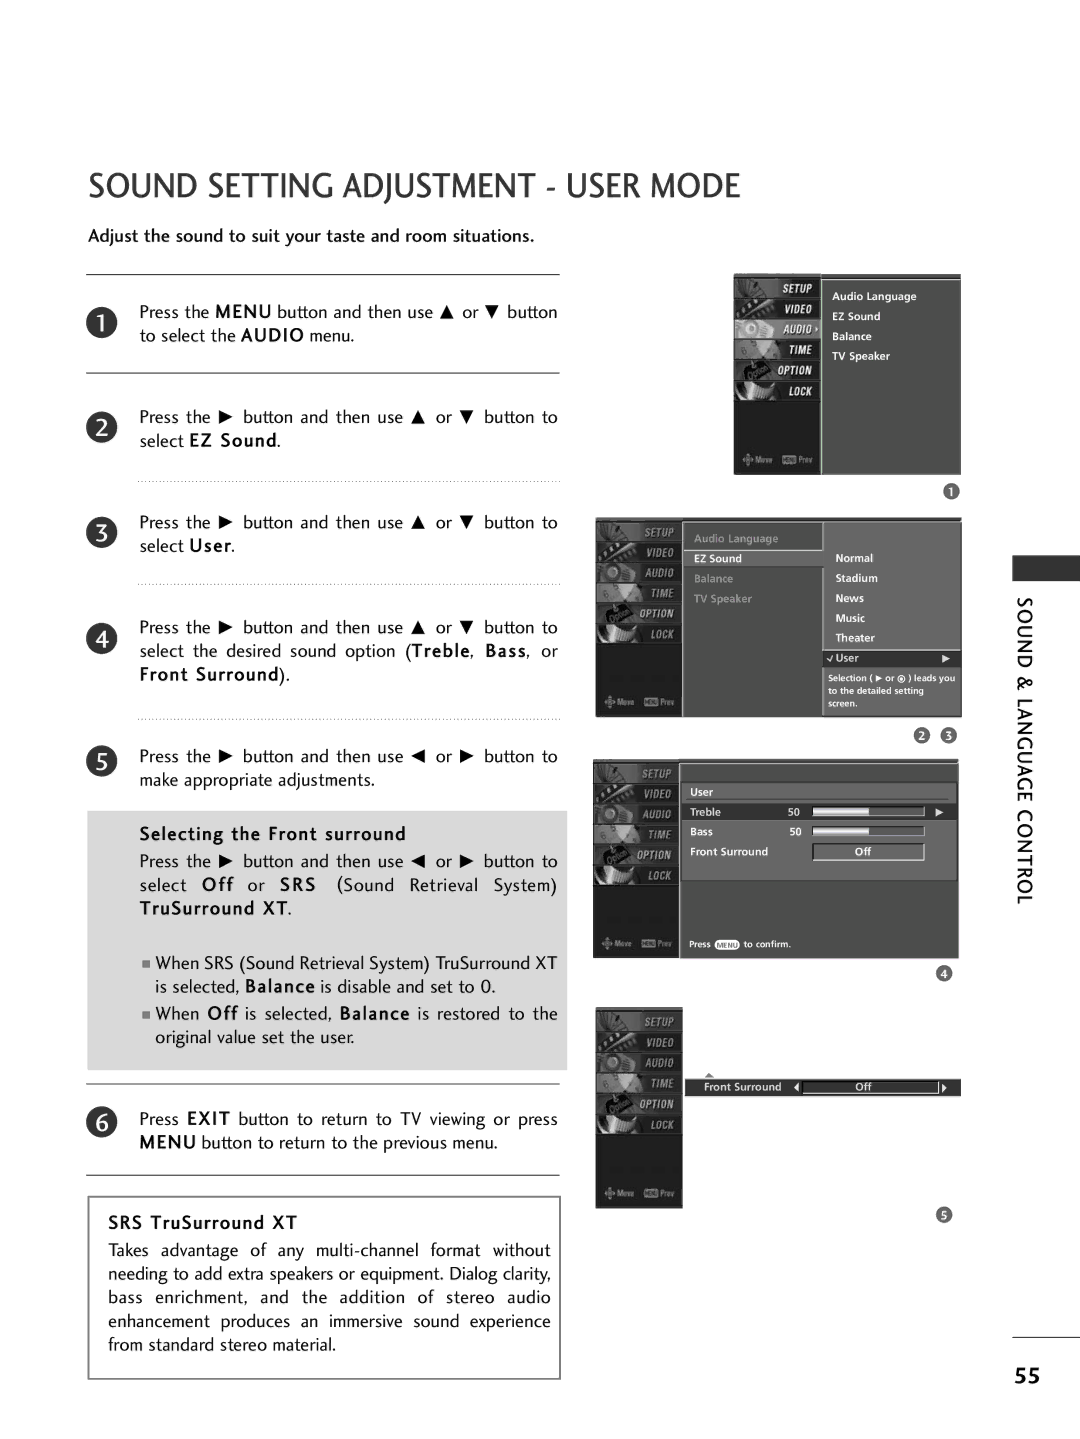
Sound & Language Control
Preset Sound Settings EZ Sound
Language Control
Sound
Balance
Make appropriate adjustments
Select Balance
Press the G button and then use F or G button to
Sound & Language Control
TV Speakers ON/OFF Setup
Stereo, or SAP appear in turn
STEREO/SAP Broadcasts Setup
Them with the SAP button
Press Exit button to save and return to TV viewing
Audio Language
Select Language
ON-SCREEN Menus Language Selection
Analog Broadcasting System Captions
Caption / Text
Caption
Text
Digital Broadcasting System Captions
Select Caption/Text
Or French
Customize the DTV/CADTV captions that appear on your screen
Caption Option
Sound & Language
Size Set the word size
Time Setting
Clock Setting
Auto Clock Setup
Time Setting
Manual Clock Setup
Button and then use Or E button to
Auto ON/OFF Timer Setting
Sleep Timer Setting
Auto SHUT-OFF Setting
To select the Time menu
Select Auto Off
Setting up Your Password
SET Password & Lock System
Parental Control / Ratings
Chip rating and categories
Set Password
Lock System
Rating
Channel Blocking
External Input Blocking
Parental Control / Rating
Movie Rating Mpaa for USA only
Movie & TV Rating
TV Rating General for USA only
TV Rating Children for USA only
TV Rating English for Canada only
Remote control Doesn’t work Power is suddenly Turned off
Troubleshooting
Appendix
Appendix
Vertical bar or stripe on Background
Appendix
Cleaning the Screen
Maintenance
Cleaning the Cabinet
Extended Absence
Models
Product Specifications
37LC7D 42LC7D
Programming a code into a remote mode
Programming the Remote Control
VCR
Remote Control Code
Hdstb
Cable Box
DVD
Audio
IR Codes
Remote Control IR Codes
Code Function
Type of Connector D-Sub 9-Pin Male
RS-232C Setup
External Control Through RS-232C
GND
Communication Parameters
RS-232C Configurations
Transmission / Receiving Protocol
Command Reference List
Set ID OK/NGDatax
Set ID DataCr
Step