INSTALLATION

MODELS 95RI, 93R, 90R RECUMBENT LIFECYCLE® EXERCISE BIKES

TOOLS REQUIRED: Metric Hex Key Set, Side Cutters

NOTE: Proceed with the following steps before attaching the DISPLAY CONSOLE as described in the Assembly Instructions.

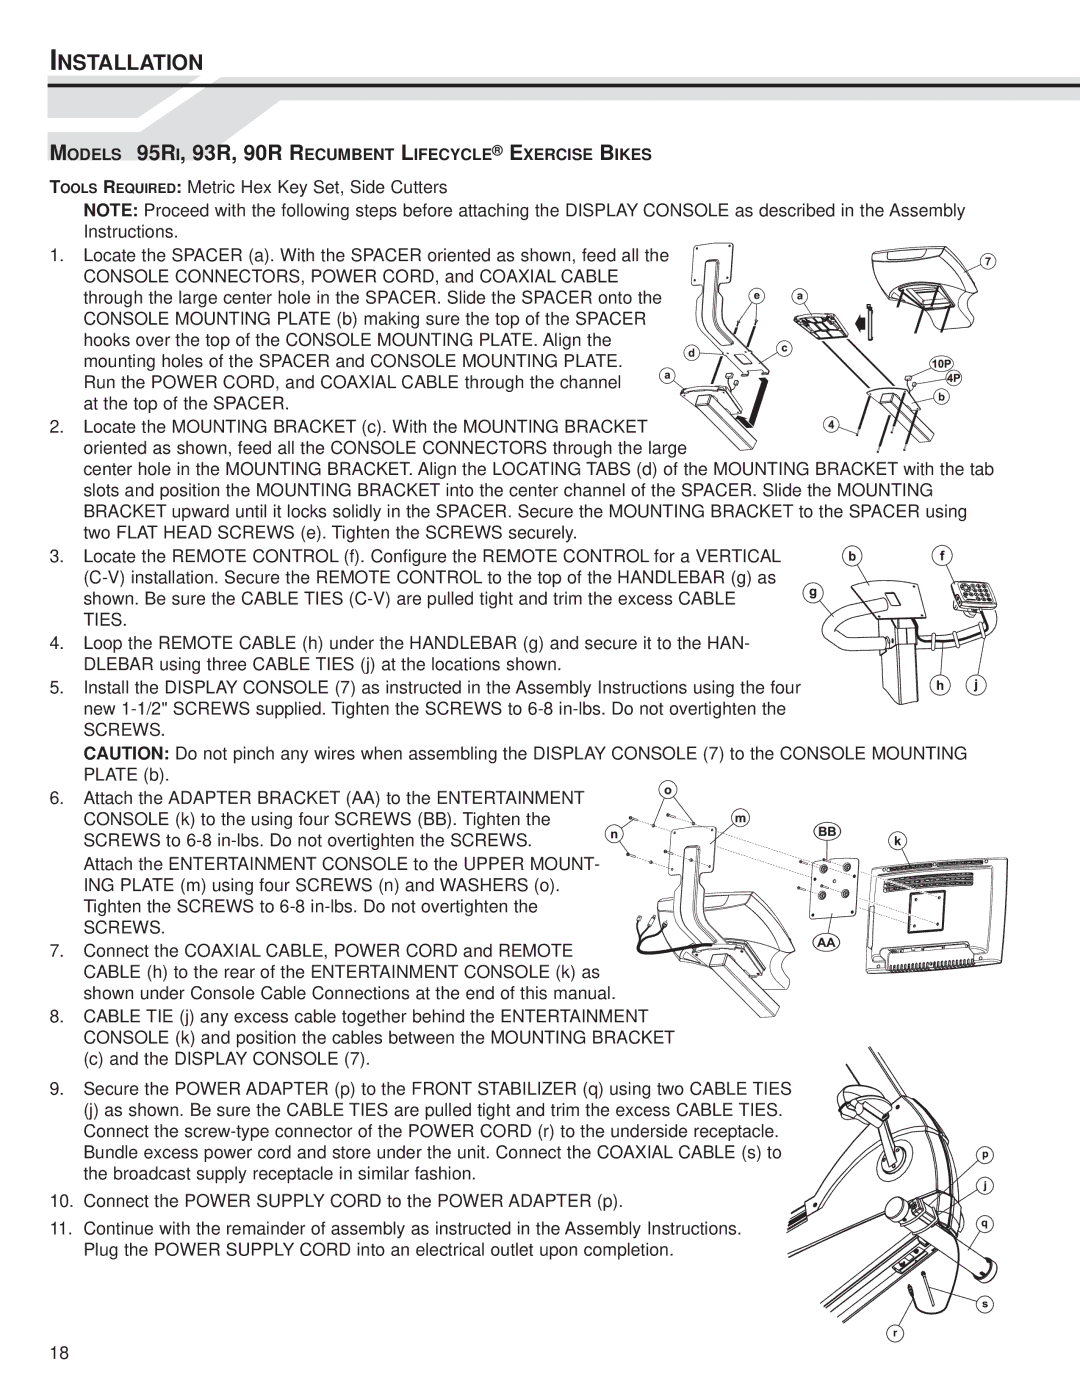
1.Locate the SPACER (a). With the SPACER oriented as shown, feed all the

CONSOLE CONNECTORS, POWER CORD, and COAXIAL CABLE

through the large center hole in the SPACER. Slide the SPACER onto the CONSOLE MOUNTING PLATE (b) making sure the top of the SPACER hooks over the top of the CONSOLE MOUNTING PLATE. Align the

mounting holes of the SPACER and CONSOLE MOUNTING PLATE. Run the POWER CORD, and COAXIAL CABLE through the channel at the top of the SPACER.

2. Locate the MOUNTING BRACKET (c). With the MOUNTING BRACKET oriented as shown, feed all the CONSOLE CONNECTORS through the large

center hole in the MOUNTING BRACKET. Align the LOCATING TABS (d) of the MOUNTING BRACKET with the tab slots and position the MOUNTING BRACKET into the center channel of the SPACER. Slide the MOUNTING BRACKET upward until it locks solidly in the SPACER. Secure the MOUNTING BRACKET to the SPACER using two FLAT HEAD SCREWS (e). Tighten the SCREWS securely.

3. Locate the REMOTE CONTROL (f). Configure the REMOTE CONTROL for a VERTICAL (C-V) installation. Secure the REMOTE CONTROL to the top of the HANDLEBAR (g) as

shown. Be sure the CABLE TIES (C-V) are pulled tight and trim the excess CABLE TIES.

4. Loop the REMOTE CABLE (h) under the HANDLEBAR (g) and secure it to the HAN- DLEBAR using three CABLE TIES (j) at the locations shown.

5. Install the DISPLAY CONSOLE (7) as instructed in the Assembly Instructions using the four new 1-1/2" SCREWS supplied. Tighten the SCREWS to 6-8 in-lbs. Do not overtighten the

SCREWS.

CAUTION: Do not pinch any wires when assembling the DISPLAY CONSOLE (7) to the CONSOLE MOUNTING PLATE (b).

6. Attach the ADAPTER BRACKET (AA) to the ENTERTAINMENT

CONSOLE (k) to the using four SCREWS (BB). Tighten the SCREWS to 6-8 in-lbs. Do not overtighten the SCREWS. Attach the ENTERTAINMENT CONSOLE to the UPPER MOUNT- ING PLATE (m) using four SCREWS (n) and WASHERS (o). Tighten the SCREWS to 6-8 in-lbs. Do not overtighten the

SCREWS.

7. Connect the COAXIAL CABLE, POWER CORD and REMOTE CABLE (h) to the rear of the ENTERTAINMENT CONSOLE (k) as shown under Console Cable Connections at the end of this manual.

8.CABLE TIE (j) any excess cable together behind the ENTERTAINMENT CONSOLE (k) and position the cables between the MOUNTING BRACKET

(c)and the DISPLAY CONSOLE (7).

9.Secure the POWER ADAPTER (p) to the FRONT STABILIZER (q) using two CABLE TIES

(j)as shown. Be sure the CABLE TIES are pulled tight and trim the excess CABLE TIES. Connect the screw-type connector of the POWER CORD (r) to the underside receptacle.

Bundle excess power cord and store under the unit. Connect the COAXIAL CABLE (s) to the broadcast supply receptacle in similar fashion.

10. Connect the POWER SUPPLY CORD to the POWER ADAPTER (p).

11. Continue with the remainder of assembly as instructed in the Assembly Instructions. Plug the POWER SUPPLY CORD into an electrical outlet upon completion.

18

Page 20
Image 20
Life Fitness LCD Entertainment Ready installation instructions Models 95RI, 93R, 90R Recumbent Lifecycle Exercise Bikes

LCD Entertainment Ready specifications

Life Fitness LCD Entertainment Ready is an innovative solution designed to enhance the workout experience while providing an outlet for entertainment and motivation. This state-of-the-art display technology is integrated into a wide range of Life Fitness cardio equipment, allowing users to stay engaged during their exercise routines. The LCD screens offer a vivid display that provides easy access to entertainment options, workout stats, and various fitness programs.

One of the standout features of Life Fitness LCD Entertainment Ready is its versatility. The screens are compatible with various entertainment platforms, enabling users to connect their personal devices to stream their favorite shows, movies, or music. This feature not only helps to make workouts more enjoyable but also encourages longer duration exercise sessions as individuals become immersed in their content.

In terms of technology, the Life Fitness LCD systems are equipped with high-definition screens that provide clear and concise visuals. The user interface is intuitive, allowing for easy navigation of multiple options, whether it’s tuning into a TV show or monitoring workout progress. Additionally, the screens are often touch-sensitive, providing a seamless interaction experience for users.

Another key characteristic of this entertainment system is its focus on user engagement. The interface not only provides entertainment but also promotes fitness goals through real-time feedback. Users can track calories burned, distance traveled, and heart rate. This information helps in maintaining motivation and allows individuals to adjust their workouts for optimal performance.

Moreover, Life Fitness prioritizes practicality and ease of installation. The LCD Entertainment Ready feature is designed to be integrated easily into the Life Fitness equipment lineup. Whether it's treadmills, stationary bikes, or ellipticals, this feature enhances the existing functionalities of the machines without compromising space or usability.

In conclusion, the Life Fitness LCD Entertainment Ready system exemplifies the merging of fitness and technology, creating an engaging workout environment. With its high-definition displays, entertainment compatibility, and user-friendly interface, it transforms routine exercise into a more enjoyable and motivating experience. This innovation showcases Life Fitness’s commitment to enhancing health and well-being through advanced technology and user-centric design.