Lytecel
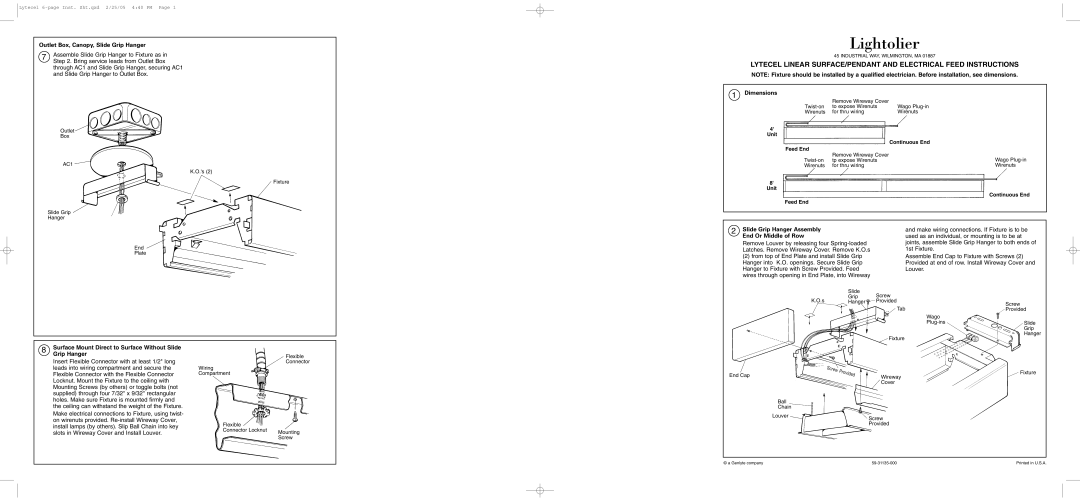
Outlet Box, Canopy, Slide Grip Hanger
7 | Assemble Slide Grip Hanger to Fixture as in |
| Step 2. Bring service leads from Outlet Box |
through AC1 and Slide Grip Hanger, securing AC1 and Slide Grip Hanger to Outlet Box.
Outlet
Box
AC1
K.O.'s (2)
Fixture
Slide Grip
Hanger
Lightolier
45 INDUSTRIAL WAY, WILMINGTON, MA 01887
LYTECEL LINEAR SURFACE/PENDANT AND ELECTRICAL FEED INSTRUCTIONS
NOTE: Fixture should be installed by a qualified electrician. Before installation, see dimensions.
1 Dimensions
| Remove Wireway Cover |
|
to expose Wirenuts | Wago | |
Wirenuts | for thru wiring | Wirenuts |
4'
Unit
|
| Continuous End |
Feed End | Remove Wireway Cover |
|
| Wago | |
tp expose Wirenuts | ||
Wirenuts | for thru wiring | Wirenuts |
8'
Unit
Continuous End
Feed End
End Plate
2 | Slide Grip Hanger Assembly |
| End Or Middle of Row |
Remove Louver by releasing four
(2)from top of End Plate and install Slide Grip Hanger into K.O. openings. Secure Slide Grip Hanger to Fixture with Screw Provided. Feed wires through opening in End Plate, into Wireway
and make wiring connections. If Fixture is to be used as an individual, or mounting is to be at joints, assemble Slide Grip Hanger to both ends of 1st Fixture.
Assemble End Cap to Fixture with Screws (2) Provided at end of row. Install Wireway Cover and Louver.
| Slide | Screw |
|
K.O.s | Grip |
| |
Hanger | Provided | Screw | |
|
| Tab | |
|
| Provided | |
|
| Wago |
|
|
| Slide | |
|
|
| Grip |
|
| Fixture | Hanger |
|
|
|
8 | Surface Mount Direct to Surface Without Slide |
| Grip Hanger |
Insert Flexible Connector with at least 1/2" long leads into wiring compartment and secure the Flexible Connector with the Flexible Connector Locknut. Mount the Fixture to the ceiling with Mounting Screws (by others) or toggle bolts (not supplied) through four 7/32" x 9/32" rectangular holes. Make sure Fixture is mounted firmly and the ceiling can withstand the weight of the Fixture.
Make electrical connections to Fixture, using twist- on wirenuts provided.
Wiring
Compartment
Flexible
Connector Locknut
Flexible Connector
Mounting
Screw
End Cap |
| Fixture |
| Wireway | |
|
| Cover |
| Ball |
|
| Chain |
|
| Louver | Screw |
|
| |
|
| Provided |
© a Genlyte company | Printed in U.S.A. |